Sunday 28 April 2013

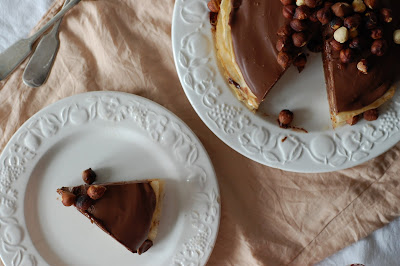
Nutella and Cream Cheese Crêpe Cake.


Hiiiii. So here's the thing I told you about the other day; the thing that would mean the humble crêpe is not so humble any more.


It goes like this...crêpe, Nutella, crêpe, cream cheese, crêpe, Nutella, crêpe, cream cheese, on and on and on until finally...GANACHE. I mean....wowzeers.


And let's be clear...this is not any old Nutella, oh nonono, this is the homemade stuff I haven't really stopped banging on about that tastes of actual nuts and joyfullness. And the ganache? Yeeeeeah, that's the genius stuff that's made of chocolate and water and NOTHING ELSE.


Maaan, I surprise mySELF sometimes...I mean, yes yes there are plenty of Pinterest pins of Crêpe Cakes, but did those pinners make their own Nutella, or use kitchen wizardry to magic up healthy ganache....I don't think soooo. I'll take congratulations and donations by email, postcard or tweet...thanks. With Love and Cake.


Nutella Crêpe Cake.

A few notes:
  • This is not exactly a 'recipe' as such. There is no fine line between success and failure, as long as you have your basic crêpe, you can have all the fun of the fair....perhaps replace the Nutella with lemon curd, or any jam really, or you could go savoury and use cheese and pesto, whatever floats your boat.
  • Of course, I used my very genius homemade Nutella (nope, still not over it yet), but do not feel bad about using the bought stuff, it's just harder to convince yourself of it's health giving properties that way. Either way you will probably not use a whole jar as I have prescribed below, but who was ever sad about leftover Nutella?
  • For extra fancyness, I topped my stack with some ganache that I had in the fridge. Feel free to do that too, I used 1 x portion of this recipe, but if I didn't happen to have it made up already, I would happily use extra Nutella.
Serves 6-8 generously
You will need

20-30 crêpes, I used 2 x this recipe

1 x tub cream cheese
1 x handful hazelnuts, toasted under the grill for a few minutes

  • Everything is ready, we just need to assemble really. So lay your first crêpe on the plate you want to serve from.
  • Spread over about 1 heaped dessert spoonful of Nutella.
  • Lay another crêpe on top and spread about the same amount of cream cheese on top of that.
  • Keep going like this, crêpe, Nutella, crêpe, cream cheese, crêpe etc until your final crêpe is on top.
  • Pretend you're icing a cake and top with a neat layer of ganache (if using) or Nutella.
  • Pile the hazelnuts of top and you. are. done.
  • Wowzas, so fancy but so simple.


Tuesday 23 April 2013

The Humble Crêpe.


I've harped on and on about my love of the pancake, but I have yet to include a recipe for the humble crêpe here on my teensy little corner of Kingdom Blog.


The reason is not profound, not that they are difficult in any way, only that I don't really ever make them, because, well, if I'm going to make pancakes, I really am wanting the fat fluffy American/Scotch Pancake type ones. They are my jam.


But for some reason, I can't even remember the thought process, I got a little hankering for them....ow, no, wait, IIIIII remember now. It all started with a freshly made jar of my homemade Nutella (perfect post training fuel you see) and I was just looking for another vehicle for it. They really are a fab vehicle for anything scrummy that you want to savour, but need a sort of 'turn into a meal' justification to be able to shovel directly into your mouth


I show you them here in their most basic, most delicious form, and the way in which they graced my breakfast table (lap) this morning. But fear not...I am concocting a veryvery Nutella-ey notion that will be winging its way to you very shortly. In the meantime though, get that frying pan heating and perfect that toss, you will be needing plenty of these beauties. With Love and Cake.


Crêpes.
A Delia recipe from her Complete Cookery Course

A few notes:
  • With traditional batters, you're usually asked to let them stand, which I think is so the flour particles can soack up all the liquidyness and you get a nice juicy pancake or whatever (though I may be tttttotally making this up). Delia says that you don't have to do this with her batter however, which I guess is because it's quite eggy and therefore quite juicy anyway. I, in fact, did let it stand for a bit, just because it worked out best in terms of my schedge...but you do as you please.
  • I think the most important variable factor in terms of your success rate when it comes to pancakes, of any kind, is your frying pan. I want a heavy based one, with good quality non-stick (which NEVER goes in the dishwasher and NEVER comes into contact with metal utensils)....this one is my pride and joy.


You will need

an 18-20cm frying pan

200ml milk plus 75ml water
2 eggs
110g plain flour
pinch salt
2 tbsp butter, melted, plus a bit extra for the pan

  • First get your pan on the heat so it gets fairly hot while you get on with the batter.
  • Measure out the milk and water in a measuring jug and whisk in the eggs.
  • Sieve the flour into a mixing bowl and add the salt.
  • Make a well in the centre of the flour and whisk in the milk mix.
  • Finally, whisk in the melted butter...your batter is ready. 
  • I find it easiest to pour the batter into the pan from a jug, so at this point transfer the mix to the measuring jug you already used.
  • Swirl a tiny bit of butter around your hot pan, just to get it started. 
  • Pour about 2 tbsp batter into your pan and immediately swirl it around so it covers the base of the pan.
  • Leave the batter alone on the heat for a few minutes, until you see the edges brown and curl away from the pan.
  • Time to flip, tossing is deffo my preferred method but feel free to use a turner.
  • Leave to cook for another few minutes; you want both sides golden and molted dark brown.
  • Set the pancake aside, transferring to a warm oven if you want to keep it warm, and continue to use up the rest of the batter in the same way.
  • Get going with some lemon and sugar, or stay tuned for a rather exciting crêpe based recipe coming soooon.

Saturday 20 April 2013

Lime and Blueberry Cheesecake.


When I told the Mr the flavour of the cheesecake I was offering him for pud, he scrunched his face up.WHO scrunches their face up at CHEESECAKE...I might as well have said 'it's dead man's toe and dried worm cheesecake darling'.


Lime and blueberry cheesecake....ok, it's not chocolate fudge and salted caramel cheesecake (must make this the next project!), but don't screw you FACE UP, it's CHEESECAKE.


So anyway, I gave him a teensy sliver because, by then I think he might have felt a bit bad and knew that he does actually cheesecake really and also probably shouldn't be rude to the person that facilitates the whole eating thing in our house, so he pretended to want to try it.


Turns out he liked it a lot (eeeer obvs, it's light, creamy, lime-sharp cheesecake, on a coconutty base with a sweet blueberry topping....only a mentalist would not like that) and went back all by himself for another, more proper sized piece. The moral of the story people, is to never judge a cake by it's flavour, it's cake after all, and never eeeeeever screw your face up when food, very yummy, sugary home cooked food, is being offered. Got it. With Love and Cake.


Lime and Blueberry Cheesecake.
Adapted from a Nigella recipe, found in Nigella Bites.

A few notes:

  • The blueberry part of the cheesecake is a blueberry jam layer on top. I used this lovely 'extra jam'; the 'extra', I think, refers to a higher than normal percentage of fruit, but you could use any that you fancy, or even maybe make your own compote like I do for my breakfast pancakes.
  • Like all cheesecakes, this benefits from a night in the fridge, so tryyyyyyyy to hold back.
  • I used leftover cake crumbs that I had in the freezer for the base, but you could equally yummily use digestive biscuits (if you remember to buy them when you're at the supermarket that is....ahem...no that was NOT me....probs).
Makes 1 medium cheesecake
You will need

1 x 20cm springform tin

For the base
120g leftover cake
50g dessicated coconut
50g butter, melted

For the cheesecake layer
750g cream cheese, at room temperature
200g caster sugar
4 eggs, plus 2 extra yolks
juice of 4 limes

  • First job is to set up your cake tin. Place a big bit of foil over the base of your tin, then attach the outside ring so the foil covers the base inside the tin then comes up around the sides on the outside.
  • Put the whole thing on another big piece of foil and scrunch that up around the sides too.
  • Now to make the base, pop the cake, coconut and melted butter in a food processor and whizz to sandy crumbs.
  • Press the crumbs into the bottom of your cake tin to form a firm layer.
  • Pop in the fridge to set.
  • Preheat the oven to 180°c.
  • Now we make the cheesecake part. Beat the cream cheese until nice and smooth.
  • Beat in the sugar, then the eggs and yolks and finally the lime juice.
  • Pour the mixture into your cake tin over the cakey base.
  • Place the cake tin in a roasting tin and boil the kettle...you're going to bake the cheesecake in a bain-marie.
  • Pour hot water from the kettle into the roasting tin so it comes about halfway up the side of the cake tin.
  • Carefully transfer the whole thing to the oven and bake for 50 minutes.
  • At this stage, just have a little peak and a little wobble...if you think the wobble is excessive; as in it wobbles all over, rather than just in the middle, give the cake another 10 minutes in the oven, otherwise, remove everything from the oven.
  • Take the cake out of it's water bath, take off the outer layer of foil and peel away the sides of the under layer.
  • Set the cake on a wire wrack and leave to cool completely in the tin.
  • When cool, leave to chill in the fridge before serving.


Wednesday 17 April 2013

Marmalade Roll...Third Time Lucky.


If I were a real proper food blogger, like all those good ones that write actual books and Tweet all day and the likes, I would test all the recipes I show you again and again and then I would write it and get someone else to test it to make sure I wasn't talking a lot of twaddle.


I don't really doooooooo that. I think of this as more of a window looking in on to the journeys I undertake in my little kitchen and things tend, on the whole, to work out well and then I tell you about it, and if I think I could make them work out even better, I tell you how I think YOU should do things instead of how I actually did them.


This time I did though, oooow this time...three whole times. First try = diAAAAAASTer daaaaarling...didn't even bother getting it in the oven. And I'm not about to give you a recipe that makes me sad. Second try = perfectly edible, nice and tasty in fact but definitely not a looker and a recipe not worthy of repeating. Third try = pheeeeeew, made it. I learned my lessons and I can tell you about them....this is surely the main appeal of bloggys; the whole 'I make mistakes so you don't have to' thing, in a real life kitchen with real life, non-professional mistakes. Plus my genius prose of course.


So, lessons. You deffo need suet here, butter will not do. If you are making your own marmalade, DO NOT use it to make the roll on the same day, it will be TOO HOT. And don't be a div and make the wrong (actually really easy) calculations. Hope that helps. With Love and Cake.


Marmalade Roll.
Recipe from the wonderful Jane Brocket's book; Cherry Cake and Ginger Beer.

A few notes:
  • DO NOT use hot marmalade fresh out of the pan and DO NOT substitute butter for the suet. I have made the mistakes so you don't have to.
  • You could, of course, replace the marmalade with you fav jam or conserve or compote or nut spread or whatever you fancy really.
Serves 6
You will need

1 baking sheet, lined

250g self raising flour
pinch salt
125g shredded suit (beef or vegetarian)
50g light brown sugar
1 jar or your favourite marmalade
milk, for brushing
1 tbsp demerara

  • Preheat your oven to 200°c.
  • In a nice big bowl combine the flour, salt, suet and sugar.
  • Add 100ml of water and start to bring everything together with your hands. Add more water if you need to, I used around 200ml in all; you're looking for a fairly stiff dough with no stickiness.
  • Gather the dough into a tight ball and turn out onto a clean, floured surface.
  • Roll it out into a rectangle, about 30 x 15 cm with a depth of 1cm.
  • Spread your lovely marmalade over the dough, leaving a border of 1cm.
  • Brush water over the border.
  • Roll up the dough from one long side to the other; don't worry about a bit of leakage.
  • Transfer the roll to your baking sheet and tuck the ends under to create as much as a seal as poss.
  • Brush all over with milk and sprinkle with demerara sugar.
  • Bake for 30 to 40 minutes until golden and firm. Don't worry about it splitting a bit or leaking, it's hooomely. Do, however, try and carefully remove the roll from the baking sheet before too long, you don't want any leaked marmalade to cool and stick the paper to the roll.
  • Serve hot, in slices, with custard or double or clotted cream.

Friday 12 April 2013

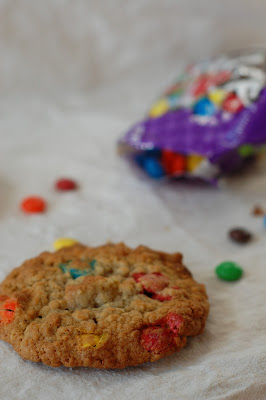
Dark Chocolate M&M and Pretzel Cookies.


Friday = Spinning Day and Spinning Day = the implementation of two strategies; Operation 1. Not Die and Operation 2. Not get a Migraine. Both of these strategies include afternoon snacks and in this form, afternoon snacks = the beeeee's kneeeeeeees.


I know what you're thinking...you're all, cookies? Sports fuel? Reeeeallly? Well let me tell you...I got 70-something percent in the sports nutrition module of my Dance Science Masters therefore know allll about pre-fueling carbs and post-fueling protein and all the thing the cool kid athletes need....or at least I did once, and give these cookies a big fat thumbs up.


There's protein-ey carbs in the oats, and carb-ey carbs in the sugar and flour and there's salty carbs in the pretzels and there's protein and fun fat in the cream cheese and butter and egg and there's eeeven those clever little antioxidant things for recovery in the dark chocolate. So there.


They also taste bloomin' great so don't worry if Friday is not your spinning day....make them anyway. With Love and Cake.


Dark Chocolate M&M and Pretzel Cookies.
Adapted from a recipe by Bakers Royale

A few notes:
  • I used dark chocolate M&Ms and bashed up pretzels, because, well, that sounded bloomin' GREAT to me, but feel free to use anything that sounds great to you, you could use actual 'pretzel M&Ms', or salted peanuts or, I don't know...jelly beans?
  • If you can't lay your hands on dark chocolate M&Ms, (get a friend that travels to the states often, thanks sis) they're similar to Smarties so maybe give those a go.
Makes a good 15-20
You will need

2 x baking sheet, lined (or bake in batches)

55g cream cheese, at room temperature
1 egg
100g caster sugar
110g soft brown sugar
1.5 tsp bicarbonate of soda
165g butter, melted
160g plain flour
130g oats
100g dark chocolate M&Ms
50g snack sized pretzles, chopped and bashed up a bit

  • Oven on....180°c.
  • In a nice big bowl, beat together the cream cheese, egg, caster sugar, brown sugar and bicarb until well combined.
  • Add the melted butter and then gently fold in the flour and oats.
  • Finally, stir through the M&Ms and pretzel pieces to evenly distribute.
  • Pop heaped dessertspoon-fulls of cookie dough onto your prepared baking sheet, leaving plenty of space for spreading between each one.
  • Bake the cookies 12-15 minutes, then have a peak. What you're looking for is bronzed edges and a non-wibbly centre....so pop them back in for a few minutes if you're not quite there yet, otherwise remove from the oven and let the cookies firm up on the baking tray for 5 minutes or so to, then transfer them to a wire rack to cool completely...or just enough to make gooey, mmmmm.

Tuesday 9 April 2013

Breakfast Smoothie.


My friends quuuuuite often ask who eats all the things that I make....I think they get confused because here I am, documenting all the (fat and sugar laden) treats that do indeed emerge from my oven, and they see me, not exactly obese, and actually quite a health-obsessed-bean. 


And I shall tell you, that I probably eat moooost of what I cook. See I live with a boy who'd rather have a plate of steak than a plate of biscuits and would rather have a second helping of main course than save room for the dessert and only someone obsessed with cake, both the baking and eating, would write a blog all about cake. I like to eat cake.


But because I bake all the time, I don't do the things that I imagine people that don't bake as often, imagine that I do (does that make sense). What I mean is, baking is an everyday thing for me (in the BEST way), so I don't get over excited and eat all the mixture before it's gone in the oven, or nibble away at all the biscuits sitting on the cooling rack. And I am quite often baking foooor something...a birthday, where I can share stuff, or a time of day that I really need to eat and can tailor my baking exactly to it (see my special spinning bars). I have pudding after dinner most days...but because I know that that's what I want to do, I make allowances when it comes to how much of the savoury stuff I eat.


Plus....a day of mine is not complete without a good sweat; mostly in the form of pounding out the miles on two legs. If I'm going somewhere and I can run there, I will. And finally, not eeeeevry day of mine starts with pancakes....and I thought I should show you one of my favourite non-usually-bloggy breakfasts. P-P-P-Packed with good stuff and easy to digest if you've got a hardcore sweating sesh planned. Hope that solves the mystery. With Love and Cake.


My Favourite Breakfast Smoothie.

A few notes:
  • I'm afraid I've made this so many times that I don't really do any weighing, and who wants to get the scales out before breakfast anyway...not me. So I hope you don't mind the vagueness of the quantities here.
  • While this is my fav combination of stuff, think of it as a blue print; change berries, change liquid, change protein...it's up to you.
  • I have decided that I will, from now on, never buy fresh spinach again; I don't love it as a salad leaf anyway and I just end up throwing half the bag away because it's gone bad before I use it....hence the frozen stuff here...and as long as your blender's good and powerful enough to cope with ice, all will be well.
  • If you're blender is sub-par however, I'd suggest partially thawing out the frozen stuff, either by getting it out the freezer half an hour or so before you blend, or by a quick stint in the microwave.
Serves 1
You will need

a blender, definitely a blender

frozen blueberries, a good handful
frozen spinach, 3ish pellets (or a large handful of the fresh stuff)
1/2 frozen banana
milk 
1 tsp honey 
1 heaped dessertspoon smooth, natural peanut butter.

  • Put the berries and spinach in your blender and just about cover with milk.
  • Blend for a few minutes until everything seems pretty smooth.
  • Add the honey and peanut butter and a splash of water if it looks like you'd like the texture a little looser.
  • Blend again to combine.
  • Pour into a big glass and feel suuuuuper.


Saturday 6 April 2013

Banana Bread French Toast and Peanut Butter Caramel.


So remember last, time when I was all like "here have something norrrrrmal and traditional, let's take a holiday from crazy-town cake fun"? Well, yeah, it was fun while it lasted and I do promise it really is very lovely banana bread, but ya knoooow, it's fun to have fun....so here it is again...just a little more mixed up.


As you may have assumed, I tottttally am ok with cake for breakfast. I mean, not everyday of course, and probably not the kind with 17 layers of buttercream, but at the weekend maybe, or as a celebration of the fact that you, I don't know, managed to get a load of washing on, I am fully supportive of cake at the breakfast table.


Banana bread if perfect breakfast cake because you can kid yourself into thinking that it's one of your five a day and that because it's brown, it deffo counts as some sort of health food.....but here's a way to make cake into ACTUAL breakfast that you don't even neeeeeed to justify....just make it into French Toast.


See, French toast has 'actual breakfast status' and therefore is not questioned....who cares that it's drizzled in peanut butter caramel....it still counts. So slice it, dunk it in egg and fry it in butter, drizzle it in the good stuff and serve yourself cake for breakfast...cake becomes an actually breakfasty breakfast. Thank me when you're plate's clean. With Love and Cake.


Peanut Butter Banana Bread French Toast.

A few notes:

  • You could actually use any sort of fruity, dense loaf cake here...but I do think banana bread feels most appropriate somehow.
  • Serve with fresh banana and you're winning even mooooore....I just had used all mine in the actual cake part.
  • You will have some peanut butter caramel left over....ice cream syrup anyone?


Serves 2
You will need

For the peanut butter syrup
1 tbsp smooth peanut butter
2 tbsp golden syrup

For the French toast
1 egg
1 tsp vanilla extract
pinch salt
2 x slices peanut butter banana bread
butter for frying

  • First, let's make the syrup. Pop the peanut butter and golden syrup in a small saucepan, heat gently and whisk to a smooth and fairly pour-able syrup.
  • Now get your fav frying pan on a medium heat ready for the 'toast'.
  • In a shallow dish, gently whisk together the egg, vanilla and salt.
  • Dunk the banana bread slices into the egg, leaving each side to soak for a minute or two.
  • Now fry each side, just like normal French toast, of the banana bread in butter in your hot frying pan until golden and tinged.
  • Serve with creme fraiche and a drizzle of the syrup.


Tuesday 2 April 2013

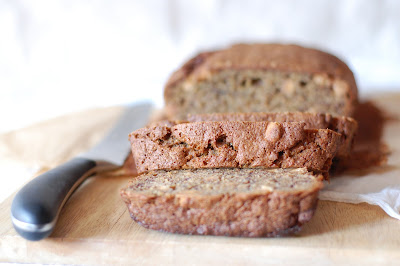
Peanut Butter Banana Bread.


It has come to my attention that in my last few posts I have been ranting on like a raving luny...it's ok, I do that most days, it's just that I WANT you to visit here. Usually the people that I am a raving luny around, have no choice....my parents made me after all, they can't very put the phone down on me, sister HAS to read a blog basically dedicated to her, we're bound by genetics...and the Mr, well he must even LIKE me being a crazy because he chose me. But you chaps...well you can click away in an instant


So here is a nice and soothing and normal banana bread recipe to distract you from my crazy-pants and to remind you that there is more to my repertoire than chocolate based spreads. I already have one banana bread recipe tucked away in the archives for you, but I think it's the sort of cake that you can't have too many recipes for and this one is particularly simple and speedy.


Of course I am MEEEE so can't just give you another plain banana bread, there has to be sooomething about it to make it fun...and that thing comes in the form of peanut butter chips. But that's not too mental....just good sense.


So let's all light some scented candles, run a hot bath, take a big deep relaxing breath and cut ourselves a fat slice of good old, traditional-ish banana bread and ready ourselves for the next crazy cake craze around the corner. With Love and Cake.


Peanut Butter Banana Bread.
Adapted from a recipe in one of my most loved cookbooks; Miss Dahl's Voluptuous Delights by Sophie Dahl

A few notes:
  • So yeah, I'm afraid peanut butter chips are not exactly UK friendly, you can get them online and in American caaaaandy stores but they are fairly expensive. The best thing to do though, I say, is to get a friend who is half Canadian and does the transatlantic trip especially to pick up goodies for you (and see family), but do substitute chocolate chips if you can't find one of those, or just leave them out entirely.
Makes 1 large loaf
You will need

1 large (2 pound) loaf tin, greased and lined

4 x very ripe bananas
75g soft butter
200g soft brown sugar
1 egg, lightly beaten
1 tbsp vanilla extract
1 tsp bicarbonate of soda
pinch salt
170g wholemeal flour

  • Preheat the oven to 180°c.
  • Mash your bananas, in a big mixing bowl using a fork to as fine a paste as you can manage.
  • Now easypeasily, just throw in the butter, sugar, egg and vanilla and give everything a good beat with a wooden spoon to get it all combined.
  • Add the bicarb, salt and flour and fold in gently.
  • Pour into your prepared loaf tin and bake in the centre of the oven for 1 hour until bronze and firm.
  • Leave to cool in the tin for a good 10 minutes before turning out and allowing to cool completely on a wire rack.