Showing posts with label Cake. Show all posts

Friday, 4 October 2013

Lemon Sour Cream Pound Cake.


Oo helloooo. I'm sorry it's all been a bit sporadic around here lately... I've been so good and organised with my 2 posts a week over the past couple of years and now I keep being silly and forgetting to press publish or having a little holiday and getting all the posts prepared but not actually telling you about them. What a wally.


And I'll be starting a new job next week, in a new town with a new schedule and having not started yet it's hard to see how it'll all work out...when will I bake, when will I run, when will I tell you how excited about my latest peanut butter discovery??


Plus, it's winter now, or at least it felt like it when i walked home yesterday... battling through the wind and rain, mascara more on my cheeks than my lashes... which means it's dark, which means I am SO much less productive at either end of the day.


So I hope you don't mind but I'm just going to see how I go and work it out along the way. It'll work out I'm sure. In the mean time, here's some cake, to say thanks for coming back and fingers crossed for lots more peanut butter excitement.


Lemon Sour Cream Pound Cake.
Adapted from a Life Made Simple Recipe

A few notes:
  • You could change the citrus here, orange would be lovely.
  • The recipe below is for a 2lb cake tin... but I like my 1lb one better for cakes so I used about 2/3 of the mixture in that and the rest as muffins (baking for 20 minutes after the cake was done so I didn't have to open the oven door part way through the cooking time). You do as you will.
Makes a 2lb loaf cake
You will need

1 x 2lb loaf tin, greased and lined

For the cake
190g caster sugar
60g soft brown sugar
225g butter, at room temperature
Zest 3 lemons
3 tbsp lemon juice
5 tbsp sour cream
5 eggs
225g plain flour
1/2 tsp baking powder
3 tbsp poppy seeds
Pinch salt

For the syrup
2 tbsp caster sugar
2 tbsp lemon juice

For the glaze
50g icing sugar
lemon juice

  • Preheat the oven to 160c.
  • Beat the 2 types of sugar and the butter together until light and fluffy.
  • Beat in the zest, juice and sour cream, followed by the eggs, one at a time.
  • Gently fold in the flour, baking powder, poppy seeds and salt until everything is well combined.
  • Pour the mixture into your prepared loaf tin and bake for 45 minutes...I wouldn't expect it to be ready at this point but you want to check if the top is browning too quickly and you need to cover it with foil. 
  • Name for a further 15 minute or until firm and a skewer comes out clean.
  • Leave the cake to cool for a while in the tin while you get on with the syrup.
  • Pop the sugar and lemon juice in a small saucepan and heat until the sugar is dissolved.
  • Prick the cake all over with a skewer or cocktail stick and then spoon over the syrup so it soaks into all the holes.
  • Remove the cake from the tin to cool completely.
  • When it's cooled, make the glaze by mixing just enough lemon juice to make a smooth paste with a dropping consistency.
  • Spoon over the cake and let it dribble down the sides...mmmm.


Thursday, 19 September 2013

Caramel Apple Cake.


Uh oh...here come the apples. It's all over. I love apples, I do, but what I don't love is how they signal that it's all down hill from here....no more strawbs, no more watermelon, raspberries are just a figment of the imagination....until it's time for rhubarb kicks in in spring....and I don't even like rhubarb.


Yes, of course, there's pears too, which are yummers, and all the sticky dried fruits of the festive season, but I proper LOVE fruit, and having no choice for half the year is not my fav.


The cheer up answer? Caaaake...OBVS. I'll just have to spend the dark months concocting all sorts of non-boring apple delights to keep the fruit excitement....seems like a plan. And here seems like a good place to start...and it's not just cake, ohnono...here we have appley sponge, plus buttery apples, plus creamy yoghurt PLUSPLUPLUS the most velvety caramel there ever was. Perhaps we'll make it through the apple season after all. With Love and Cake.


Caramel Apple Cake.
Adapted from a delicious. magazine recipe

A few notes:
  • This recipe is for a THREE LAYERED CAKE. I stole away one of the layers to take to a friend and kept the too other layers to show all you lovely peeps (thought she wouldn't appreciate a slice already hacked out of the cake I was to hand over), but I will keep the recipe written as for 3 layers because that's how I made it and you don't want to be faffing around dividing eggs and such malarky. 
  • Here's how the cake is layered (I sometimes find it easier to comprehend a recipe when you know basically what your making....)
caramel
sponge
caramel
apples
yoghurt
sponge
caramel
apples
yoghurt
sponge

You will need

3 x 20cm loose based cake tins, greased and bottoms lined

For the sponges
4 eating apples (I used cox), peeled, cored and chopped roughly
390g caster sugar
375g butter, at room temp
5 eggs
385g self raising flour
1 tsp baking powder
pinch salt

For the filling
4 eating apples (again, I used cox), peeled, cored and sliced
50g caster sugar
70g butter
350ml thick yoghurt

For the caramel
75g butter 
50g soft light brown sugar 
50g caster sugar
50g golden syrup
20g icing sugar
220ml double cream
big pinch salt

  • First we'll make the sponges, and to start off we make a purée out of the apples. Pop the chopped apples in a small saucepan with 50g of the caster sugar and 100ml of water.
  • Heat over a high heat until they've broken down to a fairly smooth purée, hopefully this'll take about 15 minutes.
  • Remove the apples from the pan and leave to cool completely.
  • Preheat the oven to 170˚c.
  • In a mixing bowl, beat the butter and sugar with an electric hand whisk until pale and creamy.
  • Beat in the eggs one at a time followed by the cooked apple.
  • Sift over the flour, baking powder and salt then fold in gently.
  • Divide the mixture evenly between your cake tins and bake for 30 minutes or until they are bronzed and firm in the centre.
  • Leave to cool in the tins until cool enough to handle, then turn them out and leave to cool completely...and I mean completely.
  • Now we make the filling. Heat a frying pan over a medium heat and throw in the apples, sugar and butter.
  • Cook, stirring regularly, for around 15 minutes, or until the apples are soft and shiny and just starting to properly caramelise around the edges.
  • When they're done, remove the apples from the pan with a slotted spoon and set aside to cool.
  • Now we make the caramel. Put all the ingredients in a saucepan and heat gently to melt the butter and dissolve the sugar. 
  • Bring to a simmer and let lightly bubble away for 7-8 minutes so it turn a proper toffee colour.
  • Pour the caramel into a bowl to allow to cool.
  • When everything is at room temperature, it's assembly time. Place one sponge layer on your serving dish and top with half of the yoghurt, then half of the apples, then drizzle over a tablespoon or so of caramel.
  • Set the next sponge layer on top and top that with the rest of the yoghurt, apples and another drizzle of caramel.
  • Finally add the last sponge layer and pour over the rest of the caramel, allowing to to dribble down the sides. 
  • Oh My....


Sunday, 1 September 2013

Chocolate Beetroot Cake.


Did you know beetroot is practically magic. There are trillions of studies all about it, saying how it makes you stronger and speedier and how it makes hard things like running up hills feel less hard. Runner's World are allllways going on about it.


I think if you're, like, a proper mentalist fitty, you're supposed to do shots of the juice at exactly 18 minutes 37 seconds before you run or something...but I think that's only because most people haven't heard that it goes bloomin' great in chocolate cake. 


And that's not in a 'let's take all the goodness out of this cake because I couldn't possibly let gluten/dairy/anything actually tasty past my lips'...no, it is just a really brilliant addition in that it adds unbeatable moistness and something a bit earthy in flavour. Fear not, there is still pleeeenty of butter and sugar and good stuff to keep you going.


So I hope for your sake that you have a Nana and Grandad that grown squillions of fruit and veggies and ring you especially to check what you might want and that you have parents that drive 500 miles to see you and deliver the goods...you could always go to a supermarket I suppose but that just doesn't seem like it would be as much fun. With Love and Cake.


Chocolate Beetroot Cake.
A Nigel Slater recipe

A few notes:
  • To cook beetroot, just chuck it in a pan of cold water, bring it to the boil and boil away until tender when you insert a knife...timings are a bit useless because beetroot vary so much in size, especially if you're using home grown stuff, but check first after 20 minutes and then every 10 minutes after that. Once cooled enough to handle the skin will rub off easily with gloved hands or a knife. 
  • You could indeed use the ready cooked stuff that comes vacuum packed in its own juice...just please oh please make sure you don't get confused and buy the pickled stuff.
  • If you don't have a food processor, you could grate the cooked beetroot finely with just an ordinary cheese grater.


You will need

1 x 20cm loose bottomed cake tinned, greased and base lined

200g dark chocolate
4 tbsp hot espresso
200g butter
135g plain flour
1 heaped tsp baking powder
3 tbsp cocoa
5 eggs, separated
190g caster sugar
250g beetroot, cooked and peeled and blended to a paste in a food processor

  • Preheat your oven to 180˚c.
  • Break the chocolate into a heatproof bowl and set over a pan of just-simmering water without letting the bowl and water touch.
  • Leave to melt slowly before stirring in the coffee and butter.
  • Remove from the heat and allow the butter to slowly melt, stirring occasionally.
  • Meanwhile, mix together the flour, baking powder and cocoa and set aside.
  • In a clean bowl whisk the egg whites until they form stiff peaks. 
  • Fold the sugar into the egg whites and set them aside too.
  • Now beat the egg yolks in a fairly large bowl until frothy.
  • Stir the beetroot into the yolks, followed by the chocolate mixture.
  • Fold in the egg whites and finally sift over the flour mixture and fold that in too.
  • Pour the batter into your cake tin and bake for about 45 minutes, until the cake is firm and skewer comes out clean....I would have a check after 35 minutes.
  • Leave to cool in the tin before turning out and serving with whipped or pouring cream.


Thursday, 15 August 2013

Mississippi Mud Pie.


I can't really think of a Mississippi Mud Pie, let alone type about it, without thinking of Matilda and Miss Honey....m i s s i s s i p p i. And then there's Bruce Bogtrotter and his triumphant cake munching...but here's the thing, I don't think even Matilda could help Bruce get through this beast of a pie in one sitting.


And let's be clear of the context...if you've ever say to me 'mmm it's nice but, myyy, it's awfully rich'...we probs aren't be friends anymore...I most likely cut you out for good. Because come ON, what sort of dessert wimp are you...try harder. 


So now I've clarified my commitment to sugar endurance (if it weren't already clear), you will understand that when I say 'serve this is smaller portions than you naturally would' I really really mean it and am not just lacking dessert stamina. I'm not very good at following my own advice though, because this pie is heaven on a plate and I don't want LESS...so my tactics are run harder and eat tofu for tea.


This pie heaven is dedicated to little sis, whose birthday it was over the weekend, and while I know she will never make it herself (hangs head) I hope the rest of you do, because, myy this is NICE and really RICH. Mmmm. With Love and Cake.


Mississippi Mud Pie.
recipe adapted from delicious. magazine

A few notes:
  • Alcohol wise, I used cherry brandy because it seemed best out of what I had...rum is traditional as far as I understand, but Bourbon seems like it would work well too.
  • If you want the mousse super firm, and therefore able to maintain it's shape better than mine has for serving fancyness, it might be worth putting the cake in the freezer for 15 minutes or so.
  • When I say espresso powder I mean espresso powder, which is not the same as instant coffee.
Serves plenty...at least 10
You will need

1 x 23cm loose-based or springform cake tin, greased and based lined

For the base
300g Oreos
75g butter, melted

For the cake
200g dark chocolate
1 tbsp espresso powder
50ml cherry brandy
100g butter
pinch salt
150g caster sugar
3 large eggs
2 tsp vanilla extract
50g golden syrup
30g plain flour

For the mousse and top
550ml double cream
250g dark chocolate, plus extra to decorate
4 eggs, separated
80g icing sugar

  • First we'll make the base. Whizz the Oreos to a powder in your food processor.
  • Add the melted butter and pulse together.
  • Tip into your cake tin and press down to a smooth compact layer.
  • Chill in the freezer while you get on.
  • Now we make the cake. Preheat the oven to 180°c.
  • Melt the chocolate, espresso powder, cherry brandy, butter and salt in a medium sized pan over a low heat.
  • When it's turned into a glossy chocolate sauce whisk in the sugar.
  • Remove from the heat and whisk in the eggs, one at a time, followed by the vanilla, golden syrup and flour.
  • Pour the batter into the cake tin over the Oreo base and bake for 30-35 minutes; until firm to the touch.
  • Leave to cool completely in the tin...this will take a good couple of hours.
  • When the cake's cool it's time to make the mousse topping. First put 250ml of the double cream and the chocolate in a heatproof bowl and set over a pan of barely simmering water to allow it to melt slowly.
  • When melted and glossy, whisk in the egg yolks one at a time.
  • In a clean bowl, whisk up the egg whites with 30g of the icing sugar until stiff peaks form.
  • Fold the whites into the chocolate mixture, a dollop at a time, until you have a billowy mousse.
  • Spoon the mixture over the cake and chill for a good couple of hours or overnight if you can.
  • When it's time to serve, whip up the double cream with the rest of the icing sugar and dollop over the cake.
  • Turn it out and serve in smaller portions than you would naturally...this is a beast that packs a rich punch.


Wednesday, 3 July 2013

Pound Cake French Toast.


Soooooo French Toast....made.of.cake. I'm not really sure why, after eating this, one would ever think it a good idea to dip bread in egg and fry it in butter, when you can do the same WITH CAKE. This solves all my problems with French Toast; when you chew past the buttery egg layer, you're not greeted with soggy toast which makes you think 'mmmm I think someone's got this wrong....didn't we invent toasters?' but 'Oh good heavens, it's all sweet and buttery, with added sweet and buttery...this is CRAZY GOOD'.


It also means that when you make a fairly giant sized cake that is pretty much solely consumed by oneself, you feel less bad about it because French Toasting it turns it into a meal, an actual meal that you need, rather than an afternoon snack that you just plain because you're greedy.


Have you ever noticed how good I am at justifying the consumption of cake. I reckon that's a very particular skill....I should probably add it to my CV.


Justification #273: there is fruit, and it is very much fruit season in Fife and I can't get through it quick enough. There...turns out it's pretty much mandatory to make this....GO. With Love and Cake.


Pound Cake French Toast with Raspberry Compote.

A few notes:
  • A pound cake is the perfect sort of cake for soaking and frying, it's firm and sturdy so isn't going to disintegrate on you. I wouldn't suggest trying it with something delicate or crumbly.
  • You could quite happily sub frozen raspberries or in fact any berries you fancy.
Serves 2 greedies
You will need

For the compote
100g raspberries
1 tbsp icing sugar

For the French toast
1 egg
1 tsp vanilla extract
1/2 tbsp icing sugar

  • First make the compote by mixing the raspberries and icing sugar in a small saucepan and heating gently until the raspberries have broken up, bubbled a bit and you're left with a thick crimson sauce.
  • Whisk the egg, vanilla and icing sugar together in a shallow dish.
  • Soak the slices of cake in the egg mixture for a minute or so on each side.
  • Meanwhile heat a medium frying pan on a medium heat and add a big fat knob of butter to it.
  • Fry the cake a couple of minutes each side, until golden and crispy.
  • Serve topped with the compote and dusted with icing sugar.


Wednesday, 26 June 2013

Sour Cream Pound Cake.


This is my 'OMG Wimbledon is here, it must be officially summer, let's get excited' cake. This cake, strawbs and a bottle of elderflower bubbly was combined with a whole afternoon of tennis joy in celebration of the Monday kick-off. I LOVE it...the whole thing. 


However I know there are numerous mentalists out there who realllllllly are not bat and ball fans so I shall shhh for the time being and go back to the cake talk. So yes, cake. DO you know, I've never actually made a bundt cake before...ever. I'll let wikipepants explain properly but it is a pretty standard American shape of cake tin, filled with a cake dense and sturdy enough to hold it's holey shape when turned out.


Now, usually in my little corner of this blog world I try and keep the recipes ultra accessible and only really needing equipment that even the most basicest of bakers will have or that I suggest you aspire to having. So I'm sorry about this one. Not that I consider a bundt pan in ANY way a gimmicky piece of cookware...I mean, it's no Flexiado...but if you were in the market for a start up set of cake pans, I wouldn't include a bundt pan in the list.


However, I also must assume that people that read my ramblings must care about baking...it's not the genius prose that draws them in let's be honest, and I am excited about bundt pans and therefore think that some peeps out there might be too. They make a super simple and plain cake look fancy enough for Wimbledon and as long as you have a suitable recipe are not at ALL scary to use. So here cake lovers, have a suitable recipe. With Love and Cake.


Sour Cream Pound Cake.
Adapted from a recipe from The Kitchn

A few notes:
  • To make sure you don't have any disasters, first brush the inside of your cake tin with melted butter, then throw some flour in there and roll it around so that the layer of butter is coated in a layer of flour. This seemed to work fine for me, and it's a sturdy cake, so don't fret.


Makes 1 laaaaarge cake
You will need 

1 x 10" bundt or angel food cake pan, greased and floured (see notes)

385g plain flour
1/4 tsp bicarbonate of soda
pinch salt
225g butter, at room temperature
450g caster sugar
6 eggs
2 tsp vanilla extract
240ml sour cream

  • Preheat your oven to 160°c.
  • Weigh out the flour, bicarb and salt together and a bowl and set aside.
  • In a large mixing bowl, cream together the butter and sugar as best you can, though don't worry if it stays quite granular, there is a fair amount of sugar here.
  • Beat in the eggs one at a time, followed by the vanilla extract.
  • Add the sour cream and then sift over the dry ingredients you weighed out.
  • Using a metal spoon fold everything together gently until it is well combined.
  • Pour the mixture into your cake tin and give it a tap on the kitchen surface to allow any air bubbles to rise to the surface and escape.
  • Bake in the centre of your oven for 1 hour, checking whether it's cooked by inserting a skewer or knife....if it comes out clean, you're done, if there's a bit of uncooked mixture on it, give it another 5 minutes.
  • Let the cake cool in the tin for 10 minutes before turning it out.
  • Leave to cool completely on a wire wrack before slicing and getting the strawbs and Pimms involved.

Tuesday, 4 June 2013

Spiced Coffee Loaf.


This is the PERFECT cake for a Sunday when you have a million things you want to get done; most of them fun, but including the time consuming task of painting your living room, lots of washing and a run because it's too sunny not to....and you want to not have to get up at 5am.


I wouldn't usually factor baking in on a day like that but I needed a cake for a coffee morning (yes, I woke up one day and I had turned 65) the next day, so I scoured my book shelf for a super speedy low maintenance sort of recipe.


This one turned out to be just the thing, and I made it even easier by chucking everything in my wondrous Magimix and letting that do all the work. It honestly came together in moments...and I'd so much rather make a super easy, unfancypants cake than not make a cake at all.


 It's also a cake rather well suited to the whole coffee morning thing...not a dessert thing that feels wrong at 11 in the morning, not too flavour packed to sit next to coffee and nice and sturdily easy to transport. SO I'd thoroughly recommend it for a busy day that still requires cake, and I'd definitely recommend coffee mornings...coffee, cake and conversation? Winner. With Love and Cake.


Cinnamon Coffee Loaf.
Adpted from a recipe in The Hamlyn All Colour Teatime Favourites

A few notes:
  • You could add a whole manner of scrummy things to this...dried fruit, chopped walnuts, different spices. 
  • I didn't try it this time round but I'm sure this would be lovely a few days old, toasted, so the butter goes alllllll melty. Yum.
  • I'm afraid I whizzed everything up in my food processor to make it extra easy, however, if you don't have one, run the butter into the flour with your finger tips, and stir in the rest of the ingredients with a wooden spoon....still pretty easy.
Makes 1 loaf
You will need

a medium loaf pan (1 lb), greased and lined

225g self-raising flour
100g butter
100g dark muscovado sugar
3 tbsp strong black coffee
2 eggs
1 tsp ground cinnamon
grated zest 1 lemon

  • Preheat your oven to 180°.
  • Put the flour and butter in your food processor and whizz until the mixture has the look of fine breadcrumbs.
  • Add the rest of the ingredients and whizz to combine.
  • Pour the mixture into your prepared loaf tin and bake for about 1 hour, though check after 45 minutes to see how it's getting on....you want it risen and firm and deep bronze.
  • Remove from the tin as soon as it's cool enough to handle and cool on a wire rack.....or slice and spread with too much butter.


Wednesday, 22 May 2013

Black Forest Cupcakes.


Did you watch Eurovision? I did...for the first time in a few years. It was BRILLIANT, we had score cards, comment boxes and took our marking mighty seriously...obvs. I was SO rooting for Greece. If you didn't see their entry, sod this reading about cake malarky and look them up on YouTube IMMEDIATELY. That is an order.


We also had themed food...again, obvs. These cakes were my German entry, but were not neeeearly as impressively researched as our savoury offerings which were a significant nod to Azerbaijan. Ever had plov? I would recommend it.


I can't even remember the German musical entry...oh no, yep yep I do...it was Cascada. In a very VERY ugly dress, and no, not even in a 'hey it's Eurovision, let's make a dress out of turtles' crazy fun type way, just in a boring ugly way. 


They should have entered these cakes instead because, while they aren't exotic and Azerbaijani, they are mighty tasty, and squodgy and rich and WAY easier than they look...the perfect party cake formula. But don't wait til next year to make them...or plov. Oh I wish Eurovision was once a MONTH...then we can all prove to Nigel Farage that we are all friends and that he should SHUUUSSSH. With Love and Cake.


Black Forest Cupcakes.
adapted from a BBC Food recipe

A few notes:
  • These are not light and airy sponges, but dense and aaaalllmost gooey cakes, so don't be sad if they sink a bit, it's just what they do.
  • If you don't have black cherry jam, you could use a jar of those lovely cherries in kirsch or brandy and  boil them with a bit of cornflour to thicken; keeping some of the alcohol aside to soak the cakes. 
  • I used the liquor I had left over from these bad boys, hence the specification for cherry brandy, but you could happily use kirsch, or perhaps just plain brandy.
Makes 12 
You will need

1 x 12 hole muffin or cupcake tray, lined with cupcake cases

For the cakes
125g butter, softened
175g caster sugar
2 eggs
200g self-raising flour
2 tbsp cocoa powder
125ml milk
100g dark chocolate, melted

For the filling
300ml double cream, lightly whipped
1/2 medium jar black cherry jam
8 tbsp cherry brandy

  • First we make the cakes. Preheat the oven to 170°.
  • Beat the butter and sugar together until pale and fluffy.
  • Beat in the eggs, one at a time.
  • Sift in the flour and cocoa powder and fold in until thoroughly combined.
  • Finally stir through the milk and melted chocolate.
  • Bake for 20 minutes until risen and fairly firm.
  • Leave to cool completely.
  • While the cakes are cooling, pop the jam and 3 or 4 tablespoons of the cherry brandy in a small saucepan and heat gently until it starts to boil.
  • Let it bubble for a few minutes; until the liquid turns to a syrup. Set aside to cool.
  • When you're ready to assemble the cupcakes, all you need to do is slice or scoop the top off each cake, leaving a little well.
  • Spoon a teaspoon or so of cherry brandy into each well, followed by a good dollop of the whipped cream.
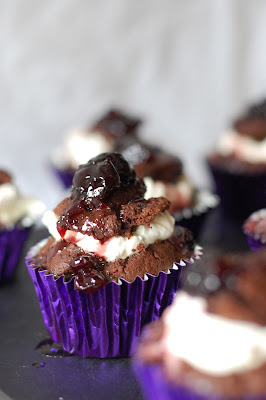
  • Pop the little round of cake that you cut out on top of the cream and spoon over some of the cherries in syrup.
  • Serve as soon as poss, or chill in the fridge if you want them extra fudgy.

Sunday, 19 May 2013

Ricotta and Hazelnut Cake.


This is a recipe from The River Café Cookbook, which I refer to often but rarely follow a recipe verbatim (alas I have never been to the actual River Café, though there are few restaus I'd like to try more). The cake recipes are IMMENSE; made pretty much entirely of eggs and chocolate.


The Chocolate Oblivion, probs their most famous recipe, is 675g chocolate, 350g butter and 9 eggs and that is.it. I mean WoWzers. Have you seeeeeen how expensive butter is right now? Maybe I'll make it for a superspesh occasion or something (because I'm sure it tastes ammmmmmaze) but I don't feel like I can justify the hit my wallet or arteries would take for a spot of random day kitchen pottering.


This one however, is perfect for such pottering. It's not a 'bish bash bosh, chuck it all in and cake is done' sort of recipe; there are multiple bowls and several processes going on. But don't misinterpret that as meaning it is difficult. It's just the sort of thing for when you have an afternoon free and just fancy some kitchen therapy.


As with all the River Café recipes, it is quite sophisticated and continental tasting....I imagine they would frown upon buttercream and such likes. But that makes it all the more treat-full...you can close your eyes and imagine that you're touring Italy in the 20s; all drop waist dresses, loooong strings of beads, too much gin and crystal seas. See you there. With Love and Cake.


Hazelnut and Ricotta Cake.

A few notes:
  • As you can see, I topped my cake with my ever faithful homemade Nutella; it just made sense. You could happily sub shop bought Nutella though, or do as the River Café ladies did and throw over some finely chopped chocolate while the cake is hot from the oven and let it melt. You could also leave it bare.
  • The original recipe uses the zest of 5 lemons...ZINNGGG. I had run out of lemon zest (plenty of lemons, just no zest) so used an orange instead, which I think sounds like more of an appealing combination with the chocolate....if you're not putting chocolate on the top though, go with whichever you fancy.

Serves 10
You will need

1 x 12" round cake pan, base lined with greaseproof

250g hazelnuts
225g butter, at room temperature
250g caster sugar
8 eggs, separated
250g ricotta
zest 1 orange
65g plain flour
1/2 batch Nutella

  • Preheat your oven to 180°.
  • Roast the nuts on a baking sheet for 10-15 minutes, until the skins are loose and the nuts are just starting to bronze.
  • When they've cooled a bit, peel off the skins by rubbing them around in a tea towel.
  • Pop in a food processor and chop coarsely (you could also use a large pestle and mortar if you don't have a food processor).
  • In a medium bowl, beat together the butter and sugar until pale and smooth.
  • Beat in the egg yolks one at a time, leaving the egg whites in another large, clean bowl.
  • In a anooother bowl, lightly whisk up the ricotta with a fork, then fold in the orange zest and chopped hazelnuts.
  • Whisk up the egg whites until they form soft peaks.
  • So...a quick moment to clarify. You have 3 bowls; 1 with the buttery yolks, one with the ricotta, and one with egg whites. 
  • Fold the egg yolk mixture into the ricotta, followed by the flour.
  • Finally, gently fold in the egg whites.
  • Spoon the mixture into your prepared tin and bake for 30-35 minutes.
  • Leave to cool for a few minutes before turning out from the tin.
  • When the cake is completely cold, spread the Nutella on top.

Sunday, 28 April 2013

Nutella and Cream Cheese Crêpe Cake.


Hiiiii. So here's the thing I told you about the other day; the thing that would mean the humble crêpe is not so humble any more.


It goes like this...crêpe, Nutella, crêpe, cream cheese, crêpe, Nutella, crêpe, cream cheese, on and on and on until finally...GANACHE. I mean....wowzeers.


And let's be clear...this is not any old Nutella, oh nonono, this is the homemade stuff I haven't really stopped banging on about that tastes of actual nuts and joyfullness. And the ganache? Yeeeeeah, that's the genius stuff that's made of chocolate and water and NOTHING ELSE.


Maaan, I surprise mySELF sometimes...I mean, yes yes there are plenty of Pinterest pins of Crêpe Cakes, but did those pinners make their own Nutella, or use kitchen wizardry to magic up healthy ganache....I don't think soooo. I'll take congratulations and donations by email, postcard or tweet...thanks. With Love and Cake.


Nutella Crêpe Cake.

A few notes:
  • This is not exactly a 'recipe' as such. There is no fine line between success and failure, as long as you have your basic crêpe, you can have all the fun of the fair....perhaps replace the Nutella with lemon curd, or any jam really, or you could go savoury and use cheese and pesto, whatever floats your boat.
  • Of course, I used my very genius homemade Nutella (nope, still not over it yet), but do not feel bad about using the bought stuff, it's just harder to convince yourself of it's health giving properties that way. Either way you will probably not use a whole jar as I have prescribed below, but who was ever sad about leftover Nutella?
  • For extra fancyness, I topped my stack with some ganache that I had in the fridge. Feel free to do that too, I used 1 x portion of this recipe, but if I didn't happen to have it made up already, I would happily use extra Nutella.
Serves 6-8 generously
You will need

20-30 crêpes, I used 2 x this recipe

1 x tub cream cheese
1 x handful hazelnuts, toasted under the grill for a few minutes

  • Everything is ready, we just need to assemble really. So lay your first crêpe on the plate you want to serve from.
  • Spread over about 1 heaped dessert spoonful of Nutella.
  • Lay another crêpe on top and spread about the same amount of cream cheese on top of that.
  • Keep going like this, crêpe, Nutella, crêpe, cream cheese, crêpe etc until your final crêpe is on top.
  • Pretend you're icing a cake and top with a neat layer of ganache (if using) or Nutella.
  • Pile the hazelnuts of top and you. are. done.
  • Wowzas, so fancy but so simple.


Saturday, 20 April 2013

Lime and Blueberry Cheesecake.


When I told the Mr the flavour of the cheesecake I was offering him for pud, he scrunched his face up.WHO scrunches their face up at CHEESECAKE...I might as well have said 'it's dead man's toe and dried worm cheesecake darling'.


Lime and blueberry cheesecake....ok, it's not chocolate fudge and salted caramel cheesecake (must make this the next project!), but don't screw you FACE UP, it's CHEESECAKE.


So anyway, I gave him a teensy sliver because, by then I think he might have felt a bit bad and knew that he does actually cheesecake really and also probably shouldn't be rude to the person that facilitates the whole eating thing in our house, so he pretended to want to try it.


Turns out he liked it a lot (eeeer obvs, it's light, creamy, lime-sharp cheesecake, on a coconutty base with a sweet blueberry topping....only a mentalist would not like that) and went back all by himself for another, more proper sized piece. The moral of the story people, is to never judge a cake by it's flavour, it's cake after all, and never eeeeeever screw your face up when food, very yummy, sugary home cooked food, is being offered. Got it. With Love and Cake.


Lime and Blueberry Cheesecake.
Adapted from a Nigella recipe, found in Nigella Bites.

A few notes:

  • The blueberry part of the cheesecake is a blueberry jam layer on top. I used this lovely 'extra jam'; the 'extra', I think, refers to a higher than normal percentage of fruit, but you could use any that you fancy, or even maybe make your own compote like I do for my breakfast pancakes.
  • Like all cheesecakes, this benefits from a night in the fridge, so tryyyyyyyy to hold back.
  • I used leftover cake crumbs that I had in the freezer for the base, but you could equally yummily use digestive biscuits (if you remember to buy them when you're at the supermarket that is....ahem...no that was NOT me....probs).
Makes 1 medium cheesecake
You will need

1 x 20cm springform tin

For the base
120g leftover cake
50g dessicated coconut
50g butter, melted

For the cheesecake layer
750g cream cheese, at room temperature
200g caster sugar
4 eggs, plus 2 extra yolks
juice of 4 limes

  • First job is to set up your cake tin. Place a big bit of foil over the base of your tin, then attach the outside ring so the foil covers the base inside the tin then comes up around the sides on the outside.
  • Put the whole thing on another big piece of foil and scrunch that up around the sides too.
  • Now to make the base, pop the cake, coconut and melted butter in a food processor and whizz to sandy crumbs.
  • Press the crumbs into the bottom of your cake tin to form a firm layer.
  • Pop in the fridge to set.
  • Preheat the oven to 180°c.
  • Now we make the cheesecake part. Beat the cream cheese until nice and smooth.
  • Beat in the sugar, then the eggs and yolks and finally the lime juice.
  • Pour the mixture into your cake tin over the cakey base.
  • Place the cake tin in a roasting tin and boil the kettle...you're going to bake the cheesecake in a bain-marie.
  • Pour hot water from the kettle into the roasting tin so it comes about halfway up the side of the cake tin.
  • Carefully transfer the whole thing to the oven and bake for 50 minutes.
  • At this stage, just have a little peak and a little wobble...if you think the wobble is excessive; as in it wobbles all over, rather than just in the middle, give the cake another 10 minutes in the oven, otherwise, remove everything from the oven.
  • Take the cake out of it's water bath, take off the outer layer of foil and peel away the sides of the under layer.
  • Set the cake on a wire wrack and leave to cool completely in the tin.
  • When cool, leave to chill in the fridge before serving.