Showing posts with label Desserts. Show all posts

Thursday, 15 August 2013

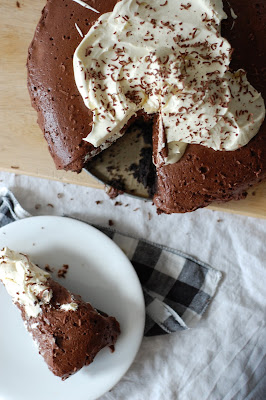
Mississippi Mud Pie.


I can't really think of a Mississippi Mud Pie, let alone type about it, without thinking of Matilda and Miss Honey....m i s s i s s i p p i. And then there's Bruce Bogtrotter and his triumphant cake munching...but here's the thing, I don't think even Matilda could help Bruce get through this beast of a pie in one sitting.


And let's be clear of the context...if you've ever say to me 'mmm it's nice but, myyy, it's awfully rich'...we probs aren't be friends anymore...I most likely cut you out for good. Because come ON, what sort of dessert wimp are you...try harder. 


So now I've clarified my commitment to sugar endurance (if it weren't already clear), you will understand that when I say 'serve this is smaller portions than you naturally would' I really really mean it and am not just lacking dessert stamina. I'm not very good at following my own advice though, because this pie is heaven on a plate and I don't want LESS...so my tactics are run harder and eat tofu for tea.


This pie heaven is dedicated to little sis, whose birthday it was over the weekend, and while I know she will never make it herself (hangs head) I hope the rest of you do, because, myy this is NICE and really RICH. Mmmm. With Love and Cake.


Mississippi Mud Pie.
recipe adapted from delicious. magazine

A few notes:
  • Alcohol wise, I used cherry brandy because it seemed best out of what I had...rum is traditional as far as I understand, but Bourbon seems like it would work well too.
  • If you want the mousse super firm, and therefore able to maintain it's shape better than mine has for serving fancyness, it might be worth putting the cake in the freezer for 15 minutes or so.
  • When I say espresso powder I mean espresso powder, which is not the same as instant coffee.
Serves plenty...at least 10
You will need

1 x 23cm loose-based or springform cake tin, greased and based lined

For the base
300g Oreos
75g butter, melted

For the cake
200g dark chocolate
1 tbsp espresso powder
50ml cherry brandy
100g butter
pinch salt
150g caster sugar
3 large eggs
2 tsp vanilla extract
50g golden syrup
30g plain flour

For the mousse and top
550ml double cream
250g dark chocolate, plus extra to decorate
4 eggs, separated
80g icing sugar

  • First we'll make the base. Whizz the Oreos to a powder in your food processor.
  • Add the melted butter and pulse together.
  • Tip into your cake tin and press down to a smooth compact layer.
  • Chill in the freezer while you get on.
  • Now we make the cake. Preheat the oven to 180°c.
  • Melt the chocolate, espresso powder, cherry brandy, butter and salt in a medium sized pan over a low heat.
  • When it's turned into a glossy chocolate sauce whisk in the sugar.
  • Remove from the heat and whisk in the eggs, one at a time, followed by the vanilla, golden syrup and flour.
  • Pour the batter into the cake tin over the Oreo base and bake for 30-35 minutes; until firm to the touch.
  • Leave to cool completely in the tin...this will take a good couple of hours.
  • When the cake's cool it's time to make the mousse topping. First put 250ml of the double cream and the chocolate in a heatproof bowl and set over a pan of barely simmering water to allow it to melt slowly.
  • When melted and glossy, whisk in the egg yolks one at a time.
  • In a clean bowl, whisk up the egg whites with 30g of the icing sugar until stiff peaks form.
  • Fold the whites into the chocolate mixture, a dollop at a time, until you have a billowy mousse.
  • Spoon the mixture over the cake and chill for a good couple of hours or overnight if you can.
  • When it's time to serve, whip up the double cream with the rest of the icing sugar and dollop over the cake.
  • Turn it out and serve in smaller portions than you would naturally...this is a beast that packs a rich punch.


Wednesday, 24 July 2013

Double Salted White Chocolate and Oat Cookies.


You may not think it from just a glance, but these, I think, are mighty fancy cookies. Like Coco Chanel, they've taken off their extra accessories at the door to allow their understated chic-ness to do all the talking. That's right...I just compared Coco Chanel to cookies.


Think of the salt ('double' because there's table salt IN the cookies and sea salt ON them) as diamonds and the white chocolate as pearls tumbling down their back a la Coco. And all the rest is a little black dress. Nothing frilly...just taste.


They're the sort of biscuits, no sorry cookies...because they're big and bendy...that you could serve for a dessert with coffee. If you're a dinner party type that is. 


Or if you're feeling less fancy you could do what I did last night and use them to make ice cream sandwiches...can't quite imagine a Parisian fashion Goddess doing as such but I live in Fife, it's not quite the same. With Love and Cake.


Salted White Chocolate and Oat Cookies.
From a smittenkitchen.com recipe

A few notes:
  • You could very happily change the chocolate here...super dark would be fab.
  • This makes a fair amount of cookies, and they spread out a lot on baking, so you'll need lots of space on your baking sheet. I therefore find it easiest to bake in batches...but you could use multiple baking sheets and swap their positions in the oven around half way through baking.
  • Use the best white chocolate you can justify...Green and Blacks is my fav.
Makes 20-24
You will need

a baking sheet, greased

200g butter, at room temperature
200g caster sugar

1 egg
1 tsp vanilla extract
130g plain flour
3/4 tsp baking powder
1/2 tsp bicarbonate of soda
1/4 tsp table salt
55g soft brown sugar
210g oats
180g best white chocolate, roughly chopped
sea salt

  • Preheat your oven to 180°c.
  • Cream together the butter and caster sugar until pale and fluffy.
  • Beat in the egg and vanilla extract.
  • Gently stir in the flour, baking powder, bicarbonate of soda, table salt and brown sugar until fairly well combined.
  • Tumble in the oats and and chocolate and stir in until evenly distributed....it will look like you're adding loads and that you'll never stir it all in, but keep going and you will.
  • Pull off pieces of dough, about 1 tablespoon at a time, and roll it into a ball in your palms.
  • Flatten a little as you place them on your baking sheet, leaving enough space for each one to at least double in size...for me this means baking in batches (see note).
  • Sprinkle each little patty with a good pinch of sea salt before baking for 13-16 minutes....look for them to reach a pale gold colour if you want them to remain a bit bendy when cooled. This will mean they are very soft straight out of the oven so leave them to firm up for a few minutes on the baking tray before carefully transferring to a wire rack to cool completely.


Sunday, 14 July 2013

Frozen Honey Cheesecake.


This is possibly the easiest cheesecake ever. No foil, no bain maires, not even any baking, which means you don't really have to worry about having the exact sized cake tin or reaching the perfect ratio of set vs. wibbly.


Plus...it's basically a combination of ice cream and cheesecake....and I'm preeeeetty sure that they are the top 2 non-chocolate based desserts ever and that that makes this one of THE top desserts. 


It's also a fabby-pants thing to make ahead, even a few day ahead, if you've got a little soirée planned...


...or if, maybe, you're home alone for a while because you're Mr is far away doing important work things (read: boat bound, playing with seals and porpoises in the most beautiful weather of the year), making it less than ideal to have a whole fresh cheesecake to be get through alone.With Love and Cake.


Frozen Honey Cheesecake.
Recipe adapted from The Essential Dessert Cookbook

A few notes:
  • Choose a honey that you like the taste of on its own; it can be a strong taste and really comes through despite how little you use and they vary greatly.
  • I think you get the best out of this beast if you slice and plate about half an hour before you serve, so it gets a little bit melted and soft. Put any that you're not going to eat back in the freezer for another day.
  • The easiest and most hassle free way of making this will be with a food processor. If you are without one however, don't fret...to make the base just pop the biscuits in a plastic food bag and bashbashbash them with a rolling pin, then stir in the butter. The filling would just need an extended beating with a hand whisk.

Serves 8-10
You will need

1 x 23cm springform cake tin, greased, and base lined

For the base
250g digestive biscuits, crushed
75g butter, melted

For the filling
250g mascarpone, at room temp
250g cream cheese, at room temp
397g can condensed milk
60 ml honey
315ml double cream

  • Process the base ingredients to a powder and press into the bottom of your cake tin using your fist or a spatula. Pop in the fridge.
  • Wash up your processor bowl and blade and process all your filling ingredients to a smooth, glossy mixture.
  • Pour the filling over the base.
  • Pop in the freezer for at least a couple of hours; until firm and properly frozen.
  • Serve as detailed above in the 'notes'.


Sunday, 23 June 2013

Chocolate and Peanut Butter Cups.


This was one of those things that I didn't see coming. I had not planned on making anything like peanut butter cups...though now I come to think of it this seems to be a foolish stance. What was happening you see was that I was getting full on into this summer malarkey and making lollys in my lolly maker.


The thing is, I haven't actually done that for several millions of years because the Scottish summer has not exactly warranted such cool aids. This year I'm excited though, I feel like the North East of Fife is aaaaalmost winning at the weather (South East England is in a different league so I'm not competing with them).


 So yes, I filled my lolly maker with the delicious mix you see before you but then forgot how to get the lollys out when they are frozen. HOW do you DO THIS? I did the whole dunking in warm water thing, the waitingwaiting until it softens and releases but in the end I just pulled out the middle stick thing so I'm left with frozen chocolate goo that I'm going to have to eat out of the lolly maker with a spoon (throw it away you say? What? I don't understand you?).


Happily I made waaaay too much mixture and am clever enough to realise that it would make a yummy little dessert not frozen...similar to what those American folks would call pudding or Italians call budino di cioccolato, so I wasn't stuck for a dessert. Phew. Now help me....how to I get them out...I can't have a lolly-less summer. With Love and Cake.


Peanut Butter and Chocolate Cups
Adapted recipe from Craft, Bake, Sew, Create.

A few notes:
  • You can top these with whatever you like really. Pictured is a topping of salted caramel sauce and Reese's Pieces...pretty darn good, but a spot of whipped cream would be nice and 80s American diner style should you be feeling that way inclined.
Serves 4
You will need

75g granulated sugar
15g cocoa
1 1/2 tbsp corn flour
300ml milk
1 tsp vanilla
35g butter
1 heaped dessert spoon smooth peanut butter

  • Whisk together the sugar, cocoa and cornflour in a medium saucepan.
  • Gradually whisk in the milk and set over a medium heat.
  • Bring to the boil and let bubble for about 1 minute, whisking fairly continuously.
  • Remove from the heat and whisk in the vanilla, butter and peanut butter; at this point you should have a thick, shiny mixture.
  • Pour into 4 ramekins and top each one with clingfilm, allowing it to touch the surface of the mixture all over.
  • Allow to cool completely before chilling in the fridge and topping with something yummy.

Sunday, 19 May 2013

Ricotta and Hazelnut Cake.


This is a recipe from The River Café Cookbook, which I refer to often but rarely follow a recipe verbatim (alas I have never been to the actual River Café, though there are few restaus I'd like to try more). The cake recipes are IMMENSE; made pretty much entirely of eggs and chocolate.


The Chocolate Oblivion, probs their most famous recipe, is 675g chocolate, 350g butter and 9 eggs and that is.it. I mean WoWzers. Have you seeeeeen how expensive butter is right now? Maybe I'll make it for a superspesh occasion or something (because I'm sure it tastes ammmmmmaze) but I don't feel like I can justify the hit my wallet or arteries would take for a spot of random day kitchen pottering.


This one however, is perfect for such pottering. It's not a 'bish bash bosh, chuck it all in and cake is done' sort of recipe; there are multiple bowls and several processes going on. But don't misinterpret that as meaning it is difficult. It's just the sort of thing for when you have an afternoon free and just fancy some kitchen therapy.


As with all the River Café recipes, it is quite sophisticated and continental tasting....I imagine they would frown upon buttercream and such likes. But that makes it all the more treat-full...you can close your eyes and imagine that you're touring Italy in the 20s; all drop waist dresses, loooong strings of beads, too much gin and crystal seas. See you there. With Love and Cake.


Hazelnut and Ricotta Cake.

A few notes:
  • As you can see, I topped my cake with my ever faithful homemade Nutella; it just made sense. You could happily sub shop bought Nutella though, or do as the River Café ladies did and throw over some finely chopped chocolate while the cake is hot from the oven and let it melt. You could also leave it bare.
  • The original recipe uses the zest of 5 lemons...ZINNGGG. I had run out of lemon zest (plenty of lemons, just no zest) so used an orange instead, which I think sounds like more of an appealing combination with the chocolate....if you're not putting chocolate on the top though, go with whichever you fancy.

Serves 10
You will need

1 x 12" round cake pan, base lined with greaseproof

250g hazelnuts
225g butter, at room temperature
250g caster sugar
8 eggs, separated
250g ricotta
zest 1 orange
65g plain flour
1/2 batch Nutella

  • Preheat your oven to 180°.
  • Roast the nuts on a baking sheet for 10-15 minutes, until the skins are loose and the nuts are just starting to bronze.
  • When they've cooled a bit, peel off the skins by rubbing them around in a tea towel.
  • Pop in a food processor and chop coarsely (you could also use a large pestle and mortar if you don't have a food processor).
  • In a medium bowl, beat together the butter and sugar until pale and smooth.
  • Beat in the egg yolks one at a time, leaving the egg whites in another large, clean bowl.
  • In a anooother bowl, lightly whisk up the ricotta with a fork, then fold in the orange zest and chopped hazelnuts.
  • Whisk up the egg whites until they form soft peaks.
  • So...a quick moment to clarify. You have 3 bowls; 1 with the buttery yolks, one with the ricotta, and one with egg whites. 
  • Fold the egg yolk mixture into the ricotta, followed by the flour.
  • Finally, gently fold in the egg whites.
  • Spoon the mixture into your prepared tin and bake for 30-35 minutes.
  • Leave to cool for a few minutes before turning out from the tin.
  • When the cake is completely cold, spread the Nutella on top.

Wednesday, 17 April 2013

Marmalade Roll...Third Time Lucky.


If I were a real proper food blogger, like all those good ones that write actual books and Tweet all day and the likes, I would test all the recipes I show you again and again and then I would write it and get someone else to test it to make sure I wasn't talking a lot of twaddle.


I don't really doooooooo that. I think of this as more of a window looking in on to the journeys I undertake in my little kitchen and things tend, on the whole, to work out well and then I tell you about it, and if I think I could make them work out even better, I tell you how I think YOU should do things instead of how I actually did them.


This time I did though, oooow this time...three whole times. First try = diAAAAAASTer daaaaarling...didn't even bother getting it in the oven. And I'm not about to give you a recipe that makes me sad. Second try = perfectly edible, nice and tasty in fact but definitely not a looker and a recipe not worthy of repeating. Third try = pheeeeeew, made it. I learned my lessons and I can tell you about them....this is surely the main appeal of bloggys; the whole 'I make mistakes so you don't have to' thing, in a real life kitchen with real life, non-professional mistakes. Plus my genius prose of course.


So, lessons. You deffo need suet here, butter will not do. If you are making your own marmalade, DO NOT use it to make the roll on the same day, it will be TOO HOT. And don't be a div and make the wrong (actually really easy) calculations. Hope that helps. With Love and Cake.


Marmalade Roll.
Recipe from the wonderful Jane Brocket's book; Cherry Cake and Ginger Beer.

A few notes:
  • DO NOT use hot marmalade fresh out of the pan and DO NOT substitute butter for the suet. I have made the mistakes so you don't have to.
  • You could, of course, replace the marmalade with you fav jam or conserve or compote or nut spread or whatever you fancy really.
Serves 6
You will need

1 baking sheet, lined

250g self raising flour
pinch salt
125g shredded suit (beef or vegetarian)
50g light brown sugar
1 jar or your favourite marmalade
milk, for brushing
1 tbsp demerara

  • Preheat your oven to 200°c.
  • In a nice big bowl combine the flour, salt, suet and sugar.
  • Add 100ml of water and start to bring everything together with your hands. Add more water if you need to, I used around 200ml in all; you're looking for a fairly stiff dough with no stickiness.
  • Gather the dough into a tight ball and turn out onto a clean, floured surface.
  • Roll it out into a rectangle, about 30 x 15 cm with a depth of 1cm.
  • Spread your lovely marmalade over the dough, leaving a border of 1cm.
  • Brush water over the border.
  • Roll up the dough from one long side to the other; don't worry about a bit of leakage.
  • Transfer the roll to your baking sheet and tuck the ends under to create as much as a seal as poss.
  • Brush all over with milk and sprinkle with demerara sugar.
  • Bake for 30 to 40 minutes until golden and firm. Don't worry about it splitting a bit or leaking, it's hooomely. Do, however, try and carefully remove the roll from the baking sheet before too long, you don't want any leaked marmalade to cool and stick the paper to the roll.
  • Serve hot, in slices, with custard or double or clotted cream.

Saturday, 9 February 2013

Chocolate Ganache with Sea Salted Caramel and Brazil Nut Crumble.


I probably shouldn't tell you this online, for burglars and dodgy types to see, but I'm going to be home alone for a month, the Mr is in Chile playing with seals or whatever it is he does for a living...and a month is a looooong time, long enough for me to definitely want to complain about it on here at least once and long enough for me to go mental and start talking to myself more often than usual, and I feel I should alert you, so you can be on the look out for any signs of crazy-pants-dom and come and save me.


Anyway....I really don't think anyone would bother coming allllll the way to deepest darkest Fife just to rob be of my things...which mainly consist of second hand teapots, and if they did, well, HA, I just sorted us out with contents insurance and am now officially protected and a grown up (a grown up with 17 German Shepards and a highly proficient alarm system of course).


So anyway...yes. Last weekend I was sad because I had been abandoned for said seals (or is it porpoises this time mmm?), so turned to chocolate...obvs. This, however, is not you're average 'sad snack', oh no, this is no family sized Dairy Milk. This is Chocolate Ganache with Sea Salted Caramel and Brazil Nut Crumble. Read those words again. Chocolate. Caramel. Crumble. SALTED CARAMEL.


AND. The bloomin' ganache is only made of 2 things; chocolate and water. WATER? Who knew this was even possible? Chocolate is good for you yeah...so you add water and it can only be even better. They should serve this in gyms. Can you tell I'm not sad anymore. With Love and Cake.


Chocolate Ganache with Sea Salted Caramel and Brazil Nut Crumble.
Adapted from a delicious. magazine recipe

A few notes:
  • So this is a dessert of 3 parts, ganache, caramel and crumble topping...and they are FAB.U.LOUS together, but if that just sounds like too much to be bothered with for you, they work equally well as individuals. The ganache on its own would be a divine pud, or you could top it with just the caramel. And if you're looking for a salted caramel recipe for any other purpose, well, your search is over.
  • This makes a lot more caramel and crumble than you need; you could halve the recipe and still have enough....but atop vanilla ice cream, well, there are worse ways to eat leftovers.
  • I made 2 rather greedy portions...my excuse being that I don't really have any smaller receptacles, but you could definitely use the same amount to serve 4 in little ramekins or dainty espresso mugs.
Serves 2-4 (see notes)
You will need

either 4x200ml ramekins or 2 larger ones (see notes)

For the caramel
100g unsalted butter
100g light brown sugar
1 tsp sea salt
25g milk chocolate, finely chopped

For the crumble
30g Brazil nuts
50g plain flour
15g demerara sugar
15g caster sugar
50g cold butter
pinch sea salt

For the ganache
170ml water
140g dark chocolate, finely chopped
60g milk chocolate, finely chopped
pinch sea salt to serve

  • First things first, we make the caramel. Heat the butter, sugar and salt over a medium heat until the butter has melted; stirring all the time.
  • Bring to the boil and let bubble for a few minutes; still stirring constantly.
  • Add the cream and stir in.
  • Remove from the heat and stir in the chocolate until it it melted and smooth. Set aside to cool.
  • Now for the crumble. Preheat the oven to 180°c. Toast the nuts for 10 minutes in the oven.
  • Chop the nuts roughly when they're cool enough to handle.
  • Rub together the flour, sugars and butter until the mix looks like fine breadcrumbs.
  • Mix in the nuts and salt and spread out the crumbs on a baking sheet. Bake in the oven for 10 minutes, then set aside to cool.
  • Now the final part; the ganache. Pop your ramekins in the fridge to chill.
  • Bring the water to the boil in a pan. Remove from the heat and stir in the chocolate until melted and smooth.
  • Pour into a bowl and beat, hopefully you'll have an electric hand whisk, for 10 minutes or until the mixture is cool and just beginning to thicken.
  • Pour the mix into your ramekins and chill for 20 minutes; it may still look wobbly in the middle but will set after a while don't worry.
  • When you're ready to eat, sprinkle the salt over the ganache, drizzle over some caramel and finish with a a few spoonfuls of the crumble.


Friday, 18 January 2013

Proper Custard.


This Christmas, from Santa, I got 2 of the biggest, plumpest, shiniest  vanilla pods you have ever seen. Yes, I get excited by vanilla pods and yes SANTA UNDERSTANDS ME...he understands that it’s not every day that you get treated to such fancy baking treats because when it’s just a normal rainy Wednesday and you’re traipsing round Morrisons, it just doesn’t seem quite appropriate to spend £5 on something that you TOTALLY don’t need and that you can get in a jar for the same price and get manyMANY more uses from it.


Santa understands that however delicious smelling the jar stuff is, it doesn’t leave those tiny-beyond-belief black dots behind, and it doesn’t require you to split and run your knife along anything; there’s no cheffy and fancy pants feeling. So he understands that I will squeal actual squeals if he leaves these for me and I get to use them just once a year.


I had to use them soon because there is something most dissatisfying about a dried up old vanilla pod and I had to use them in something that would be ‘all about them’, spoil them and make them the star of the show....they are worth it.


So here is the destiny of pod number one. He is basically the whole point of custard and makes a rather dull egg sauce something special and mmm-inducing. Plus, I thought a recipe for proper custard that is pretty fool proof (you can thank the cornflour) would never be amiss. Expect pod number two to be here soon. With Love and Cake.


Proper Custard.
Adapted from Delia's Complete Cookery Course.

A few notes:
  • Of course if you don't get excited by such things or Santa doesn't understand you, you could definitely replace the vanilla pod with a splash of extract (not essence)...or in fact flavour the custard any way you fancy; maybe with a splash of Cointreau stirred in at the end or brandy. 
  • Do NOT throw away your scraped out vanilla pod, you could drop it into the custard and leave it to infuse even more deliciousness as it heats and remove it before serving, or immerse in a jar of sugar for your own homemade vanilla sugar. Ooooor post them to me and I will just waste time smelling them.
  • Don't be scared of making custard, just don't leave anything unattended and if there's a hint of scrambled eggs, pop the custard in a bowl standing in cold water in your sink to cool it down quickly and whiskwhiskwhisk.
Serves 4
You will need

275ml double cream
3 egg yolks
1 tsp cornflour
1 tbsp caster sugar
1 vanilla pod, split and seeds removed (like they do on the telly)

  • Pour the cream into a medium sized saucepan and heat gently.
  • In a bowl, whisk together the egg yolks, cornflour sugar and vanilla seeds until well combined.
  • When the cream has juuuuuust come to the boil, pour it into a jug that will allow you to pour it in a little trickle onto the egg yolk mixture, whisking constantly.
  • Pour the mixture back into the saucepan and heat very gently, stirring all the time.
  • After just a few minutes the sauce will be thickened and ready. 
  • Pour out of the saucepan into your serving vessel as soon as it's ready to stop any overcooking.
  • Eat hot or chilled (in which case cover the top of the custard with clingfilm to stop a skin forming), poured over something equally delicious. 

Friday, 11 January 2013

Malteser Cups.


This recipe was meant to save me from sinking under a sea of hanger-on-er Christmas treats. I mean I LOVE being surrounded by abundent, indulgent foodstuffs as much as the next kitchen based obsessive, but it seems kind of improper for half of my kitchen surfaces to be unusable as a result of an extensive panettone and gold coin collection past the first week on January.


Wheeeen will I have a kitchen big enough to pile food highhighigh...yet still have enough space to cook?

It turns out I have quiiiite a lot more than 60g of chocolate left, and that a sprinkling of Maltesers does not an empty box make. I know I know...life is hard.


I guess I'll just have to keep ploughing through it, mouthful after glorious mouthful. The only tricky bit is that I'm a teensy bit injured...which means running is a no, so I maaaaay just about turn into a gold coin, all shiny and round. Ah well, soomeone's got to do it. With Love and Cake.


Malteser Cups.
A product of inspiration from Nigella and Bourbonnatrix Bakes

A few notes:
  • While I've said these serve 4, if you're one of the (crazy) people that says things like 'mm it's delicious but very rich', then I'd suggest using espresso cups or littler ramekins and splitting the mixture between 6 or 8.
  • If you don't fancy the malty element here, just replace the 15g Ovaltine with the same amount of cocoa and use dark chocolate.

Serves 4
You will need

4 x cups or ramekins, each about 150ml in capacity 

250ml milk
125ml double cream
30g caster sugar
1tbsp cornflour
20g cocoa
15g Original Ovaltine
2 tbsp boiling water
2 egg yolks
1 tsp vanilla extract
60g milk chocolate, finely chopped

  • Pop the kettle on and pour the milk and cream into a small saucepan.
  • Heat the milk and cream gently while you get on with the other steps.
  • Pop the sugar and cornflour in another saucepan, and sieve in the cocoa and Ovaltine.
  • Add the 2 tbsp of boiling water and whisk to a paste.
  • Whisk in the egg yolks one at a time, followed by the milk mixture, which should be just about to boil, and the vanilla.
  • Heat the chocolatey mixture gently, whisking constantly for 4-ish minutes, until it thickens to the consistency of mayonnaise.
  • Remove from the heat and whisk in the chopped chocolate until smooooooth and shiny.
  • Divide the mixture between your cups and cover with clingfilm, so that it actually sits on the surface of the pudding, to stop a skin forming.
  • Leave to cool and then chill in the fridge.
  • Serve as they are or top with whipped cream (you'll need about 200ml, pre-whipping) and maltesers...


Tuesday, 20 November 2012

My First Pumpkin Pie.


I’ve neverever done the Thanksgiving thing before; the most involved I’ve ever felt is watching that geeeenius episode of Friends with Brad Pitt and the yams and the story Ross kissing the lady with the stick. But St Andrews (my nearby little town) is rather full of Americans (mostly girls, on the hunt for princes) and you sort of pick up on wafts of excitement...which is why I am aware that it is Thanksgiving this very Thursday.


As well as never having done Thanksgiving, I have also never tried pumpkin pie...I KNOW, craaazyness. I love pumpkin. I love pie. How could it have remained absent from my repertoire for so long. Well I guess the truth is that I kiiiiiind of assumed it wouldn’t actually be very nice. You see I tend to not love things with not much more to offer than a silky texture, like trifle or custard tart, and I guess I thought pumpkin pie fell into that category.


But hurrah...I am pleased to say that while the pie is pretty silky smooth, the spicyness and crumbly pastry mean that I was wrong and that pumpkin pie is tasty indeed....and soso silky that it is actually one of my favourite things about it. Furthermore it’s very easy to pull together, especially if you use shop-bought pastry and canned pumpkin puree (if you can get it).


I do apologise for the slightly wonky look of the pie however...rather shamefully, the reason for the imperfection in the looks departments is that I was going to buy a pie dish, but then I bought shoes, so could no longer justify the purchase...woops....and had to make do with a cake tin. I will, however, verify that I made the correct decision...the pie worked great and I LOVE my shoes. Winwin. With Love and Cake.


Pumpkin Pie.
Recipe from marthastewart.com

A few notes:
  • I had to adjust the recipe slightly due to my new shoes and subsequent lack of pie tin but I will write it as it appears originally because, well, it's Martha Stewart, you can't go wrong.
  • If you have to adjust too though....left over pastry freezes fine. As for left over filling...mmmm leave it with me, I'm still working on a solution. Updated 23/11/12: I mixed mine with self-raising flour; enough to make a very stiff dough, a fried into thick pancakes...delish.
  • Find my 'recipe' for pumpkin puree here.
  • As usual I made the pastry in a food processor, it just seems so much more accessible to me that way, but if the opposite is the case for you just use your finger tips to rub in the butter and to bring the dough together.
Serves at least 8
You will need

a 23cm pie tin or dish, greased

For the pastry
320g plain flour
1 tbsp caster sugar
225g butter, fridge cold
3-4 tbsp water

For the filling
420g pumpkin puree
165g soft brown sugar
1 tbsp cornflour
pinch salt
3/4 tsp cinnamon
3/4 tsp ground ginger
pinch ground cloves
1/2 tsp freshly grated nutmeg
1 tsp vanilla extract
3 eggs
335g evaporated milk

  • First lets make the pastry. Pulse together the flour and sugar in a food processor (or sift into a bowl).
  • Then add the butter and pulse until the mixture looks like fine breadcrumbs.
  • Add 3 tbsp of cold water and pulse until a soft dough forms, adding 1 more spoonful of water if necessary.
  • Remove the dough from the processor and form gently into a disc. Wrap in clingfilm and rest in the fridge for around 30 minutes.
  • Next, roll the pastry out thinly onto a floured surface. I used the cling film it was wrapped in to cover the pastry as I rolled, to stop the rolling pin sticking which worked well.
  • Line your prepared tin with the pastry, and gently prick the base with a fork. Cut off the excess and chill in the freezer for 15 minutes.
  • Meanwhile preheat the oven to 190°c.
  • Blind bake the pastry case; line it with a scrunched up piece of baking paper and fill with baking beads, or uncooked rice or dried beans (save them to continue to use for the same purpose, just don't cook them to eat).
  • Place the pie tin in the oven and bake for 15 minutes, until the edges have started to colour.
  • Remove the beans and paper and bake for a further 15 minutes.
  • Remove the pastry from the oven, set aside to cool and turn the oven down to 160°c.
  • Now we make the filling...it's easy. Simply whisk all the ingredients together so you have a smooth paste.
  • Pour the filling into the cooled pastry case and bake for 50-55 minutes, at which point the filling should barely wobble.
  • Leave the pie to cool completely and then chill for a good few hours before tucking in (don't you just hate recipes that say that).