Wednesday 28 August 2013

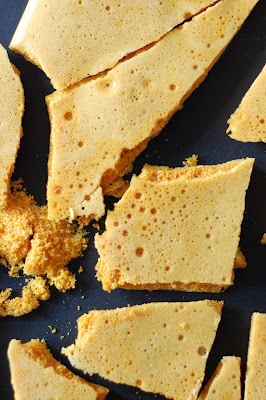
Honeycomb.


Ok...before you think anything....don't. Because you're wrong. I'm not mental for saying that it's easy peasy to make what is essentially the inside of a Crunchy. I shouldn't be arrested for suggesting that you make this in an emergency, last minute, for an occasion that requires pud, or at least a sweet offering. And it is most definitely not silly to say that YOU could DO THIS.


While yes, it is true that some magic occurs, what is with bicarb and all it's crazy uses, it's not actually a requirement that you are a witch, all you do is throw the ingredients together and some spell/scientific reaction occurs all by itself. Mix, Pour, Done.


It's one of those genius things that makes everyone think YOU are the genius and slaved over a hot stove just for their benefit and they will therefore think you love them very much and are very generous and will love you back and maybe even buy you presents.


That's not to say that you DON'T love them millions for taking the easy way out, but you probably just have lots of washing to do or maybe you've used all your baking time watching re-runs of Gilmore Girls...I don't know, I'm only guessing...so when you're in a fix, don't fret, just chuck bicarb at stuff. With Love and Cake.


Honeycomb.
Original recipe from Nigella Express

A few notes:
  • This is best eaten as soon as poss really, it fairly quickly goes a bit bendy and overly chewy. It's so speedy to knock together I would make it an hour or 2 before it's needed.
Makes enough for 6-8 to have a nibble
You will need

A large piece of foil, oiled, set over a heatproof surface

100g caster sugar
4 tbsp golden syrup
1 1/2 tsp bicarbonate of soda

  • Mix together the sugar and syrup together in a small-medium saucepan.
  • Place the pan over a medium heat, don't stir beyond this point.
  • You want the mixture first to melt, then turn into a golden goo, then bubble fairly fiercely to the colour of maple syrup...hopefully taking around 3 minutes.
  • Take the pan off the heat and quickly whisk in the bicarb...it goes mighty poofy at this point, that's what we want.
  • Pour this immediately onto your oiled foil and leave it to cool and set.
  • When it's hard, bash or snap it into pieces.


Sunday 18 August 2013

Coconut Macaroons.


We've gone over the macaron/macaroon divide before...and here's some more confusion to throw on the fire. You see in Scotland a macaroon is more of a confection than a baked good...with a fondant centre (made of left over potato in times of yore) covered in chocolate and coconut (I knoooow but don't blame them, it's faaar to here, they didn't get the 'macaroon memo' in time).


THIS...is not that, but is perhaps, no definitely, my favourite incarnation of the M-word. A big puffy ball of damp coconut help together by magic and prayers....ok egg whites and rye flour, in this instance.


They're very old school English and would fit perfectly in an Enid Blyton tea time and while they look all pretty and delicate, they are actually fairly robust and therefore perfect picnic fayre.


I used rye flour because I'm a health nut and want to make everything gluten free I'd run out of ground almonds and thought I'd give it a go...it works darn well, and makes me feel very 'health food shop'. So there you have it, a biscuit to make you feel like you're wearing a hessian shirt to an Edwardian tea party and tasting bloomin' lovely...what more could you ask for. With Love and Cake.


Rye and Coconut Macaroons.
Adapted from a Nigella recipe; from How to Be A Domestic Goddess.

A few notes:
  • If you don't have rye flour and don't fancy investing, replace with the same amount of ground almonds.
  • If you happen to have it (and if you do, I LOVE you), replace the vanilla extract with coconut essence.
  • Nige was very specific about using shredded coconut here, which you'll often see in American recipes and is much damper that dessiccated, but I neeeever see it, and you can make your own by faffing about with soaking the dessiccated stuff but I just used it as is and relative to the ease the macaroons don't suffer I think.
Makes 8
You will need

1 x baking sheet, lined

2 egg whites
1/4 tsp cream of tartar
100g caster sugar
30g rye flour
pinch salt
1 tsp vanilla extract
250g dessiccated coconut

  • Preheat that oven to 170°c.
  • Beat the egg whites until they start to froth before adding the cream of tartar and continuing to beat until the soft peak stage is reached.
  • Continue to beat as you add the sugar, teaspoonful by teaspoonful until all is added and the egg whites are stiff and shiny.
  • Now fold in the rest of the ingredients gently.
  • Using 2 spoons, divide the mixture into 8 and make round clementine shape balls on your baking sheet out of each 8th.
  • Bake for 15-20 minutes, until they have turned a few shades darker and begin to turn deep golden in parts.
  • Leave to cool and firm up on the baking sheet for half an hour or so before transferring to a wire rack to cool completely...if you can wait that long.


Thursday 15 August 2013

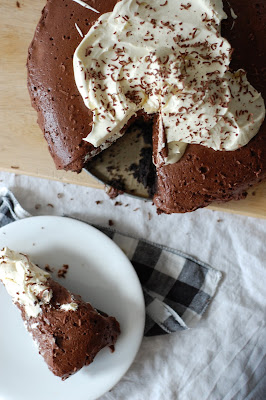
Mississippi Mud Pie.


I can't really think of a Mississippi Mud Pie, let alone type about it, without thinking of Matilda and Miss Honey....m i s s i s s i p p i. And then there's Bruce Bogtrotter and his triumphant cake munching...but here's the thing, I don't think even Matilda could help Bruce get through this beast of a pie in one sitting.


And let's be clear of the context...if you've ever say to me 'mmm it's nice but, myyy, it's awfully rich'...we probs aren't be friends anymore...I most likely cut you out for good. Because come ON, what sort of dessert wimp are you...try harder. 


So now I've clarified my commitment to sugar endurance (if it weren't already clear), you will understand that when I say 'serve this is smaller portions than you naturally would' I really really mean it and am not just lacking dessert stamina. I'm not very good at following my own advice though, because this pie is heaven on a plate and I don't want LESS...so my tactics are run harder and eat tofu for tea.


This pie heaven is dedicated to little sis, whose birthday it was over the weekend, and while I know she will never make it herself (hangs head) I hope the rest of you do, because, myy this is NICE and really RICH. Mmmm. With Love and Cake.


Mississippi Mud Pie.
recipe adapted from delicious. magazine

A few notes:
  • Alcohol wise, I used cherry brandy because it seemed best out of what I had...rum is traditional as far as I understand, but Bourbon seems like it would work well too.
  • If you want the mousse super firm, and therefore able to maintain it's shape better than mine has for serving fancyness, it might be worth putting the cake in the freezer for 15 minutes or so.
  • When I say espresso powder I mean espresso powder, which is not the same as instant coffee.
Serves plenty...at least 10
You will need

1 x 23cm loose-based or springform cake tin, greased and based lined

For the base
300g Oreos
75g butter, melted

For the cake
200g dark chocolate
1 tbsp espresso powder
50ml cherry brandy
100g butter
pinch salt
150g caster sugar
3 large eggs
2 tsp vanilla extract
50g golden syrup
30g plain flour

For the mousse and top
550ml double cream
250g dark chocolate, plus extra to decorate
4 eggs, separated
80g icing sugar

  • First we'll make the base. Whizz the Oreos to a powder in your food processor.
  • Add the melted butter and pulse together.
  • Tip into your cake tin and press down to a smooth compact layer.
  • Chill in the freezer while you get on.
  • Now we make the cake. Preheat the oven to 180°c.
  • Melt the chocolate, espresso powder, cherry brandy, butter and salt in a medium sized pan over a low heat.
  • When it's turned into a glossy chocolate sauce whisk in the sugar.
  • Remove from the heat and whisk in the eggs, one at a time, followed by the vanilla, golden syrup and flour.
  • Pour the batter into the cake tin over the Oreo base and bake for 30-35 minutes; until firm to the touch.
  • Leave to cool completely in the tin...this will take a good couple of hours.
  • When the cake's cool it's time to make the mousse topping. First put 250ml of the double cream and the chocolate in a heatproof bowl and set over a pan of barely simmering water to allow it to melt slowly.
  • When melted and glossy, whisk in the egg yolks one at a time.
  • In a clean bowl, whisk up the egg whites with 30g of the icing sugar until stiff peaks form.
  • Fold the whites into the chocolate mixture, a dollop at a time, until you have a billowy mousse.
  • Spoon the mixture over the cake and chill for a good couple of hours or overnight if you can.
  • When it's time to serve, whip up the double cream with the rest of the icing sugar and dollop over the cake.
  • Turn it out and serve in smaller portions than you would naturally...this is a beast that packs a rich punch.


Wednesday 7 August 2013

Chocolate Truffle and Strawberry Pie.


I went Pick Your Own-ing last week. On maybe the rainiest day of July. It's a gooood job those strawbs grow undercover or I think you'd have to front crawl down the lanes of plants. My plan was jam, stash some in the freezer for smoothies, and this beast of a pie.


I'm always fairly conservative when I'm PYO-ing...I always think it seems like you've got SO MANY berries in your basket and that it might be really embarrassing when you get to the til and they're like 'that's £50bajillion pounds please' and then you take them home and they spontaneously combust into a pile of mould in under half an hour.


But then what always happens in real life is that they say 'that'll be 53 pence please' and I'm all 'uuuurrrm are your sure' and then I get home and think, yep, could easily have handled double the amount, dammit. MUST remember that for next year....


What I must also remember is that things that are best chilled before eating are also best chilled before photographing. You see I got ahead of myself and photied this luscious lady of a pie before she'd had her chill time and it means you don't get a good enough sense of the chocolate velvetyness that's shining beneath all that cream and fruit. You'll have to take my work for it though....my word is MAKE THIS PIE. With Love and Cake. 


Chocolate Truffle and Strawberry Pie.
Adapted from a Bakers Royale recipe

A few notes:
  • Eat ASAP...I mean, why wouldn't you.
  • You could just throw a lovely layer of fresh strawbs on top rather than cooking them up...I did both.
Serves 8
You will need

1 x 18cm tart tin or pie dish


For the pastry
175g plain flour
25g cocoa powder
50g icing sugar
100g butter, cold from the fridge, cubed
1 egg yolk
2-3 tbsp cold water

For the chocolate filling
170g dark chocolate
1 tbsp butter
225g cream cheese, at room temperature
30g icing sugar

For the top
250ml double cream, lightly whipped
350g strawberries, halved or quartered
75g icing sugar 
2 tsp cornflour 

  • First we must make the pastry. Pulse together the flour, cocoa and sugar in a food processor (or sift into a bowl).
  • Then add the butter and pulse until the mixture looks like fine breadcrumbs (or rub in with your finger tips).
  • Add the yolk and 2tbsp of cold water and pulse until a soft dough forms, adding more water if necessary.
  • Remove the dough from the processor and gently form into a disc. Wrap in clingfilm and rest in the fridge for around 15 minutes.
  • Next, roll the pastry out to about the thickness of a pound coin on a floured surface. I used the cling film it was wrapped in to cover the pastry as I rolled, to stop the rolling pin sticking, which worked well.
  • Line your prepared tin with the pastry without trimming the edges, just let the excess overhang. Gently prick the base with a fork and chill in the fridge for 20 minutes.
  • Preheat the oven to 200°c.
  • Blind bake the pastry case by lining it with a scrunched up piece of baking paper and filling with baking beans, or uncooked rice or dried beans (save them to continue to use for the same purpose, just don't cook them to eat).
  • Place the tart tin on a baking tray and bake for 20 minutes.
  • Remove the beans and paper and bake for a further 10 minutes.
  • Remove from the oven and leave to cool and crisp up while you get on with the filling.
  • Melt the chocolate and butter gently in a saucepan.
  • Stir in the cream cheese until well combined and then remove from the heat.
  • Beat in the icing sugar.
  • To get the pastry prepared, gently slice off the excess before pouring in the chocolate filling.
  • Leave to cool while you get on with the strawbs.
  • Combine the strawberries with the icing sugar and let them stand for about half an hour.
  • Then drain the liquid off, saving the lovely ruby juice.
  • Pop the juice into a little saucepan and add the cornflour.
  • Heat the juice gently to a bubble so that it thickens and becomes syrupy, then remove from the heat and leave to cool completely.
  • Mix the cold syrup back into the strawberries.
  • Now you're ready for the final assembly...spread the whipped cream over the chocolate layer and tumble over the strawberries. 
  • Chill in the fridge for at least half an hour before turning out of the tin and serving. 


Sunday 4 August 2013

Peanut Butter and Pretzel Squares.


You know in my last post I was all 'really must remember to chill the things that need to firm up before photo-ing'? Well I was...and this time I did...look how nice and set they are...


What I diiiiidn't do however was leave them to set before sampling them. You see I made them because I was all gross and headachey. Do you ever get it when your limbs feel all empty and heavy, like basically you're bod is an empty suit of armour. Well that...and these just seemed like THE thing for max calories and goodness to fill up all the gaps.


My lack of a proper body when making these should show you how easypants they are...less easy though was to make them for an emergency and let them do the chilling thing....so yeaah, I ate some, all gooey, with a spoon and had to straighten out the edges when they were actually ready for their close up.


They worked though and I'm back to being full on sparky-pants again...maybs I should let the British Medical Association in on the secret...they could give them out on prescription. With Love and Cake.


Salty Peanut Butter and Chocolate Bars.
Adapted from a Cookies and Cups recipe

A few notes:
  • Without pretzels...these are basically these, so check them out if you're not a pretzel person.
  • I think these would be a tad more annoying to make without a food processor but definitely not impossible...use an electric whisk or mixer or just a good old wooden spoon to do the beating.
  • You could make this in any receptacle really...I used a square tin, about 20 x 20 cm, but round would work too, then you could cut wedges rather than squares.
Serves 1 empty person plus a few others
You will need

300g smooth peanut butter
100g unsalted butter, at room temperature
225g icing sugar
50g pretzels, crushed up a bit, plus extra for the top
100g dark chocolate, broken into pieces

  • Line your receptacle (see notes) with foil.
  • Pop the peanut butter, minus 50g which you want to save for later, and butter in the food processor and whizz to combine.
  • Add the icing sugar and whizz to a sandy mixture.
  • The mixture into a big bowl and stir in the broken up pretzels.
  • Press into your foil lined tin.
  • Melt together the chocolate and remaining 50g of peanut butter, either in a saucepan over a low heat or in the microwave, until smooth and shiny.
  • Pour over the peanut butter layer and scatter over a few whole pretzels.
  • Chill until the chocolate is set before turning out and cutting as you fancy.