Showing posts with label Vegetable Cake. Show all posts

Sunday, 1 September 2013

Chocolate Beetroot Cake.


Did you know beetroot is practically magic. There are trillions of studies all about it, saying how it makes you stronger and speedier and how it makes hard things like running up hills feel less hard. Runner's World are allllways going on about it.


I think if you're, like, a proper mentalist fitty, you're supposed to do shots of the juice at exactly 18 minutes 37 seconds before you run or something...but I think that's only because most people haven't heard that it goes bloomin' great in chocolate cake. 


And that's not in a 'let's take all the goodness out of this cake because I couldn't possibly let gluten/dairy/anything actually tasty past my lips'...no, it is just a really brilliant addition in that it adds unbeatable moistness and something a bit earthy in flavour. Fear not, there is still pleeeenty of butter and sugar and good stuff to keep you going.


So I hope for your sake that you have a Nana and Grandad that grown squillions of fruit and veggies and ring you especially to check what you might want and that you have parents that drive 500 miles to see you and deliver the goods...you could always go to a supermarket I suppose but that just doesn't seem like it would be as much fun. With Love and Cake.


Chocolate Beetroot Cake.
A Nigel Slater recipe

A few notes:
  • To cook beetroot, just chuck it in a pan of cold water, bring it to the boil and boil away until tender when you insert a knife...timings are a bit useless because beetroot vary so much in size, especially if you're using home grown stuff, but check first after 20 minutes and then every 10 minutes after that. Once cooled enough to handle the skin will rub off easily with gloved hands or a knife. 
  • You could indeed use the ready cooked stuff that comes vacuum packed in its own juice...just please oh please make sure you don't get confused and buy the pickled stuff.
  • If you don't have a food processor, you could grate the cooked beetroot finely with just an ordinary cheese grater.


You will need

1 x 20cm loose bottomed cake tinned, greased and base lined

200g dark chocolate
4 tbsp hot espresso
200g butter
135g plain flour
1 heaped tsp baking powder
3 tbsp cocoa
5 eggs, separated
190g caster sugar
250g beetroot, cooked and peeled and blended to a paste in a food processor

  • Preheat your oven to 180˚c.
  • Break the chocolate into a heatproof bowl and set over a pan of just-simmering water without letting the bowl and water touch.
  • Leave to melt slowly before stirring in the coffee and butter.
  • Remove from the heat and allow the butter to slowly melt, stirring occasionally.
  • Meanwhile, mix together the flour, baking powder and cocoa and set aside.
  • In a clean bowl whisk the egg whites until they form stiff peaks. 
  • Fold the sugar into the egg whites and set them aside too.
  • Now beat the egg yolks in a fairly large bowl until frothy.
  • Stir the beetroot into the yolks, followed by the chocolate mixture.
  • Fold in the egg whites and finally sift over the flour mixture and fold that in too.
  • Pour the batter into your cake tin and bake for about 45 minutes, until the cake is firm and skewer comes out clean....I would have a check after 35 minutes.
  • Leave to cool in the tin before turning out and serving with whipped or pouring cream.


Tuesday, 20 November 2012

My First Pumpkin Pie.


I’ve neverever done the Thanksgiving thing before; the most involved I’ve ever felt is watching that geeeenius episode of Friends with Brad Pitt and the yams and the story Ross kissing the lady with the stick. But St Andrews (my nearby little town) is rather full of Americans (mostly girls, on the hunt for princes) and you sort of pick up on wafts of excitement...which is why I am aware that it is Thanksgiving this very Thursday.


As well as never having done Thanksgiving, I have also never tried pumpkin pie...I KNOW, craaazyness. I love pumpkin. I love pie. How could it have remained absent from my repertoire for so long. Well I guess the truth is that I kiiiiiind of assumed it wouldn’t actually be very nice. You see I tend to not love things with not much more to offer than a silky texture, like trifle or custard tart, and I guess I thought pumpkin pie fell into that category.


But hurrah...I am pleased to say that while the pie is pretty silky smooth, the spicyness and crumbly pastry mean that I was wrong and that pumpkin pie is tasty indeed....and soso silky that it is actually one of my favourite things about it. Furthermore it’s very easy to pull together, especially if you use shop-bought pastry and canned pumpkin puree (if you can get it).


I do apologise for the slightly wonky look of the pie however...rather shamefully, the reason for the imperfection in the looks departments is that I was going to buy a pie dish, but then I bought shoes, so could no longer justify the purchase...woops....and had to make do with a cake tin. I will, however, verify that I made the correct decision...the pie worked great and I LOVE my shoes. Winwin. With Love and Cake.


Pumpkin Pie.
Recipe from marthastewart.com

A few notes:
  • I had to adjust the recipe slightly due to my new shoes and subsequent lack of pie tin but I will write it as it appears originally because, well, it's Martha Stewart, you can't go wrong.
  • If you have to adjust too though....left over pastry freezes fine. As for left over filling...mmmm leave it with me, I'm still working on a solution. Updated 23/11/12: I mixed mine with self-raising flour; enough to make a very stiff dough, a fried into thick pancakes...delish.
  • Find my 'recipe' for pumpkin puree here.
  • As usual I made the pastry in a food processor, it just seems so much more accessible to me that way, but if the opposite is the case for you just use your finger tips to rub in the butter and to bring the dough together.
Serves at least 8
You will need

a 23cm pie tin or dish, greased

For the pastry
320g plain flour
1 tbsp caster sugar
225g butter, fridge cold
3-4 tbsp water

For the filling
420g pumpkin puree
165g soft brown sugar
1 tbsp cornflour
pinch salt
3/4 tsp cinnamon
3/4 tsp ground ginger
pinch ground cloves
1/2 tsp freshly grated nutmeg
1 tsp vanilla extract
3 eggs
335g evaporated milk

  • First lets make the pastry. Pulse together the flour and sugar in a food processor (or sift into a bowl).
  • Then add the butter and pulse until the mixture looks like fine breadcrumbs.
  • Add 3 tbsp of cold water and pulse until a soft dough forms, adding 1 more spoonful of water if necessary.
  • Remove the dough from the processor and form gently into a disc. Wrap in clingfilm and rest in the fridge for around 30 minutes.
  • Next, roll the pastry out thinly onto a floured surface. I used the cling film it was wrapped in to cover the pastry as I rolled, to stop the rolling pin sticking which worked well.
  • Line your prepared tin with the pastry, and gently prick the base with a fork. Cut off the excess and chill in the freezer for 15 minutes.
  • Meanwhile preheat the oven to 190°c.
  • Blind bake the pastry case; line it with a scrunched up piece of baking paper and fill with baking beads, or uncooked rice or dried beans (save them to continue to use for the same purpose, just don't cook them to eat).
  • Place the pie tin in the oven and bake for 15 minutes, until the edges have started to colour.
  • Remove the beans and paper and bake for a further 15 minutes.
  • Remove the pastry from the oven, set aside to cool and turn the oven down to 160°c.
  • Now we make the filling...it's easy. Simply whisk all the ingredients together so you have a smooth paste.
  • Pour the filling into the cooled pastry case and bake for 50-55 minutes, at which point the filling should barely wobble.
  • Leave the pie to cool completely and then chill for a good few hours before tucking in (don't you just hate recipes that say that).


Friday, 2 November 2012

Pumpkin and Cheddar Cheese Scone Bread.


I am quite sad...you see being the organised fiend that I am, I in fact made that delicious cheesy bread you see before you some time ago. I made it and photographed it and uploaded the photies all in advance of what I knew would be a very busy week with little cooking time, so I would have something to talk to you about.


The organised thing isn't the sad part...no, that would be my grazed knee. I was running you see, and some fooool told us to turn all our clocks back an hour which meant that was was darkydarkdark because I live in the countryside and I didn't have a candle on me and I’m not sure whether I can justify buying a head-torch when there a trillion other things I need to buy to get me winter ready including shoes that don’t leak...and the long and short of it is that I took a tumble.


So here I am, missing a sizable chunk of my knee and I reeeeeeally would love some of this bread and the pumpkin and sweetcorn soup that goes with it so well (the recipe for which you can find here), to cheer me up and warm my cockles (winter running tights is also on my list).


My suggestion to you is make this now, and make lots, so that when you get home on those days that leave you needing steaming bowl food and a carbohydrate hug, this tasty, spongy bread will be on hand. Oh...and don’t run in the dark, it hurts. With Love and Cake.


Pumpkin and Cheddar Cheese Scone Bread.
Adapted from Delia Smith's Vegetarian Collection

A few notes:
  • To all intents and purposes, this is really a giant scone; it's made with raising agent rather than yeast. That, in my book, is a very good thing.
  • If you have pumpkin puree, or fancy making your own (find my recipe here) feel free to replace the weight of fresh pumpkin in the recipe with puree...you will need to adjust the amount of flour you use to 250g though, to stop the dough being too wet to handle.
  • You could replace the pumpkin with butternut squash, or indeed any other type of edible squash.
Makes 1 loaf
You will need 

a greased baking sheet

225g self raising flour
large pinch salt
175g pumpkin
25g pumpkin seeds
50g cheddar cheese, cubed
2 eggs
1 tbsp milk

for the topping
extra pumpkin seeds
extra cheese, cubed

  • Preheat the oven to 190°c.
  • Mix the flour and salt together in a bowl.
  • Coarsely grate the pumpkin into the bowl and mix it all around so each strand it covered in flour.
  • Add the pumpkin seeds and cheese and toss around again.
  • Lightly beat the eggs with the milk and add to the flour mixture a little at a time while mixing with your fingertips.
  • You will end up with a fairly sticky dough, but don't worry, all you need to do is form into a round, transfer to your baking sheet and bake for 45-50 minutes or until golden and firm.
  • Serve warm, with butter and a hug. 


Friday, 19 October 2012

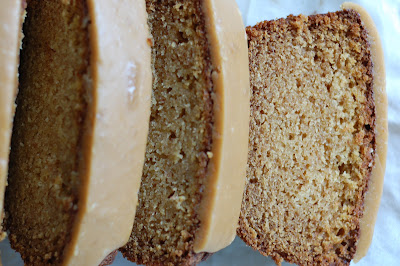
Pumpkin Loaf Cake with Brown Sugar Icing.


Oh dear, there is a serious possibility that I am steadily getting rounder and more orange as we speak and that by midnight I will be one big shiny pumpkin person. Do you think that’s what happened to Cinderella’s carriage...it just munched too much pumpkin?


I have made pumpkin soup, pumpkin lasagne, pumpkin bread, pumpkin pancakes and this mega pumpkin loaf cake and I still have 1 and a third pumpkins left. Aaaaand yesterday I unwittingly managed to make it a major component off all the meals....pumpkin for breakfast, lunch and tea. A bit mental but also a bit genius considering I spent £3 on them in all.


Pleaseplease believe me when I say that this loaf cake is indeed mega. It’s one of those cakes that might be a bit of a hard sell given its demure appearance. All brown and dowdy looking it may be, and if you saw it in a shop you may pass it up for a slice for a more spangley option. But please NO.


It is so so tasty and moist and the icing is swooooon-worthy and has that really lovely spice combination of cinnamon, nutmeg and ginger that you would expect from such an autumnal cake. Don’t judge this cake by its cover and make it pleeeease...then we can both turn into pumpkins together and two pumpkin people probably will look less weird than one. With Love and Cake.


Pumpkin Loaf Cake with Brown Sugar Icing.
Adapted from a honeyandjam.com recipe

A few notes:

  • You can buy pumpkin puree from a can if you can find it, but making your own is easypeasy and muchmuch more of a bargain....I tell you how here.
  • You could make this more healthy and wholesome if you wanted, by replacing some or all of the flour with wholemeal and maybe adding a handful of oats.
  • Using large grained sugar for the icing means that it doesn't all dissolve and you get lovely crunchy bits, which I love, but if you wanted it to be 100% smooth you could substitute soft brown sugar which has finer grains.
Makes 1 loaf
You will need

1 medium loaf tin, greased and lined

For the cake
200g plain flour
1 tsp ground cinnamon
1/2 tsp freshly grated nutmeg
1 tsp ground ginger
pinch salt
1/2 tsp bicarbonate of soda
1/2 tsp baking powder
300g caster sugar (golden for preference)
115g butter, at room temperature
2 eggs
225g pumpkin puree

For the icing
55g butter
100g raw cane sugar or demerara sugar
2 tbsp milk
pinch salt
splash vanilla extract
75g icing sugar

  • Right, let's get on shall we? First we'll preheat the oven to 180°c.
  • In a medium bowl combine the flour, spices, salt, bicarb and baking powder.
  • In another bowl cream together the sugar, butter and eggs for a few minutes until pale and fluffy and increased in volume.
  • Stir the pumpkin into the egg mixture.
  • Fold in the dry ingredients a bit at a time until everything is well combined.
  • Pour the mixture in your loaf tin and pop in the oven. It will probably need around 1 hour to bake but check after 45 minutes to see if the top is browning too quickly and in danger of burning: if so, top with foil and continue to bake until a knife comes out clean.
  • Leave to cool for a while in the tin and then, when it's cool enough to handle, remove from the tin and allow to cool completely on a wire rack.
  • When the cake is cold it's time to make the icing...it isn't the sort of icing that you can make ahead really, as it will become more viscous as it cools and be hard to pour over the cake.
  • First, put the butter and cane or demerara sugar in a saucepan and heat very gently, so the butter melts, the sugar starts to dissolve and slowlyslowy you get a dark bronze caramel. Swirl everything around every so often but don't stir.
  • When you have a thick syrup with a rich coffee colour, remove from the heat and whisk in the milk, salt and vanilla....it might not look like everything's mixing too well at this stage but keep going.
  • Sift in the icing sugar and after a bit more whisking you should have a lovely shiny sauce.
  • Pour over the cake and allow to cool before you even think about sampling...sorry but I am not here to induce burny sugar mouth.

Tuesday, 16 October 2012

Pumpkin Pancakes with Gingery Honey.


I WENT TO THE PUMPKIN PATCH. Does that not just sound like the cutest way ever to spend a Saturday afternoon? It doooooooes...until I tell you that, well, I looked at the very soggy pumpkin patch and it’s big KEEP OUT sign through the fogging up window of the deserted farm shop, and picked my pumpkins from the indoor display.


Yes, weather-wise it was not ideal. It did not live up to my image of crunching through golden leaves and crystallised ground in wellies and woolly hats and cutting my very own pumpkin and taking pictures and hugging it.


Silver lining though...the farm shop folk seemed to just so grateful that anyone would even leave their front doors that day, let alone make a special ‘out the way’ trip to pick veg, that they gave everyone a big bargain and we got 2 hefty pumpkins for £3. Bargain. That’s a lot of pumpkin baking that’s got to be done.


The reason I did make the ‘out the way’ trip was because sooooo many of the recipes that are floating around bloggyland at the mo are pumpkin all the way; in the states they buy pureed pumpkin in cans you see, and I was determined not to be left out. And I am sooooo pleased I did. The puree is super easy to make....I explain how here, and it’s just so much fooooood; tasty and nutritious food at that, for such little effort and money. You can expect a fair few pumpkin recipes popping up here over the next few weeks so be sure to find your local patch and to go on a soggy day when the people behind the till will feel sorry for you. With Love and Cake.


Pumpkin Pancakes with Gingery Honey.

A few notes:
  • I wanted to make these kind of wholesome, hence the addition of oats and wholemeal flour. If you're not feeling the hippy vibe just replace the wholemeal flour with extra self raising and leave out the oats.
  • I cannot stress enough how much difference a good, heavy based frying pan makes to pancake success. I have a little but brilliant one and big rubbish one....I use both at the same time for maximum output and the difference in pancake lovelyness is thoroughly evident I'm afraid. It's not a bargain addition to your cupboard but will be a lifelong investment if pancakes are your thing.
Makes about 20
You will need

For the syrup
4 tbsp honey 
1 tbsp golden syrup
2 cm fresh ginger, finely grated

For the pancakes
100g wholemeal flour
125g self raising flour
2 tsp baking powder
1 tsp bicarbonate of soda
2 tbsp caster sugar (golden, for preference)
pinch salt
1 tsp cinnamon
1/2 tsp nutmeg
1/2 tsp ground ginger
300ml yogurt or buttermilk
300g pumpkin puree (homemade or from a can)
1 egg
100g rolled oats
crystalised ginger (optional)

  • First we'll make the syrup. Pop the honey, syrup and ginger in a little saucepan with a small splash of water.
  • Heat gently until a syrupy consistency is achieved and set aside while you get on with the pancakes.
  • Stir together all the dry ingredients in a large bowl.
  • In a separate bowl or mixing jug, whisk together the yogurt or buttermilk, pumpkin and egg.
  • Whisk the pumpkin mix into the dry ingredients until well combined and fold in the oats.
  • Heat your frying pan over a medium heat and cook heaped tablespoon-fulls of pancake batter until you see little air bubbles all over the surface of the uncooked side of the pancake; a few minutes.
  • This means it's time to flip and cook the pancakes on their second side for another couple of minutes...they're ready when they're firm and bronze on both sides.
  • Keep the pancakes warm in a low oven if you need, while you carry on cooking the rest of the batter.
  • Top pancakes with butter and ginger syrup and a few pieces of crystalised ginger if you're feeling fancy.


Monday, 1 October 2012

Carrot Cake Pancakes.


Yep. That’s right. Carrot. Cake. Pancakes. So good I made them twice in one week. 


Weeeeell you could say that I suppose, ooor you could say that while they are very lovely, it was actually me being a bit of a dimwit, making my first major camera based booboo in the form of taking  a whole set of photies of them sans memory card and not noticing until they were all tucked up tight in the freezer, that caused the excessive devotion to these spiced flatties. *Slow clap for me*. 


But I’m going to see it as a blessing in disguise because your experience of these pancakes will be greatly improved by my assessments of the first batch and the subsequent alterations I made to the recipe. Yippeeee for silver linings.


You therefore have a lighter, tastier and all round more interesting breakfast at the tip of your fingers. AND they have fruit and vegetables and wholemeal flour and you could even add nuts if you wanted to go all the way to Health Food Heaven. Cake...unhealthy? Not here. With Love and Cake.


Carrot Cake Pancakes.
Inspired by Joy the Baker


A few notes:
  • These need spice, so don't skimp on that part of the recipe.
  • You don't have to use wholemeal flour if you don't fancy it or simply don't have any; just replace the quantity with extra self-raising.
  • Feel free to omit the sultanas or go crazy and accompany them with a handful of chopped nuts.
  • These are a bit more high maintenance to cook because of the added extras that stick a bit to the pan so just be patient, don't stress, use a good heavy based pan if that's poss, otherwise greasegreasegrease with butter or oil. 
Makes 10-15
You will need

good heavy based frying pan or flat griddle, greased

For the pancakes
150g self-raising flour
75g wholemeal flour
2 tsp baking powder
2 tbsp caster sugar
1 tsp cinnamon
1/2 tsp freshly grated nutmeg
1/2 tsp ground ginger
50g sultanas
300ml milk
1 egg
1 tsp vanilla extract
2 medium carrots, grated finely...and it MUST be finely

For the topping
3 tbsp mascarpone
1 tbsp icing sugar
1 tsp vanilla extract
2 tbsp milk
  • Combine the two types of flour, baking powder, sugar, cinnamon, nutmeg, ginger and sultanas in a large bowl.
  • In another bowl or measuring jug whisk the egg and vanilla into the milk.
  • Whisk the liquid into the dry mixture so everything is well combined and you have a thick batter.
  • Stir in the carrots until evenly distributed throughout the mix.
  • Heat your pan over a medium heat and cook tablespoonfuls of batter in it until you can can see that the bottom half is cooked. You get fewer bubbles than you would with normal fluffy pancakes that you would rely on to tell you when to flip, so you have to pay attention to the edges to see how much the pancake had cooked.
  • Loosen and flip each pancake; it helps to clean your fish slice between each batch.
  • Cook until the second side is cooked and then flip a couple more times if you think they could do with a bit more heat.
  • Keep warm in a low oven if you're not eating immediately.
  • To make the topping, which you'll probably be able to do while the pancakes are on the go, simple whisk the mascarpone, icing sugar, vanilla and milk to a smooth paste.
  • Serve the warm pancakes with a good dollop of the sweet cream cheese and an extra sprinkling of cinnamon. 


Friday, 21 September 2012

Very Carroty Carrot Cake with Candied Carrot.


Everyone needs a good carrot cake in their repertoire...okokkkk not everyone. I’m guessing the Queen rarely gets a craving for cream cheese icing and I guess if, say, Duncan Banatyne fancied a slice he’d send out for one...probably a diamond encrusted one at that...but what I meaaaaan is that everyone that likes a spot of baking, or is the friend that is relied upon to supply treats, or is someone that just bloomin’ loves a big slice of cake...theeeey all need a good carrot cake recipe.


And this, fellow bakers and cake lovers, is that. Sorrysorrysorry but when it comes to carrot cake it’s all about MOIST. I knnoooow it’s one of the most hATEd words ever but it really is what you want from a good carrot cake. Moistmoistmoist....when you think of it in cake terms it really isn’t so bad.


The fact that this cake relies soley on carrots for this moistyness and for its bouncy structure means that it is just the right kind of moist. Not too oily and wet from the addition of oil like so many carrot cakes, and, hellllllloooo it means the cake it fat free, apart from the good healthy nut fats, so you can double up on the icing. Wooooooop.


It’s easypeasy too, especially if you don’t bother with the candied carrots on top, buuuut I must warn you...I was once told by a friend that this was the best carrot cake he had ever eaten and I that it was the candies carrots that swung it in my favour....so keep that in mind. With Love and Cake.


Carrot Cake with Candied Carrots.
From Harry Eastwood's marvelous book Red Velvet and Chocolate Heartache.  

A few notes:
  • I'm afraid I really did double the quantity of icing from the original recipe, always do, and those are the measurements I shall give you. If however you are of the (craaaazy) breed of person who does not believe that basically the very point of cake if the icing and you leave it on your plate for me to polish off, not caring that you judge me, feel free to halve the quantities back down.
  • The type of nut is variable, same for the dried fruit...just keep the quantities the same.
  • I used polenta here though you could just as easily and yummily use ground almonds.
  • If you're not going in for candied carrots, a good sprinkling of lime zest wouldn't go amiss.

Makes one 18cm cake
You will need 

For the cake 
one orange
150g sultanas
80g mixed nuts, toasted under a grill until golden and roughly chopped
3 eggs
160g soft brown sugar
280g coarsely grated carrot
150g plain flour
80g polenta
2 tsp cinnamon
2 tsp baking powder
1 tsp vanilla extract
1/4 tsp salt

For the icing
70g butter, at room temperature
400g icing sugar
4 tsp lime juice
70g cream cheese

For the candies carrot
1/2 medium sized carrot
2 tbsp caster sugar
2 tbsp water

  • Right first the boring jobs...preheat the oven to 160° and grease two 18cm, loose bottomed cake tines and line the bases.
  • Squeeze the juice of the orange over the sultanas and leave them to soak while you get on.
  • Whisk the eggs and sugar for 5 minutes (best with an electric hand whisk unless you want a proper work out) until light coffee coloured and increased in volume.
  • Beat in the carrot.
  • Stir in the flour, polenta, cinnamon, baking powder, vanilla and salt to gently mix.
  • Add the sultanas along with any orange juice left and the nuts.
  • Mix gently but thoroughly and divide the mixture between the 2 tins.
  • Pop in the oven and check after 45 minutes; you want the cakes to be golden and firm.
  • When they are done, leave them to cool in their tins for 5 minutes before turning them out and allowing to cool completely...and I mean completely, never attempt to ice a cake that is still a bit warm.
  • To make the icing, beat the butter so it gets really soft.
  • Add half the icing sugar and combine as much as possible; it should have the texture of breadcrumbs.
  • Stir in the lime juice then add the cream cheese and remaining icing sugar
  • Beatbeatbeat until you have a lovely smooth and shiny paste.
  • Now for assembly. Pop one cake on your serving plate and spread half the icing on top.
  • Top that with the other cake and spread the rest of that lovely icing over the top.
  • If you're going in for the candied carrots, here's how it goes: shred the carrot into ribbons with a peeler.
  • Pop the sugar and water in a small frying pan and heat gently.
  • When the sugar has dissolved,add the carrots and turn up the heat a bit to get everything bubbling.
  • After a minute or 2 the liquid should be more viscous and caramel coloured and the carrots will have gone shiny and a bit translucent...there you are, you've got candies carrots.
  • Pour them daintily on top of your cake.
  • If there's much liquid left in the pan, return it, for a brief moment, to the heat and it will thicken even more.
  • Pour it over the carrots and let it drizzle over the cake (FYI clean the pan with boiling water).
  • And there you have it, a mighty fine classic that's loved by all.

Tuesday, 5 June 2012

A Right Royal Lemon Cake.


Well helloooo there. I doooo hope you’ve been having muchmuch Jubilee fun. I kiiiiind of want to not care and to poopoooo the whole notion, a millionaire Gran in a hat having Gary Barlow through her a party, as a tacky indulgence, but alas, I am not that person. Somehow, at some point I became the person that threw a Royal Wedding parting and made a red, white and blue cake and made red, white and blue bunting out of cardboard and string. I am not ashamed...it is me and my ‘any excuse for joy and excitement’ soul. It could be worse, I could care about Made in Chelsea...oh wait....moving swiftly on.


This year, I didn’t quite reach the party throwing point; people up here across the border seem to care veeery little about the whole thing. I think the wedding was just more of a ‘thing’ because of the St Andrews connection. But I diiiiiid dust off the bunting and, of course, I made a cake. A lemon cake with lemon buttercream and white chocolate ganache to be exact. This is in fact the same one I made for my Royal Wedding do, and I think it’s one I’ll return to as a brill, fairly simple but rather spectacular centrepiece. For this occasion though I thought I’d omit the food colouring; a bit more class seemed appropriate this year; don’t think you’d EVER find HRH tucking into a red, white and blue cake.


While it IS simple I prOMise, there are a few steps required if you are to get the full ‘party cake’ effect. None of them are fiddly or majorly effortful, but they do require time, not from you, just in general, to cool and set etc, so you need to start off your efforts at least the day before you want to serve.


Allllllso, this is one of my beloved vegetable cakes....a courgette lemon sponge in fact, and therefore a million times more moist than it deserves and just gets moister and moister as time goes by. It also means there is noooo butter in the cake mix...allowing room for all that icing. You will need it, there is A LOT, but that’s the way I like it. I hope you do too. Happy Jubilee. With Love and Cake.


Lemon and White Chocolate Celebration Cake.
Adapted from Harry Eastwood's magnificent Red Velvet and Chocolate Heartache.

A few notes:
  • I'm guessing you probably don't have 4x18cm cake tins, I know I don't. In fact I had to fiddle with the original recipe which was written for 3 tins, which is why the measurements are a bit random. So what to do...hopefully you have 2x18cm tins so just halve the recipe and make 2 layers, and then start again and make the other 2. The tricky thing is the eggs...you cant really halve an egg. So...easiest thing to do is to go by volume; 7 beaten eggs is about 400ml, so use 200ml for each half.
  • Of course though if your 'occasion' is not quite up to Jubilee status and you don't fancy quite so much effort and faff, just stick to two layers. And while you're at it, it would still be a fabulous cake without one or other of the icings, or totally bare naked if you prefer.
  • My stars and hearts...I LOVE. Allllll they are is melted while chocolate poured into silicone ice cube trays (hearts) and cookie cutters on greaseproof paper (stars) and left to set. Dust with a spot of edible glitter and don your party hat.
Makes a rather tall 18cm, 4 layered cake
You will need

For the sponge
4x18cm loose bottomed cake tins, greased and lined

7 eggs
270g caster sugar
430g courgette, finely grated
290g plain flour
190g ground almonds
4 tsps baking powder
zest of 4 lemons
3 tbsp strawberry jam (or your fav)

For the buttercream
100g butter, at room temp
400g icing sugar
4 tbsp lemon juice

For the ganache
150g double cream
150g white chocolate, finely chopped

  • Ok, here we go. First, as always, preheat you oven to 180°c.
  • Now whisk together your eggs and sugar for a good few minutes until pale and bubbling full of air.
  • Next, whisk in the grated courgette, then sift in the flour and fold it in to the eggs with the ground almonds, baking powder and zest until well combined.
  • Pour a quarter of the mixture into each of the prepared tins and bake for 25 minutes, until golden brown and firm to the touch.
  • Leave the cakes to cool in the time for around 10 minutes, and then turn out and and remove the greaseproof paper, leaving to cool completely before icing.
  • While the cooling is happening you can get on with the buttercream. Just whisk the soft butter until it is nice smooth paste.
  • Then add the icing sugar and lemon juice a bit at a time; whisking to combine and scraping down the bowl in between each addition.
  • Now to make the ganache. It's easy. Pop the cream in a small saucepan over a medium heat and bring juuuust to the boil. 
  • Pour straight over the finely chopped chocolate and let sit for a few minutes, stirring occasionally, so that the heat left in the cream slowly melts the chocolate. It wont take long.
  • When it's smooth and all melted, give it a good stir and leave in the fridge while you get on with the other bits and bobs. 
  • So now you've done the hard work...now it's just time for a little prettifying.
  • First stack the cakes on your serving dish, spreading 1 tbsp of jam on the top of each cake as you go, just leaving the very top bare.
  • Now for the buttercream. First you want to do a 'crumb layer', which basically means use about 1/4 of the buttercream to ice the cake in a thin layer all over, and you'll notice that all the loose crumbs get caught and stuck in the icing. Now the cake needs 30 mins or so in the fridge, which will trap all the crumbs and stop them poking through into your proper layer of buttercream.
  • When the 'crumb layer' is cold and set, it's time to ice the cake with the rest of the buttercream and give it another 15 minutes or so in the fridge.
  • When that's done it's time for the ganache. It needs just to be poured over the cake and left to drizzle but only do this when the ganache has had a good few hours in the fridge and is not very far from being set, otherwise it'll slip right off and you'll have a very messy kitchen and a ganache-less cake.
  • Now, you've done it....save for the addition of a few white chocolate twiddles if you fancy and a flourish of glitter...you're ready to celebrate. Just don't forget to invite me.


Friday, 16 December 2011

Merry Christmas Cake Cupcakes.


IT'S CHRISTMAAAAAAS. Finally it feels appropriate to pull the party poppers, drink the mulled cider and deck the halls. It's time to celebrate with bells on. Although I'm the merriest of merry Christmas lovers, I still don't feel like I've reach the point where I need to go the whole hog and feed a cake, steam a pud and tinsel a tree.


I'll get there in not too many years I'm sure, but our micro-flat is not reeeeally Christmas hosting material, so a wreath and garland made after a good forage in the park takes the place of the tree. And instead of the soaking and steeping and religiously dolling out brandy to a big thirsty cake, it seems more appropriate to knock up a batch of these Cheerful Christmas Cupcakes. 


Another season...another vegetable cake, and they really do have a Christmas cake hat on. Fruit, spices, brandy- there's no omissions that could leave one craving more merriment. They're unashamedly festive, and perfect for sharing and parties, unlike a traditional Christmas cake which sometimes, I think, has an air of pompousness about him; all poshly jacketed and brandy fueled.  


Nothing 'brandy and cigar-y' about these lovelies, just cheeryness and sparkles. So whip up a batch and spread the joy (Cath Kidston Cupcake cases optional- but if you happen to be given some by a fabulous Secret Santa, even better). With Love and Cake.


Christmas Cupcakes
From Red Velvet and Chocolate Heartache by Harry Eastwood, my vegecake bible.

A few notes:
  • I tried and failed to make a lovely airy, shiny meringue icing. I 'stiff-upper-lipped' it and didn't have a kitchen-based meltdown (a not uncommon occurrence), but I wont tell you the recipe until I know how to make it work, so for now I'll give you a lovely traditional icing sugar drizzle.
  • If you don't fancy forking out for a bottle of brandy especially for this, you could use any sort of spirit really...I've used sloe gin before. Or just use some orange juice.
Makes 12
You will need 

a 12 hole fairycake tin, lined with cases

80g sultanas
120g candied peel
4 tbsp brandy
4 eggs
100g dark Muscovado sugar
1/4 tsp salt
200g carrot, veryvery finely grated
grated zest of 1 lemon
100g plain flour
50g ground almonds
2 tsp baking powder
2 tsp ground ginger
a pinch nutmeg
1 tsp ground cinnamon
60g glace cherries, halved
60g pecans, roughly chopped

200g icing sugar
3 tbsp water

  • Preheat the oven to 180 °c.
  • Soak the sultanas and peel in the brandy while you get on with the rest of the recipe.
  • In a nice big bowl, whisk the eggs, sugar and salt together with an electric hand whisk for a good 3 minutes, until light coffee coloured and nice and voluminous.
  • Beat in the carrot and lemon zest, and then fold in the flour, ground almonds, baking powder and spices.
  • Finally stir in the brandy soaked fruit.
  • Divide the mixture equally between the cases and bake for around 25 minutes, until risen and golden.
  • Once cooked, remove the cakes from the tin and cool on a wire wrack.
  • While the cakes are cooling, mix the icing sugar and enough of the water together to make a drizzly paste.
  • When, and only when, the cupcakes are 100% cool, drizzle over the icing and adorn with anything edible and shiney. 


Sunday, 30 October 2011

A Weird and Wonderful Vegetable Cake for Halloween.


Happy Halloween weekend. I thought Halloween would be a good time to discuss vegetable cakes with you, after several promises to. They are kind of weird you see, people do give you some funny sideways looks when you mention that the cake you just presented them with is made with butternut squash.


But weird is often accompanied by wonderful and vegetable cakes have far more than their fair share of that. Firstly the vegetable, whatever it is, takes on the job of butter, providing moistness, volume and stability, which means you can leave the chubby stuff out altogether...helloooo smug. Plus slimline cake surely means more icing is justified, yeah?


Secondly, the use of vegetables seems to mean that the cake actually gets moister over time rather than drier. I don't know what that means to the whole 'cakes get dry, biscuits get soft' definition but I don't care when it means I can make a cake on a Friday for a party on a Monday.


And finally, just when you thought your smugness levels had peaked, vegetables bring lots and lots of lovely vitamins and fibre to your cake party and you can even say 'one of me 5 a day', as you tuck in ...YESSS. Never has the addition of cake to your life been more imperative. So go and make one and eat with a ghoulish/vampirey/witchey smile. With Love and Cake.


Chocolate Mummy Cake

A few notes:
  • You could decorate any cake and filling mummy style, plain sponge, carrot, coffee....whatevs.
  • If you don't like marzipan, which I know is quite a common disorder, I'm sure you could get a similar effect with Royal icing. You could even brush it with some strong tea to distress it a bit.
Makes an 18cm cake
You will need

2 18cm loose bottomed cake tins, well greased

For the cake
3 eggs
180g soft brown sugar
300g courgette, peeled and finely grated
120g plain flour
60g cocoa
100g ground almonds
2 tsp baking powder

For the filling
40g butter at room temp
90g icing sugar 
1 tsp boiling water
1-2 tbsp apricot jam

For the decoration
1-2 tbsp apricot jam
1ish packet of marzipan

  • First let's bake the cake. Preheat the oven to 180°c.
  • Whisk together the eggs and sugar for 2 minutes until pale and increased in volume.
  • Beat in the grated courgette followed by the flour, cocoa, almonds and baking powder until well combined.
  • Divide the mixture between the 2 cake tins and bake for around 25 minutes, until risen and firm.
  • Leave the cakes to cool in the tins for 5 or 10 minutes then remove from the tin to cool completely.
  • Meanwhile make the buttercream for the filling by beating the butter until light and fluffy looking.
  • Beat in the icing sugar tablespoons at a time until you have a lovely smooth paste, then finally beat in the boiling water.
  • Spread the buttercream on top of one of the cake layers followed by the jam and finally top with the other cake, placed upside down so the top of the cake is nice and flat.
  • Now for the Halloweenification. Heat the jam in a saucepan or in a microwave until nice and melted and brush a thin layer over the top and sides of the cake.
  • Dust a clean surface with icing sugar and roll out the marzipan to about the thickness of a 10 pence piece.
  • Cut into long strips and wrap around the cake to mummify. 
  • Use buttons for eyes but try not to get them stuck in your teeth.