Showing posts with label Birthday. Show all posts

Saturday, 6 April 2013

Banana Bread French Toast and Peanut Butter Caramel.


So remember last, time when I was all like "here have something norrrrrmal and traditional, let's take a holiday from crazy-town cake fun"? Well, yeah, it was fun while it lasted and I do promise it really is very lovely banana bread, but ya knoooow, it's fun to have fun....so here it is again...just a little more mixed up.


As you may have assumed, I tottttally am ok with cake for breakfast. I mean, not everyday of course, and probably not the kind with 17 layers of buttercream, but at the weekend maybe, or as a celebration of the fact that you, I don't know, managed to get a load of washing on, I am fully supportive of cake at the breakfast table.


Banana bread if perfect breakfast cake because you can kid yourself into thinking that it's one of your five a day and that because it's brown, it deffo counts as some sort of health food.....but here's a way to make cake into ACTUAL breakfast that you don't even neeeeeed to justify....just make it into French Toast.


See, French toast has 'actual breakfast status' and therefore is not questioned....who cares that it's drizzled in peanut butter caramel....it still counts. So slice it, dunk it in egg and fry it in butter, drizzle it in the good stuff and serve yourself cake for breakfast...cake becomes an actually breakfasty breakfast. Thank me when you're plate's clean. With Love and Cake.


Peanut Butter Banana Bread French Toast.

A few notes:

  • You could actually use any sort of fruity, dense loaf cake here...but I do think banana bread feels most appropriate somehow.
  • Serve with fresh banana and you're winning even mooooore....I just had used all mine in the actual cake part.
  • You will have some peanut butter caramel left over....ice cream syrup anyone?


Serves 2
You will need

For the peanut butter syrup
1 tbsp smooth peanut butter
2 tbsp golden syrup

For the French toast
1 egg
1 tsp vanilla extract
pinch salt
2 x slices peanut butter banana bread
butter for frying

  • First, let's make the syrup. Pop the peanut butter and golden syrup in a small saucepan, heat gently and whisk to a smooth and fairly pour-able syrup.
  • Now get your fav frying pan on a medium heat ready for the 'toast'.
  • In a shallow dish, gently whisk together the egg, vanilla and salt.
  • Dunk the banana bread slices into the egg, leaving each side to soak for a minute or two.
  • Now fry each side, just like normal French toast, of the banana bread in butter in your hot frying pan until golden and tinged.
  • Serve with creme fraiche and a drizzle of the syrup.


Friday, 25 January 2013

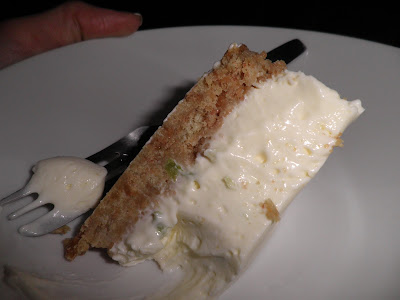
Chocolate and Peanut Butter Cheesecake.


It was my birthday week this week...yes thank you very much I did indeed get your card. I am a birthday person and while there wasn't a big party or any drinking til dawn, it did mean that I was allowed to buy new clothes without feeling bad, it meant that I let myself watch a whole afternoon of Sex and the City and Little Women (for the balance, you know) without making myself get up and fold the washing or clean the bath and it meant that I made the most gluttonous cheesecake you can possibly imagine even though only 50% of my household (me) will eat it.


I've been meaning and wanting to make this cake for aaaaaaaaages, but being that the other 50% of my household is not a peanut butter lover, which yes indeed would be a deal braker were he not so very lovely in all other ways, plus he takes car of all the car duties (phew), it doesn't make sense. And...being able to see exactly how much peanut butter chocoalte cheesecake you and only you have eaten, as represented in pie-chart (cheesecake-chart) form, is not good for your self-esteem...especially when meany physios tell you not to run more than 2 miles.


So I decided that birthday week was an excuse to be selfish and make it anyway and eat it anyway...even if it means having to have people round to dinner so I can force a slice down them so I don't feel so greedy (jokesjokes...I really DO enjoy being sociable...sometimes).


I hope fop your sake that you are surrounded by peanut butter lovers and therefore don't have to wait so long to make this cake, because it is WAY easier than it would have you believe and oh my DAYS so wonderfully peanut buttery and chocolatey and all the things you'd imagine a PEANUT BUTTER and CHOCOLATE CHEESECAKE (I just thought I should reiterate the genius of the collaboration we've got going on here) to be.


Chocolate and Peanut Butter Cheesecake
From Nigella's Kitchen.

A few notes:
  • You need to make this the day before you eat it; always good to know before you start.
  • The easiest and most hassle free way of making this will be with a food processor. If you are without one however, don't fret...you will have to tweak the base; leaving out the chocolate and peanuts because I'm not sure how you'd bash them to a powder without a processor, and you could use chocolate chip cookies instead of digestives to compensate...just pop them in a plastic food bag and bashbashbash them with a rolling pin. The filling would just need an extended beating with a hand whisk.  
  • The cream cheese absolutely 100% MUST be at room temperature before you start...do NOT think you'll be able to get away with using it straight from the fridge. Sorry for the firmness....but I've told you about my mistakes in this area before and wish someone was as demanding with me at the time.
Makes one beast of a cheesecake
You will need

1x23cm cake tin (spring-form will be easiest), greased

For the base
200g digestive biscuits
100g dark chocolate, chips or chopped from a bar
50g salted peanuts
50g soft butter

For the filling
500g cream cheese, at room temp
3 eggs, plus 3 egg yolks
200g caster sugar
125ml sour cream
250g smooth peanut butter

For the topping
250ml sour cream
100g milk chocolate
30g soft brown sugar

  • First job, as ever, preheat the oven to 170°c.
  • Process the base ingredients to a powder and press into the bottom of you cake tin using your fist or a spatula. Pop in the fridge.
  • Wash up your processor bowl and blade and process all your filling ingredients to a smooth, glossy, manila coloured gloop.
  • Pour the filling over the base in the cake tin and bake in the centre of your oven for around about 1 hour, though I would check after 45 minutes; what you're looking for is a mostly set cake with just a hint of wibblyness in the middle, or as Nigella so fabulously puts it...inner thigh wobble.
  • Make the topping by putting all the ingredients in a small saucepan and heating gently until the chocolate has melted and you have a glossy sauce.
  • Pour the topping over the top of the cake and put back in the oven for a final 10 minutes.
  • Leave the cake to cool completely in the tin and then leave to chill in the fridge overnight.
  • Let it sit out of the fridge for a while before you serve the cake, without letting it fully come to room temperature,


Friday, 23 November 2012

A Successful Apple Birthday Cake.


Do you remember the epic cake fails I told you about a week or so ago? Well...strange as it may seem, this rather autumnal looking, and tasting, offering is in fact one of those. You might think it a little odd that I should show it to you and give you the recipe and urge you to bake it, but, you see, I fixed it and turns out, it's rather good.


It's veryvery apply and oaty and spicy and not even remotely froufrou-ey...perfect for a Somerset boy's birthday cake you might say. Aaaaand it's one of those cakes that means you can definitely justify it's belonging to the breakfast food category...oats and apples and spices are heeeealthyyyy. 


The major error was icing-based...and I should have known better. Nigella aaaalways goes on about letting cream cheese get to room temperature before you do anything with it...it gets graaaaainy, she nags. OK Nige...just because you are God of my kitchen, whatevs. Turns out...she most definitley IS God of my kitchen and knows EVERYTHING. She is right...it does go grainy if you are silly/lazy/forgetful and don't do the room temp thing and poopoo Nige and her laws.


I repent...and I will NEVER disobey again...EVER. My 'fix' was to ingeniously scrape the grainy icing off the perfectly good cake once it had indeed reached room temperature and give it a good beating. It happily complied to smoothness and my fail was no longer a fail. ALWAYS LISTEN TO NIGE. With Love and Cake.


Very Appley-Apple Cake.
original recipe by Tea and Cookies

A few notes:
  • The icing is not mandatory, it would be a very lovely tea-time cake without it...but birthday cakes need icing don't they.
  • If you do make the icing though, I will reiterate what I said above....make sure that you get the butter and mascarpone out of the fridge plenty of time before you make it, allowing them to come completely to room temperature. DO NOT SKIP THIS STEP....I am not just telling you to do this for fun, your icing will be grainy if you use fridge cold ingredients.
  • You could substitute regular cream cheese for the mascarpone if you fancied...it might be a bit less rich, which would not be a bad thing.
Makes 1 big cake
You will need

1x23cm cake tine, greased and base lined

For the cake
190g plain flour
50g oats
1 tsp bicarbonate of soda
1 tsp cinnamon
1 tsp all spice
1/2 tsp freshly grated nutmeg
175g caster sugar
pinch salt
175ml vegetable oil, or other flavourless oil
2 eggs
splash of vanilla extract
2 bramley apples, peeled and finely chopped

For the icing
125g butter, at room temperature
250g mascarpone, at room temperature
1 tsp vanilla extract
250g icing sugar

  • Preheat the oven to 180c.
  • Mix the flour, oats, bicarb, spices, sugar and salt together in a large mixing bowl.
  • In another bowl or measuring jug, whisk together the oil, eggs and vanilla.
  • Pour the wet ingredients steadily into the dry, while whisking together.
  • Gently fold the chopped apple into the mixture and pour it into your prepared cake tin.
  • Bake for 45-50 minutes, at which point the cake should be dark bronze and firm in the centre.
  • Leave to cool completely in the cake tin before turning out and icing.
  • To make the icing, whisk or beat the butter into a smooth paste.
  • Add the mascarpone and vanilla and beat until combined.
  • Add the icing sugar a few spoonfuls at a time, beating to a light paste.
  • Spoon and spread the icing over the cold cake, and top with dried apple if you feel so inclined.
  • YeY...success.

Wednesday, 14 November 2012

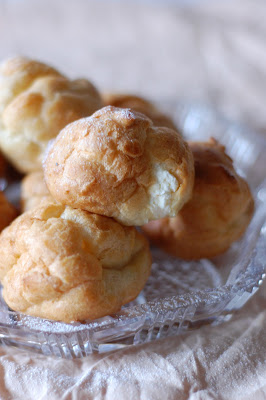
Profiteroles and Birthday Fireworks.


What is one to do...it’s the boys birthday tomorrow, you have last year’s EPIC offering to live up to and you have THREE CAKE FAILS all in one day. Quelle Desastre. I shall tell you what you do....you make profiteroles and pray (there is a special cake God just for cake praying yeah?).


I don’t, however, want you to think that I’m a crazy clever housewife lady whose answer to all culinary trouble is to rustle up something elllllse fancy on a whim. Oh no....if it hadn’t been a mighty important baking day, I probably would have cried, thrown something and gone to bed in a huff....my answer to most struggles I encounter.


I had in fact plllaaaanned to make profiteroles all along, they were to be the yummy pudding, no fuss or fireworks, just a casual, ‘time for profiteroles?’ at the end of dinner. But given that the cakey part, where the fireworks were meant to be directed, had let me down, I just sort of redirected the emphasis. And made it seeeeeem like I am a crazy clever housewife lady with the answer to everything, even birthday cake fails.


The motto? Mmm not sure really, maybe to always plan to make profiteroles, I mean, it doesn’t do any harm. Or maybe to not follow stupid cake recipes that look suspicious from the start...no eggs? What? Or maybe it’s just that you shouldn’t cry over uncookable cake...because really, people don’t care, as long as you give hugs and kisses and gnocchi, all will be well. With Love and Cake.


Profiteroles.
Original recipe from Delia's Complete Cookery Course.

A few notes:
  • Try to make these as close to the time of serving as poss, they need about half an hour to cool before filling but after that it's sogs-ville...and no one likes a soggy profiterole.
  • This is just a basic choux pastry recipe, so you basically do exactly the same to make eclairs but shape the pastry into sausages before baking.
  • If you don't have a piping bag etc, simply, split the choux buns in half, fill with whipped cream with a spoon, and join the halves together again.
Makes 12-15
You will need

a greased baking sheet

For the pastry 
60g plain flour
1 tsp caster sugar
2 eggs, lightly beaten
150ml water
50g butter, cubed

For the filling
275ml double cream, softly whipped

For the chocolate sauce
225g dark chocolate
3 tbsp cream
  • Preheat the oven to 200°c.
  • First we need to get everything ready to make the pastry, because when it gets going, it's a speedy process. So weigh the flour into a bowl and add the sugar, then beat the eggs in a separate little bowl.
  • Pop the water and butter in a saucepan and heat over a medium heat until the butter has melted and the water just starts to boil.
  • As soon as this happens, take the pan off the heat, pour the flour and sugar into the pan and beatbeatbeat with a wooden spoon until you have a smooth paste that sticks together and leaves the sides of the pan clean.
  • Continuing to beat, add the eggs, a bit at a time, until you have a smooth, glossy paste.
  • Now, run the greased baking sheet under some cold water and shake most of it off...this means a little bit of steam is created in the oven, helping the pastry to rise.
  • Arrange teaspoon-fulls of the pastry on the baking sheet, leaving plenty of room for rising between each one.
  • Bake for 10 minutes, then turn the oven up to 220°c and bake for another 15 minutes, until golden and puffy.
  • Remove the choux buns to a wire rack and pierce each one with a knife or skewer to allow any soggy-making steam to escape.
  • While they cool, make the chocolate sauce by melting the chocolate and cream together, either in a bowl set over a pan of simmering water or in the microwave.
  • Whisk so you have a lovely silky sauce.
  • Now to fill your profiteroles...pop the whipped cream in a piping bag, poke the nozzle into each choux bun and squeeze out a healthy dose of cream.
  • You could pour over the chocolate sauce now or serve it alongside, either way...well done, fail averted. 


Wednesday, 16 November 2011

Birthday Cake for Boys: Chocolate Guinness Cake.


What cake does one make for a boy's 24th birthday? It's a tricky one, particularly when the boy in question does not grant cake with great importance (I know *gasp*, but he's soso great in all other aspects of life that I tend to let it slide).

Sorry about the dodgy photo, I wasn't trying to be a food photographer extraordinaire back then. 

Last year I went for the one above, a nice and autumnal Cider and Apple cake; pretty perfect for this cider making Somerset native. Not froof or frill in sight, just moist, spiced and manly alcohol inclusive goodness. So I needed a tip top equivalent for this year, and after much deliberation it came in the form of this....Chocolate Guinness Cake. 


That's right. Chocolate.Guinness. Cake. Now let's all stand up, so we can bow down to Nigella, for this is her creation, and it is GENIUS. Chocolate and Guinness in a cake!! Sorry if you think I'm over playing this but really, once you've made it and experienced the joy in brings, you will join me in my worship. Nige has always been my 'own personal Jesus' but this really cements her status.


For starters it's super easy to put together, a bit of heat, stirrystir, bake and done. Something so easy has absolutely no right to be as delicious as it is. Each bite is dense and smooth and chocolately, some provide a waft of stout and others even verge on the brownie style gooo. Heaven. And so very manly, it even looks like a pint of the black stuff. A winner on every level. Please don't wait for a boy's birthday requirement to make this cake. With Love and Cake.


Chocolate Guinness Cake
From Nigella's Feast- one of my all time favs

A few notes:
  • As always, make sure you wait until the cake has completely cooled before icing, melty icing would be no good.
  • I'm afraid I actually didn't use Guinness but a bottle of Scottish stout which I've been wanting to buy for a while, just because of the cute bottle. It worked perfectly.
  • I made the icing in a food processor; whizz icing sugar, then add cream cheese and cream and whizz to combine. But I'll write the recipe for doing it by hand.
Makes 1 23cm cake
You will need

a 23cm cake tin, well greased and the base lined

For the cake
250ml Guinness or dark stout
250g butter, cubed
75g cocoa
400g caster sugar
142ml sour cream
2 eggs
1tbsp vanilla extract
275g plain flour
2 1/2 tsp bicarbonate of soda

For the top
300g cream cheese
150g icing sugar
125ml double cream

  • Preheat your oven to 180°c.
  • Pour the Guinness into a large saucepan, with the butter and heat gently until the butter has melted.
  • Whisk the cocoa and sugar into the pan and remove from the heat.
  • In a bowl, beat together the sour cream, eggs and vanilla and stir into the pan of Guinness.
  • Finally whisk in the flour and bicarbonate of soda until well combined.
  • Pour the dark mixture into the prepared tin and bake for 45mins to 1 hour, until risen and springy.
  • Leave to cool completely in the tin.
  • To make the topping, whip the cream cheese until smooth.
  • Sieve in the icing sugar and beat to combine.
  • Add the cream and beat until spreadable.
  • When the cake/pint is cold, remove it from the tin and spread the icing/foam in a nice smooth layer on top. 
  • Happy Birthdaaaay. 


Wednesday, 10 August 2011

Tea and Cake Cake.


It's your birthday...Woooohooooo. Now I know you're not a giant birthday fan like me, particularly when it comes to your own, so I imagine you're pretty glad about the enormous distance between us right now. But birthdays are for celebrating, for singing and parties and presents and glitter, and although I can't shower you with such joy(for me)/embarrassment(for you) in person, I can do the bloggy version. HA.

They're meant to be balloons...obviously. 

Happy Birthday to you
Happy Biiiirthday dear Hannaaaah
Happy Birthday to you.


Here is my tribute to your love of tea and my love of birthdays and our mutual love of cake. An Earl-Grey Cake. I've gone off piste here a bit and sort of invented this concoction myself...not a problem when tea-time (as in dinner) cooking is involved, but a potential mine-field in the case of proper baking. So Horrah...it worked.


I actually wrote the words for the post before I had made the cake, so am rather pleased that it turned out well. Not quite sure what I would have done otherwise. 


Anyway, make sure you find someone friendly to make it for you and load it with candles and then clap as you blow them out and make a wish.

Have a fabulous day. Eat, drink and be merry. With Love and Cake.


Earl-Grey Cake

A few notes:
  • You'll just have to trust me on the courgette situation. I'll go into detail about the genius of vegetable cakes another time.
  • Don't look at the pictures too closely. My icing curdled a little bit you see, due to too much beating and then the addition of too much tea I think. That's also why it's a bit runny and is making its way down the side of the cake. It's ok though, I made the mistake so you don't have to.
  • I only have two 18cm pans so I'm a tad naughty and make up all the cake batter, cook two thirds in the two that I have and then cook the final third when they're done. Not advisable but necessary.
  • I find the easiest thing to do with a recipe like this is to weigh everything out first and then it comes together and can get in the oven nice and quickly. Grated courgette doesn't like to sit around for too long.
Makes a towering 18cm cake
You will need

3x18cm round cake tins

For the cake
4 eggs
200g caster sugar
400g courgette, finely grated
5 Earl-Grey tea bags
220g plain flour
140g ground almonds
3 headed teaspoons baking powder

For the filling and icing sugar
1/2 jar of your fav jam
50g soft butter
50g mascarpone
200g icing sugar
3 tbsp stronglystrongly brewed Earl-Grey tea

  • Grease the tins and line the bases with grease-proof paper. Preheat the oven to 180°.
  • Whisk the eggs and sugar for around 5 minutes, until voluminous and light. 
  • Fold in the courgette then empty the contents of the tea bags into the mixture (sounds weird..tastes delish).
  • Fold in the flour, almonds and baking powder.
  • Now divide the mixture evenly between the tins and bake for around 30 minutes, though check after 20 in case they need moving around the oven for even cooking.
  • When the cakes are done, remove from the tin and leave to cool completely.
  • Meanwhile make the icing. Beat the butter and mascarpone until they come together and increase in volume a bit.
  • Next stir in the icing sugar and tea and work together until a light coloured paste is formed.
  • To assemble the cake, choose the flattest sponge and leave that as the top one.
  • Lay one of the other sponges on a plate and spread over half the jam.
  • Pop another sponge on top followed by the rest of the jam and then by the fanciest sponge.
  • Spoon the icing on the top and spread over evenly. Decorate if you fancy and serve with tea.


Friday, 5 August 2011

A Late Lemony Birthday Cake.


Hellooo there,
So have you morphed into Carrie Bradshaw? Are you eating lots of Pancakes? Have you taken a picture of the Statue of Liberty? Hope so.


I’m afraid I’m feeling a bit like a bad sort of friend at the minute. You see we took a little trip away and properly lived the Riviera life-style; no phones, no computers, playing Monopoly by candle-light. It was the sort of holiday which meant the knotty muscles in your back melted away in just one balmy night, and you don’t think of one single to-do list, which is big news for a nut like me...but I’ll go into details about that another time.


The thing about being in a different country and not knowing the time or date or day is that when far away friends’ birthdays are around the corner, you remember that it’s their birthday on the day, then you get back and realise that that day was wrong and you just text your friend on their birthday without even mentioning it to them. 


This feels mean and makes me sad because birthdays are the BEST, second only to Christmas and also, I love post and missing out on receiving birthday post is a terrible notion. I therefore must make up for it with cake and late birthday love and hope that they forgive me. With Love and Cake.


Lemon Curd Cake
From Avoca Tea Time
A few notes:
·         If I made this again, I’d double the quantities for the butter icing and use it both on top and in the middle of the cake. The whipped cream adds a nice fluffy texture but the subtle taste is a bit lost amongst all the zingy-ness.
·         To cut the cake into two layers, cut through with a bread knife and then use the knife and another similar implement to criss-cross over each other in the middle of the cake. That way, the top layer that is lifted off is supported all over.

Makes a nice big cake
You will need
For the cake
A 23cm cake tin

225g soft butter
225g caster sugar
4 eggs
225g self-raising flour
1 lemon
1 tsp baking powder

For the middle
A medium carton of double cream
A jar of lemon curd

For the butter icing
50g soft butter
100g icing sugar
 Zest of 1 lemon

·         Preheat the oven to 170°.
·         Grease and line your cake tin. I know it’s a hassle, but you’ll regret not doing it.
·         Starting with the cake, cream the butter and sugar together until creamy and light and then gradually beat if the eggs.
·         Gently fold in the flour and baking powder, followed by the zest of the lemon and the juice of half.
·         Spoon into the tin and bake, low down in the oven, for around 55 minutes, though check what it looks like after 45. It should just be turning golden and be firm in them middle.
·         Once cooked leave to cool for a bit then turn out the tin and leave to cool completely. Icing a warm cake is a bad plan.
·         Meanwhile, whip the cream and put together the butter cream by beating the butter until it increases in volume and takes on a lighter colour.
·         Beat in the icing sugar, the zest of the new lemon and the juice of the half left over from the cake mixture. It’ll look impossible at first but you’ll get there.
·         Now it’s ready to assemble. Cut the cake in half horizontally and pop the top half on the dish that you’re serving the cake from. The top becomes the bottom you see.
·         Spread this half with whipped cream and top with ¾ of the jar of lemon curd.
·         Now nestle the second half of the cake on top, with the base facing upwards. This way you get a nice even surface.
·         Spread the butter icing on top of the cake and drizzle with the rest of the lemon curd.
·         Sing happy birthday and make a wish.