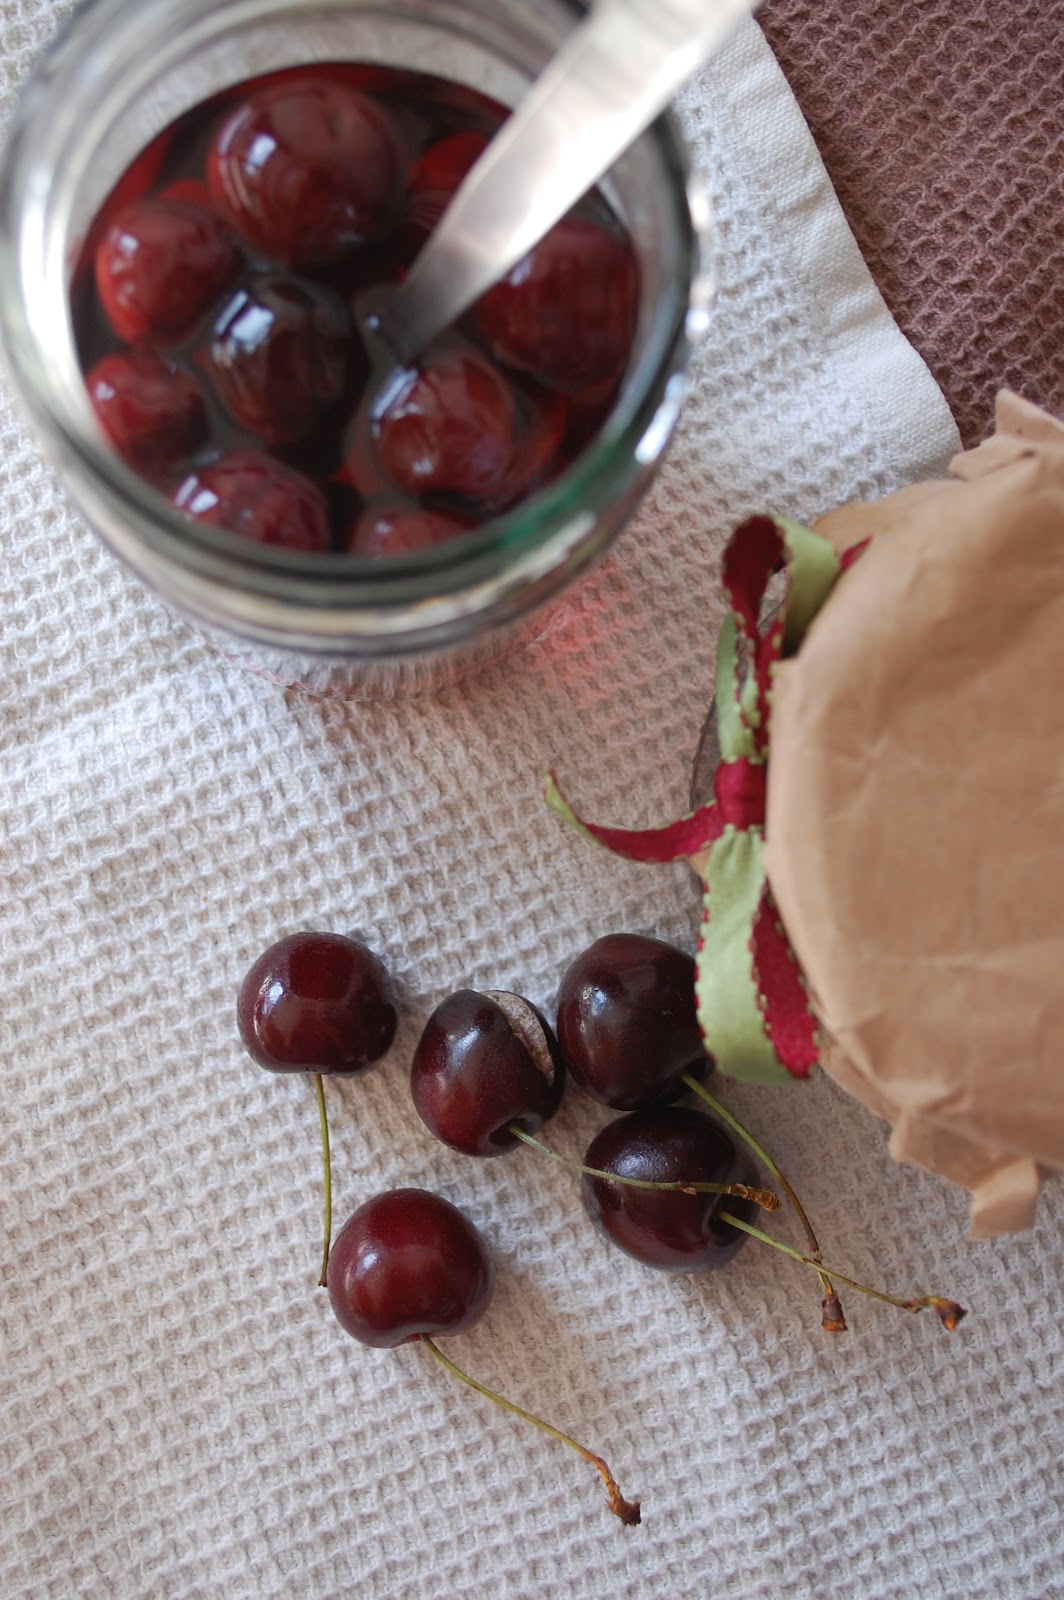
Showing posts with label Gifts. Show all posts

Wednesday, 29 August 2012

Cherries In Brandy.


Hello. Today I give you this recipe, knowing full well that you will never, never ever, be a preserver. Yesyes I knoooooooow you will never own a sugar thermometer, or know or care about ‘setting points’, or save jam jars in a box under your bed. But here I am anyway, on the off chance that you happen across some wonderful fruit and need to make it last.


I know it can be tricky to shop and cook for one. What’s happened over my summer you see, is that the wandering Mr Love and Cake has returned from the depths of Scotland after trips away, causing me to excitedly stock up on a fridge-full of goodies, only for him to be called away again at a moment’s notice. Hence my need for brandy and sugar....in the recipeeeeeee obviouslllllly, and my anticipation of yours too.


Maybe you will walk past a posh London food market (yes folks, sis has been entangled in the capital’s tentacles and may never escape....must change the blog’s tagline), and simply have to have that half kilo of shiny, end of season fruit. But once home, with your mouth and your mouth alone available for their onward journey, they start to decompose before your very eyes. Brandy and sugar to the rescue...FOR THE FRUIT.


It doesn’t have to be cherries and there’s no heat requireD...it’s really rather a simple process. Aaaaaand when you’ve gobbled up all the drunken fruit , what you’re left with is the most delectable fruit liqueur. See I knew I could make a jar saver out of you. With Love and Cake.
 

Cherries in Brandy.
Adapted from River Cottage Handbook No 7: Hedgerow.

  • These are rather free form instructions, everything depends on how much fruit you've got really, and how they pack into your jars...just go with it, and feel laid back man.
  • The original recipe is written for small wild strawberries, fat chance of you getting hold of them, so feel free to mix it up a bit in terms of what fruit you have, that is, ultimately, the point of preserving such as this. 
  • To sterilise your jars, all you need to do is pop the in the oven on their side and turn your oven on to 170°c. When the temperature is reached, pop a timer on for 10 minutes, and turn the oven off when the timer pings. Leave them in the warm oven until you need them.
You will need

Sterilised jars

cherries
granulated sugar
brandy

  • Prick each of your cherries a couple of times with a knife or skewer and the brandy can get inside and make them all delicious.
  • Fill you jar about one third full with fruit then pour oven with sugar so the fruit is covered and gaps are filled.
  • Keep going like this until your jar or jars are filled with fruit.
  • Pour over the brandy, give the jars a bang on a table and wait a few minutes for the air to escape and the brandy to find its way right to the bottom.
  • Top up the jar with more brandy if you need and seal the jars.
  • The cherries should keep for a good while but why should they, when you can top a cake with them, use them, stoned, in a trifle, they're great with meringue and cream or just pop them straight from jar into mouth.


Tuesday, 24 July 2012

Morning Coffee Cups.


Have you heard of Hope and Greenwood? Well they are wonderfully genius, wonderfully eccentric sweet makers. They make sweets with names like Pavlova Islands and Mallows D’amour and Squirrel Nibbles. There was even a scene of Made in Chelsea in one of their shops...you knowwww, the one with Millie and Francis and Jamie and....oh please don’t judge me.


Anyhoo...I’ve not been lucky enough to try any of the sweets made by their own fair hands but I am in possession of one of their magical books so I get to make some made with mmmmyyy own fair hands.


I’ve had the book since January (thank you Phoebe) but didn’t make anything from it for a good while. Of course I read it right through...I have a little cookbook obsession and have read many multiple times...but it was sweets, and, you know, making sweets is hard.


Stoopidstoopid me. Ok making SOME sweets is hard. I wouldn’t recommend making toffee after too many Gs&Ts...but off course making some sweets is easy and I’m silly for not getting my hilarious (and H&G aaare hilarious) little book dirty sooner. So they may be little, they may be ‘confectionary’, but please don’t make my mistake and presume that these Morning Coffee Cups are too much effort. You definitely could combine this recipe with too many Gins aaaaand it kind of implies the consumption of chocolate before breakfast is acceptable behaviour....so what are you waiting for. With Love and Cake.


Morning Coffee Cups.
From Life is Sweet by Hope and Greenwood.

A few notes:
  • The original recipe for these uses dark chocolate so feel free to go that route, or you could use a mixture.
  • Because we're not doing fancy things like tempering the chocolate here it might discolour a little bit on setting. Don't worry, it's not a problem, but if you're giving them as a gift you might not want to leave too long between making and giving.
Makes 10
You will need

10 mini foil cases

200g milk chocolate
25g butter
1 1/2 tsp instant espresso powder
10 chocolate covered coffee beans

  • All you need to do is melt the chocolate with the butter; either do it in the microwave, checking VERY often, or in a bowl over a pan of simmering water.
  • Stir through the espresso powder.
  • Pour the coffee-ee chocolate into your cases and top each one with a chocolate coffee bean.
  • Leave to set for a few hours of overnight.
  • You made sweets.


Tuesday, 13 March 2012

Problem Solving Gateau Breton.


Oh hiiiiiiiii. Isn't going over to a friend's house for dinner one of the funnest things in the world? Whether it's for fancy food and celebratory merriment, gossipy chats with constant nibbling, or simply laid back shared silence  and take away in front of the TV, it's one of my favourite things.


But turn that into a 'dinner party', grown up style, and involve people you haven't known and laughed with long enough to call friends, and the whole thing can be fraught with questions of etiquette and potential awkwardness. One of the most pressing unknowns for me is 'what to bring'?? Wine. Tick, can't go wrong. But I hate turning up at a 'thing' without a tin of something. If it's a friend's 'thing' I'll just make it clear that I have pud under control or will at least be contributing to it, but for a proper grown up 'thing' what do you do? You can't turn up with proper dessert fayre because the host might have made it themselves, and I don't want to do the buying chocolates thing, that's not me....I bake.


So here it is; the solution to that particular dilemma. Not pudding, more like a bite to serve with coffee, and if your hard working host has that sorted too, it would make the most diviiiiine breakfast for them the next day (and you if you're the sneaky type and snaffle some away (did that, obvs)).


Aaaand to top it all, you don't have to worry about pleasing multiple unknown tastes; 1/4 cakey, 3/4 shortbready and 250g butter, what's not to like? What's not to like is anyone that doesn't like cake and shortbread and butter. The host this particular batch was destined for told me, post grown up dinner, that he isn't a cake person but pretty much munched the whole lot. Enough said. With Love and Cake.


Gateau Breton
From Nigella's How to be a Domestic Goddess, what else?

A few notes:
  • The taste of this is unapologetically butterbutterbutter, so use the very best you can.
  • You'll end up with 6 egg whites leftover, but don't fret, I'll hit you with the perfect recipe to use them up later in the week, requiring 4, and you can freeze the rest, or all of them, for another day.
Makes enough for a gift and extra for snaffling
You will need

a 23cm loose bottomed or Springform tin, buttered really well

6 egg yolks 
225g plain flour
250g caster sugar
250g unsalted butter, nice and soft


  • Preheat your oven to 190˚c and first job, take a tsp of egg yolk out of those ready for the cake and mix with 1 tbsp water and save for later.
  • Now sieve your flour into a bowl and stir through the sugar.
  • Then tip in the butter and yolks and mix with your hands or a wooden spoon to a sticky dough. 
  • Press the dough into your cake tin and smooth over the top.
  • Now brush with the egg yolk/water mixture for a nice glaze.
  • Pop him straight in the oven and bake for 15 minutes before turning the temperature down to 180˚c and cooking for a further 25 minutes. It will be golden and firm.
  • Let it cool 100% before removing from the tin and cutting into slices of whatever shape you fancy, I went for a lattice but there's squares and wedges at your disposal also.
  • Happy dining.

Friday, 13 January 2012

Chilli Chocolate Shortbread; a Revelation.


So today, I have for you a revelation. I'm not God or anything but I feel I have come up with something which warrants some form of worship. Say hellloooooo to Chilli Chocolate Shortbread.


I mean, I'm not saying that such a thing has never been done before, most things have, particularly when it comes to baking, but I pay attention to food a lot, I read about food a lot, so I assume that if something exists, I'd have come across it...and I haven't come across this, not ever. Well, I hadn't before I Googled it to research this recipe.


I therefore come to the 'divine revelation' conclusion, considering how bloomin' lovely it is. It's either that or the fact that I am generally driven by greed towards chocolate, towards shortbread and towards anything vaguely sweet.


If it is the latter though, I'd prefer it if you play it down for now, and let me bask in my glorious 'discovery' for just a little longer. Thanks. With Love and Cake.


Chilli Chocolate Shortbread
Adapted from Avoca Tea Time

A few notes:
  • It might be best to have a tiny taste of your chilli before you use it, either fresh or dried, so you can tweak the amount, using more if it's mild or less if it's 'head-pop-off' strong.
  • These perhaps aren't the daintiest looking biscuits, a pretty shape cutter helps, use whatever you fancy. For extra prettyness you could also drizzle over a thin stream of melted chocolate....ooooh melted 'chilli chocolate' perhaps. 
  • These are a lovely prezzie tied up nicely in a box or bag, I gave mine as a ' it was your birthday and I haven't given you your proper prez yet so have these in the meantime' gift.
  • If you don't have a food processor, it might be easiest to combine all the dry ingredients and  rub the butter into this mixture.
Makes a good biscuit tin-full
You will need

a lined baking tray
cookie cutters of any shape, around 5-10cm diameter

225g butter, cold from the fridge, cubed
280g plain flour
30g corn flour
110g icing sugar
25g cocoa powder
1 small fresh chilli, finely chopped, or 3/4 tsp dried chilli flakes

  • This is a simple one really, just put all the ingredients in a food processor and whizz until just combined.
  • Transfer the mixture to a bowl, cover and chill in the fridge for at least 30 minutes.
  • Preheat your oven to 110 °c and prepare a clean surface, dusted with icing sugar and/or cocoa, to roll out your mixture onto.
  • I found it easier to deal with the dough in 2 halves, but either way, roll out to a thickness of around 1cm.
  • Cut out your shapes and transfer to the baking sheet. 
  • Bake for 1.5 hours and then leave to cool on the baking sheet for 5 minutes or so, then cool completely on a wire wrack.
  • Worship.


Wednesday, 14 December 2011

Secret Santa Truffles.


Secret Santa. Always a tricky one. It's inevitably someone you've barely ever spoken to for more that 5 minutes. Or if it is someone you know and love and you know exactly what would be the best prezzy ever for them...you only have £10, and that barely even covers the fancy wrapping paper that you want so you can wrap all Kirstie Allsopp like.


So this year, for a worky Secret Santa, I thought I'd add the homemade touch. The perfect way to make an 'ok' gift, smile-worthy.


Truffles are the perfect answer. Not time consuming in the slightest and nice and bargainous, they are much more the sum of their parts when tied up in a ribbon and nestled under a twinkly tree.


But these don't have to be the reserve of the Secret Santa. Even if it's a gift which you will put your name to, a little homemade bag of lovelyness will make anyone thankful as the almost bitter chocolatey taste explodes in their mouth. (Ooooor everyone else can bugger off and you can just plain old make these for number one...I wont tell). With Love and Cake. xxxx


Truffles
From the brilliant Nigel Slater and his brilliant book Real Food.

A few notes:
  • These are plain, super chocolatey truffles. You could add booze if you wanted, but I think the smack in the face chocolateyness is enough for me.
  • You're meant to be able use two warm spoons to shape a nice truffle from the mixture without getting messy hands. I always start out this way, with good intentions, but end up getting frustrated and just scooping out bits of mixture and rolling into balls with my hands. Eating the mixture off your hands is optional but highly recommended.
  • If you want to fancy up your truffles a bit, instead of rolling them in cocoa you could dip them in melted chocolate for a nice smooth coating. If that's still not fancy enough for you, how about dipping them in melted chocolate and then rolling them in something else...coconut, chopped nuts, white chocolate chopped super fine...


Makes around 250g; enough for 1 gift with a few treats left over for you
You will need

225g lovely proper dark chocolate
140ml whipping cream
cocoa powder for dusting

  • First lets chop the chocolate. you can either do this on a chopping board with a nice big knife; it's a messy job but a rather a delicious one, or you can pulse it in a food processor. Either way you're looking for rubble; sort of gravel sized chunks.
  • When that's done, pop it all in a nice big bowl, and put that next to the hob, which you're about to use, so the bowl looses any chill it might have.
  • Heat the cream slowly in a pan until just boiling and pour it on top of the chocolate.
  • Let everything sit and mingle for a moment or two and then turn everything over, slowly slowly, with a wooden spoon.
  • The chocolate should melt into a thick, glossy sauce but if you have lumps (I did), simmer some water in your dirty cream pan and sit the chocolate mixture over it for just a moment and stir around again.
  • Now stick the bowl of chocolate lovelyness into the fridge to set for around 1 hour.
  • It sound now be firm but not too solid, so you can scoop out blobs, shape into balls and roll them around in a saucer of cocoa to coat.
  • Tie with a ribbon and store them in a cool place.