Showing posts with label Picnic Fare. Show all posts

Wednesday, 28 August 2013

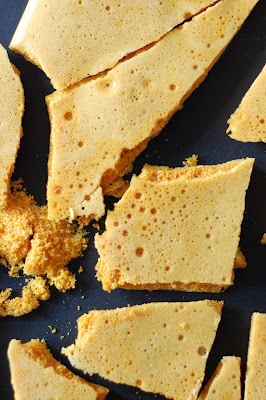
Honeycomb.


Ok...before you think anything....don't. Because you're wrong. I'm not mental for saying that it's easy peasy to make what is essentially the inside of a Crunchy. I shouldn't be arrested for suggesting that you make this in an emergency, last minute, for an occasion that requires pud, or at least a sweet offering. And it is most definitely not silly to say that YOU could DO THIS.


While yes, it is true that some magic occurs, what is with bicarb and all it's crazy uses, it's not actually a requirement that you are a witch, all you do is throw the ingredients together and some spell/scientific reaction occurs all by itself. Mix, Pour, Done.


It's one of those genius things that makes everyone think YOU are the genius and slaved over a hot stove just for their benefit and they will therefore think you love them very much and are very generous and will love you back and maybe even buy you presents.


That's not to say that you DON'T love them millions for taking the easy way out, but you probably just have lots of washing to do or maybe you've used all your baking time watching re-runs of Gilmore Girls...I don't know, I'm only guessing...so when you're in a fix, don't fret, just chuck bicarb at stuff. With Love and Cake.


Honeycomb.
Original recipe from Nigella Express

A few notes:
  • This is best eaten as soon as poss really, it fairly quickly goes a bit bendy and overly chewy. It's so speedy to knock together I would make it an hour or 2 before it's needed.
Makes enough for 6-8 to have a nibble
You will need

A large piece of foil, oiled, set over a heatproof surface

100g caster sugar
4 tbsp golden syrup
1 1/2 tsp bicarbonate of soda

  • Mix together the sugar and syrup together in a small-medium saucepan.
  • Place the pan over a medium heat, don't stir beyond this point.
  • You want the mixture first to melt, then turn into a golden goo, then bubble fairly fiercely to the colour of maple syrup...hopefully taking around 3 minutes.
  • Take the pan off the heat and quickly whisk in the bicarb...it goes mighty poofy at this point, that's what we want.
  • Pour this immediately onto your oiled foil and leave it to cool and set.
  • When it's hard, bash or snap it into pieces.


Wednesday, 26 June 2013

Sour Cream Pound Cake.


This is my 'OMG Wimbledon is here, it must be officially summer, let's get excited' cake. This cake, strawbs and a bottle of elderflower bubbly was combined with a whole afternoon of tennis joy in celebration of the Monday kick-off. I LOVE it...the whole thing. 


However I know there are numerous mentalists out there who realllllllly are not bat and ball fans so I shall shhh for the time being and go back to the cake talk. So yes, cake. DO you know, I've never actually made a bundt cake before...ever. I'll let wikipepants explain properly but it is a pretty standard American shape of cake tin, filled with a cake dense and sturdy enough to hold it's holey shape when turned out.


Now, usually in my little corner of this blog world I try and keep the recipes ultra accessible and only really needing equipment that even the most basicest of bakers will have or that I suggest you aspire to having. So I'm sorry about this one. Not that I consider a bundt pan in ANY way a gimmicky piece of cookware...I mean, it's no Flexiado...but if you were in the market for a start up set of cake pans, I wouldn't include a bundt pan in the list.


However, I also must assume that people that read my ramblings must care about baking...it's not the genius prose that draws them in let's be honest, and I am excited about bundt pans and therefore think that some peeps out there might be too. They make a super simple and plain cake look fancy enough for Wimbledon and as long as you have a suitable recipe are not at ALL scary to use. So here cake lovers, have a suitable recipe. With Love and Cake.


Sour Cream Pound Cake.
Adapted from a recipe from The Kitchn

A few notes:
  • To make sure you don't have any disasters, first brush the inside of your cake tin with melted butter, then throw some flour in there and roll it around so that the layer of butter is coated in a layer of flour. This seemed to work fine for me, and it's a sturdy cake, so don't fret.


Makes 1 laaaaarge cake
You will need 

1 x 10" bundt or angel food cake pan, greased and floured (see notes)

385g plain flour
1/4 tsp bicarbonate of soda
pinch salt
225g butter, at room temperature
450g caster sugar
6 eggs
2 tsp vanilla extract
240ml sour cream

  • Preheat your oven to 160°c.
  • Weigh out the flour, bicarb and salt together and a bowl and set aside.
  • In a large mixing bowl, cream together the butter and sugar as best you can, though don't worry if it stays quite granular, there is a fair amount of sugar here.
  • Beat in the eggs one at a time, followed by the vanilla extract.
  • Add the sour cream and then sift over the dry ingredients you weighed out.
  • Using a metal spoon fold everything together gently until it is well combined.
  • Pour the mixture into your cake tin and give it a tap on the kitchen surface to allow any air bubbles to rise to the surface and escape.
  • Bake in the centre of your oven for 1 hour, checking whether it's cooked by inserting a skewer or knife....if it comes out clean, you're done, if there's a bit of uncooked mixture on it, give it another 5 minutes.
  • Let the cake cool in the tin for 10 minutes before turning it out.
  • Leave to cool completely on a wire wrack before slicing and getting the strawbs and Pimms involved.

Friday, 12 October 2012

Sturdy Stuffy Eccles Cakes.


When treats are required to withstand a journey with the Post Man, I mean Peeerson....you need to think sturdy; daintywainty cupcuakes will not do here. And if you’ve ever gone down this thinking road (this particular road I mean, not the ‘thinking in general’ one) then you might have reached the same conclusion as me; that sturdy food = the food of sturdy people. See...you have Cornish miners eating pasties on one side and boys in top hats getting caned, eating Eton Mess on the other.


So naturally when I received a request for a posted package of baked goods the other day my mind went to those sturdy northern folk (I had Dad in my head, obvs) and what they might take down their particular mines...or mills probs, those dark satanic ones. Eccles Cakes of coooourse.


Eccles Cakes could be nothing but northern (we’re talking northern English here folks, which is confusing because from where I’m sitting that looks kinda like downwards but heyho) with their rocky shape and bolstering sweet filling. And...I just found out that you’re meant to eat them with a wedge of cheese...and the only folk I've ever know to pair cake with cheese have been northern folk (Dad), but my goodness it makes sense doesn't it?


Don’t get me wrong, I’m not shunning posh, non-sturdy food, ohnono. I’ll dunk asparagus into a soft boiled egg with as much glee as the next south-westerly gal...but that would noooot look pretty after a shove through the letter box. With Love and Cake.

Eccles Cakes.
From Delia's Complete Cookery Course.

A few notes:
  • Doooooo feel free to use shop bought puff pastry...though northern people might judge you (jokes....they definitely won't).
  • You can make these as big or as little as you want, these are more bite sized than the big fist sized ones you usually see. just make sure you use a cutter a LOT bigger than you want the finished cake and adjust the cooking time accordingly. I used a cutter about 12cm across which gave cakes about 6cm across and needed 15 minutes.
Makes 10-20
You will need 

A large baking sheet, greased

1xquantity or homemade flaky pastry, made using 225g plain flour and 175g butter with exactly the same method

For the filling
75g butter
150g caster sugar
150g currants
50g candied peel
1 tsp ground cinnamon
1/2 tsp freshly grated nutmeg

To glaze
milk
demerara or granulated sugar

  • When you've got you're pastry all ready and chilled, preheat the oven to 220°c.
  • To make the fillinf simply melt the butter in a saucepan and then stir in all the other ingredients.
  • Roll the pastry out thinly; to about 3mm thick, and cut out rounds with a cutter or upturned glass (see notes re size).
  • Into the centre of each round, place a teaspoon of filling.
  • Brush water around the outside of the round and to seal, bring one side of the circle to the centre and the opposite side to meet it. Pinch them together to.
  • Keep doing this with the edges that are left, so you have a much smaller disc.
  • Place each sealed disc, the other way up so the sealed side is the bottom, onto your baking sheet.
  • Press each one down so it flattens and gets a bit wider.
  • Make 3 slashed in the top of each disc, brush with milk and sprinkle with sugar.
  • Bake for around 15 minutes until golden and puffy.
  • Remove from the baking sheet as soon as poss so they don't stick as the sugar sets and wait a biiiit before you tuck in, so the sugar doesn't stick to your tongue. But not tooooo long. Do the cheese thing if you fancy too.


Tuesday, 7 August 2012

Birsay Cheese Scones.


Oh cheeeeeese scones....one of my favs. Warm, next to a hot bowl of soup, you can do worse for a lovely lunch at any time of year. On a recent little trip to Orkney (islands, northynorthnorth, in case you were wondering) we had lunch at Birsay Tea Room that I, of course, had looked up prior. With a poorly boy in tow, tomato soup and a cheese scone sounded perfect, and my oh my did it deliver. 


Honestly best cheese scones EVER. Sometimes I think cheese scones are made especially for the veggies amongst us, which are of course, all hippies who only eat spelt and quinoa and brown things...whateves. In that case they are made big and heavy and full of brown.


These though, were light as a feather, all unhealthy whitewhite flour, and warm and sharp with cheese. Delish.


Helpfully, there was a little Birsay Tearoom recipe booklet for sale, perched on a shelf, and, rather cheekily, I took a peek inside to get their cheese scone secrets. After much puffin watching, hill walking and basking shark spotting, off I trotted home to cheese-scone-it-up Birsay style. And here we are....light as a feather and full of proper cheesey chunks. Butter or not, soup or not...but make, or else. With Love and Cake.


Cheese Scones.

A few notes:
  • As always, scones do not respond well to your involvement. Leave as well alone as you can, mixing just until combined and barely pressing them into shape. Be dainty.
  • Usually I say you can easily knock scones up in a food processor but because you want to keep the cheese in nice lumps I think it's not worth the effort of dragging it out of the cupboard just to rub the butter into the flour...though feel free, and just stir the cheese in afterwards.
Makes 6
You will need

a lined baking sheet

225g self raising flour
pinch salt
60g butter
100g strong cheddar cheese, cut into small cubes
6 tbsp milk, plus extra for glazing

  • First job is to get your oven nice and hot; 220°c.
  • Mix the salt into the flour and then run in the butter with your finger tips.
  • Stir the cheese in so it gets evenly distributed.
  • Pour in the milk and start to bring everything together with as light a touch as possible. You might need to add a teeny bit more or less milk depending on your situation so go steady.
  • I find it easiest at this point to lightly diving the dough into 6 just with my hands, saving the rolling and cutting out. Just gently pull off even sized balls and pat lightly onto your baking sheet.
  • Brush each scone with milk and bake for 10 minutes.
  • Mmmmm eat warm with soup and butter. Delish.


Friday, 20 July 2012

Moving Home Cherry Cake.


Apparently, when someone moves house, you’re meant to give them salt as a ‘new home’ gift; something about Slavic traditions and Jewish blessings. The thing is though, when you’re moving, even when you’ve moved, it usually takes a good long while before you can even see your new kitchen surfaces let alone know where your pot and pans are. And so you probably won’t be roasting potatoes or frying eggs or eating anything that requires your salt grinder to be freshly filled with any great hurry.


So when I knew I was soon to be off on a trip to stay with a lovely friend of mine, who had not only been moving but working crazy hard in the first busybusy weeks of an exciting new job, in her brand new flat, I knew salt wouldn’t reeeeally be an appropriate prez.


Cake though, cake would be welcome. The sight of a homemade cake sitting in an unfamiliar kitchen would add comfort. A substantial picnic style cake that keeps well and is low in sugar enough to act as dinner in fraught circumstances, could really be of some use. And so it was. And so it did.


So if you know someone who’s moving, or you get a new neighbour, maybe give the salt a miss and bake this cherry cake. The attributes; sturdy, filling and not too sweet, which make it perfect for picnics are the very same that make it THE ‘new home’ cake. And even if you don’t have that excuse, bake it anyway, it really is a treat. With Love and Cake.


Cherry Cake.
From Jane Brocket's wonderful book Cherry Cake and Ginger Beer.

A few notes:
  • The almond essence adds a touch of marzipanny-ness about the cake which, if you're a normal sane person, you will love. If you're a non-normal, non-sane person who doesn't favor marzipan, just leave out.
  • When this is a bit stale, it would be divine toasted and spread with a bit too much butter.
Makes 1 large loaf cake
You will need

1 loaf tin, around 23x13x7cm, greased and lined

225g self raising flour
100g ground almonds
zest of 1 unwaxed lemon
275g glacé cherries
225g butter, at room temperature
225g caster sugar
3 eggs
a few drops of almond essence (optional)
2 tbsp milk

  • Preheat the oven to 180°c.
  • Sift the flour and combine with the almonds and lemon zest.
  • Pop the cherries in the sieve and rinse them with cool water so all the sticky syrup gets washed off.
  • Give the cherries a good dry with kitchen paper and cut them in half.
  • Add them to the flour mixture and stir around so they each get a floury coating.
  • In a large, bowl, beat the butter and sugar together until light and fluffy looking and then beat in the eggs, one at a time, followed by the almond essence.
  • Fold the flour into the eggy bowl until everything is well combined and the cherries are evenly distributed.
  • Pour the mixture into your loaf tin and pop in the oven. Set the timer for 45 minutes, at which point the cake won't be cooked but you need to check if the top is browning too quickly and at risk of burning. If that is the case wrap the top of the cake in foil and pop back in the oven for 15-20 minutes. It's done when the top is golden and the centre is firm when you push down on it lightly.
  • Leave to cool for a good while in the loaf tin; at least 15 minutes, and then turn the cake out onto a wire rack to cool completely.
  • Hand over to your kitchen-less chum if you can bring yourself to part with it....maybe make 2.


Wednesday, 4 July 2012

We Need S'mores Bars.


There are a LOT of things that we (as in the good old British folk) like to laugh at when it comes to our American chums. I get to laugh at them a bit more than average I think, given the proximity of St Andrews to my little house and therefore mt proximity to a LOT of American golfer chaps running around that teeny town being (loudly) in awe about just how cute everything is.

  (If you're American, pleaseplease don't be offended, and keep reading, I'm about to say something nice, I promise)


There is aaaaalso a LOT of things that these American chums do that we, the Brits, need to pay attention to and that is missing from our little island. I’m talking Peanut Butter M&Ms, Butterfingers, Old Bay Seasoning, PRETZEL M&Ms ...who knew, Fluffernutters, s’mores.... 


S’mores. Why on EARTH do we not have s’mores. Have you even heard of them. I’m sure I hadn’t until I was some ridiculously old age....like 22. If not I will educate you....a s’more is something cooooool American folk make when they have camp fires or light up their grill. It’s basically a sandwich made of a toasted marshmallows and bit of chocolate and 2 Graham (as in grraaaaam) crackers. Look. And look.


Good heavens we must be missing out. Next barbeque, I am hitting s’more town. The thing is though, it kind of feels, up here in the frozen wastelands, like the next barbeque won’t be for another squillion years. Plluusss there’s the ‘marshmallows not being veggie’ situation. So here comes a recipe to the rescue, it’s here to save us from our poor s’more-less lives. Aaaand is a little nod to the 4th July. Phew, we're saved. With Love and Cake.


Baked S'mores Bars.

A few notes:
  • I used Fluff, that magic 'marshmallow in a jar' stuff that I talked about here, but I know that might not be the easiest thing to find. If that's the case then why not have a go with using real proper marshmallows (if you're not veggie that is). I would go for mini ones, and I'm sure they'd be proper lovely.
  • Use whatever chocolate you like. Do correct me if I'm wrong but I'm under the impression that Hersheys is de rigueur. Here, I used milk chocolate chips but you could happily use your fav and just make sure you chop it fairly small.
  • You could make the biscuit dough in a food processor, just whizzing it all up together. I just didn't really think of that at the times so got my hands dirty the old fashioned way.
Makes about 12
You will need

1xshallow baking pan, 18x30cm, lined with greaseproof paper

170g wholemeal flour
180g plain flour
50g rolled oats
a sprinkle of salt
2 tsp baking powder
150g butter
80g soft brown sugar
6-8 tbsp milk
150g milk chocolate, in chips or finely chopped
1/2 jar Fluff, or a good handful of mini marshmallows

  • First job, as per usual....preheat your oven to 180°c.
  • Now to make the biscuit part...mix the two flours, oats,  salt and baking powder in a large bowl.
  • Rub in the butter with your finger tips so the mix has the consistence of breadcrumbs.
  • Stir through the sugar and then add the milk, starting with 6 tbsps and adding more, bit by bit, if the dough needs it to come together so it's not too wet but not too stiff.
  • Split the dough in half and press one half into an even layer in the lined baking pan.
  • Bake the biscuit layer for 12 minutes.
  • As soon as it's out of the oven, sprinkle over the chocolate and spread the Fluff over that (as best you can, it's sticky stuff), or sprinkle over your marshmallows.
  • Now for the last biscuit layer. I think the easiest thing to do is to sprinkle it all over in clumps and and press it down a bit...don't worry it won't be perfect and smooth but a bit nubbley and craggy, all the better for it I think.
  • Get everything in the oven for another 25ish minutes until goooolden brown and oooooozy in the middle.
  • If you can, eat around the camp fire....though no worries if it's sofa and woolly socks that are more appropriate.


Friday, 22 June 2012

Portuguese Custard Tarts.


Helllllloo there. This 'ere is a Dad pud. But that's kind of weird, because Dad has a thing for horrid puds, uh like trifle and custard tart and things that are squishy and wobbly. But this, these little round, rustic looking tarts, are lovely as well as being Dad-ish. 


Well I guess he doesn't just like things I think are bad....we both have a strong affection for Thomas Hardy, and he likes Bruce and his E Street Band, who, of course, I likelikeLOVE, and pastry, oh yesss we do both quite like a bit of pastry.


It's just odd because I think of custard tart as something Dad likes, because, you know, he has to because he's Northern (don't know why I think of it as a Northern treat, because it's not, but heyho.....), and it's something I would nnneeever choose. BUT...loook at theeeese, how can one not like them. They have a much higher pastry to filling ratio than a slice of the English classic, aaaaand it's puff pastry so is all light and lovely and means the wobbly, vanilla heavy filling is always accompanied by a texture that isn't jellyish.


In short these are very very tasty and likeable, especially if you're a custard tart fan, and even if you're not usually. So make them...and make a pavlova with the egg whites you have left over and feast, or...the other way round. With Love and Cake.


Portuguese Custard Tarts.
Recipe from Pastry by Richard Bertinet.

A few notes:
  • This is the sort of recipe for which the type of tin you use reallyreally makes a difference. You really want a good quality, heavy and non-stick muffin pan, otherwise be prepared for sticking and spilling and tears. The tarts will still taste lovely of course but I wouldn't risk your heart.
  • These are however, meant to look misshapen and burnt on top. The cinnamon gets sort of singed and gives a lovely smokey flavour and the homemade feel is a major part of the joy.
  • You might have a bit of creme patissiere and pastry left over...you can either make more tarts or do what I did and freeze both bits of leftovers with plans to head into improvised danish pastry territory sometime soon.
  • DON'T be scared of creme patissiere, the name of the method.
Makes 12
You will need

a 12 hole muffin pan, greased very well

For the creme patissiere
500ml whole milk
seeds of 1 vanilla pod or splosh of vanilla extract
6 egg yolks
120g caster sugar
50g plain flour

2 x quantities of homemade quick flaky pastry or 500g of shop bought puff pastry
sprinkling of cinnamon

  • First job is to make the creme patissiere...so pop the milk and vanilla in a fairly large, heavy bottomed (heeee) saucepan and heat until almost boiling.
  • Meanwhile whisk the egg yolks and sugar together in a bowl until the mixture has expanded and is light and creamy looking.
  • Then whisk the flour in to the egg mixture.
  • When the milk is juuuuuust starting to bubble, slowly slowly pour it over the egg yolks, whisking all the time.
  • When the milk is all whisked in, pour the custard back into the pan and heat gently until it comes to the boil, whisking fairly often so as not to let the bottom catch and burn.
  • Cook at boiling point for 1 minutes, whisking constantly and it should thicken to a nice thick, heaven scented mixture.
  • That's it, you've made creme patissiere. Pop it in a clean bowl and allow to cool and then chill until you need it.
  • Then it's time to make the pastry or pop to the shops to buy some.
  • When you're custard tart ready, preheat the oven to 180°c and roll out the pastry in lots of icing sugar and cut circles big enough to line your muffin pan so you have a good almost-centimetre of overhang.
  • Press the pastry circles into the muffin holes and fill with creme pattissiere.
  • Sprinkle cinnamon over the top of each tart if you fancy, though it is very optional, and pop in the oven to bake until the pastry is golden and the custard is wrinkly and singed.
  • When the tarts are out of the oven leave for just a few moments before carefully removing them from the pan...if you leave them for any longer the icing sugary bits will harden and stick everything together with devastating effect.
  • Eat, I think, at room temperature, with Dad if can.


Friday, 8 June 2012

Iced Coffee...In Hope.


Okok I know todaaaaaay might not be an Iced Coffee day. Well it might be with you I guess, living in the microclimate of eternal sunshine and crystal seas of Cornwall, but I know most places, on this June day (JUNE...COME ON), are facing weather warnings and inside out umbrellas.


Seriously....Whhhhhhy do we do this to ourselves. ‘Summer’. It doesn’t meaaaaan anything. “Have a nice summer.” “What shall we do this summer.” “See you over the summer.” Really, summer = that time when Wimbledon gets rained on, Glastonbury gets rained on and the washing, hung outside in a cloud free moment, gets rained on.


The most important summer related phrase is “are you going anywhere nice this summer?” Because really, that’s the only thing to do...ruuuun. Run to somewhere with a real summer. Somewhere where you don’t risk a heart attack by jumping in the sea. And somewhere where Iced Coffee is the standard, not the celebration of 2 hours of temps above 20°.


Heck...we live here though, so we best just buck up, pop the heating back on and get on with it I spose. Howeeeveeeeer in eternal hope, I suggest you get some of this ready and waiting in your freezer, just in case there’s a day around the corner on which the sun shines favourable on us, because when that day arrives, yes when, it'll be too late. Fingers cross, sun dance danced and sun god worshipped. With Love and Cake.


Iced Coffee.

A few notes:
  • Basically this is coffee ice cubes, defrosted in milk. Simple. So I won't get faffy with specific measurements. Hope you don't mind.
  • It's actually a great way to use up coffee that's left over, and has maybe been sitting around in the cafetiere for a while. Any time you find more than just the dregs left over, pour them in an ice cube tray and add to your stash.
  • I usually put a lot of sugar in the coffee before I freeze it. I like supersweet coffee anyway but something happens to cold coffee which I think makes it extra bitter. So maybe give it a quick taste before you freeze it and make it a tad sweeter than you would usually enjoy.
You will need 

Strong black coffee
sugar
milk

  • Ok so first you need to sweeten your black coffee to just a bit sweeter than you usually like by stirring in some sugar so it dissolves (see notes).
  • Then pour it into ice cube trays and pop in your freezer.
  • When it's frozen, transfer your coffee ice cubes into a plastic food bag and keep stashed at the bag of your freezer and keep your fingers crossed for a sunny day.
  • On that elusive occasion, a few hours before you want the drink, or maybe before a picnic a or lunch, fill your vessel; be it a single glass, big jug, or outdoors friendly Thermos, with your coffee ice cubes and pour over enough of your favourite milk to cover.
  • Slowly slowly the coffee goodness will melt into it's milky surroundings and give you heaven on a hot day. Enjoy. And never EVER complain about the heat. 


Tuesday, 24 April 2012

Macarooooons.


Hello, yes oh hiii. Today my dear I have for you...Macaroooooooons. Not Macarons. Nono not those delicate little French treats that have been oh so ‘trendy yah’ for a while now and come in pink and yellow and green and purple and rainbow stripes (probably) and are so achingly pretty that they make you wish you lived in Paris and just wandered round all day in the sun with a box of twelve, that you probably paid 50 Euros for, hooked under your arm. Please don’t read snobbery or rolley eyeyness into this teeny little rant...it’s only that I haven’t quite mastered these yet. You can be sure that when I do I shall be waxing lyrical about their wonderfulness, and lamenting that I am 2 years late to the macaron party.


I digress. Yes macarooooooons; as in the veryvery English version that the Famous Five ate platefuls of, with much ginger beer of course. I think I’m right in saying, and either way this will prove my status as the MOST uncool person that there ever was, that it’s in Five on Finniston Farm that they outrage a café owner by eating her entire stash in one sitting. Fatties.


I digress. Again. Instead of light-as-air little meringue-ey bites, these are bendy and chewy and have a strong hint of almond...no pistachio, no raspberry, no rainbows. Just a really good biscuit.


I guess the differences between these two types of confectionary are quite a good representation of the stereotypical differences between the English and the French...our version is not stylish but sturdy, not fancy but pretty, not complex but predictable, and really likes to sit next to a cup of tea or a cold glass of ginger beer. A bit like you really. HA jokes. With Love and Cake. 


Macaroon.
From The Hamlyn All Colour Book of Tea Time Treats.

A few notes:
  • Traditionally these are baked onto rice paper, which is edible. If you can find this, BRILL, tell me where you got it. If like me, you can't, or like me, can't be bothered to really look particularly hard, no probs, just make sure you grease your baking tray well and remove them from it as gently and as soon out of the oven as poss, using something flat and thin like a palate knife. This is all because they don't form a crust on their bottom which means they're sticky little blighters.
  • To get the most even shape and size of biscuits, it's best to use a piping bag, but do not panic if this isn't an option for you, a teaspoon will do just fine. You can see from my pics that a piping bag does not guarantee cheffy perfection anyway. 
Makes 10-12
You will need

a large baking sheet, well greased with butter or oil

100g ground almonds
100g caster sugar
2 egg whites
1/2 teaspoon almond essence
10-12 whole almonds

  • First job, preheat the oven to 180°c.
  • Mix the almonds and sugar together in a medium bowl.
  • Then, in a larger bowl, whisk the egg whites until nice and stiff and you can do the holding-it-upside-down-over-your-head-thing.
  • Gently fold the almond mixture and essence into the egg whites with a metal spoon.
  • Add the mixture to your piping bag if using and pipe or spoon about 10 rounds onto your baking sheet.
  • Press a whole almond onto the top of each disc and get them into the oven.
  • Bake for 20 minutes, until just golden and slightly firm.
  • Remove from the baking tray (see note) to a wire rack to cool. Ooooor eat, asap, on Finniston Farm.


Thursday, 29 March 2012

Outside Eating Sausage Rolls.


Here we are, another use for this super special homemade pastry I told you about the other day and it’s picnic tiiiiime! Or at least it’s time to stop thinking that popping outside for 5 minutes on your lunch break is the craziest thing in the world.


Now I’m not of the “heck it’s 15°c, it must be shorts and flip flops weather” school. It takes a good additional 10 degrees for sandals to even remotely be considered. But on sunshiney days early on in the year when hats and scarves and double, triple layer socks are not a distant memory and not out of the question for next week, it feels like every minute that can be squeezed out of the great outdoors, should be. And that means nibbles outside as well as walks and runs and sitting and chats.


Not barbeques or big banquets with bunting and candelabras like you see in foodie magazines- someday, but snacks on a picnic bench, or a weekend lunch in the park or a break from a walk on the beach. And theeeese sausageysausage rolls are perfect for all such occasions as well as packed lunches and parties. Being a veggie I tend to delegate the squishing up sausages bit, but the rest is easypeasy. Aaaand these is a delicious veggie version which I will have to tell you about sometime soon, should you feel that way inclined, which, little Sis, I know you are.


Both this recipe and the veggie one have never feeled to be met with praise and mmmmms, in my experience, out of proportion with the effort you are required to invest...always a bonus. With Love and Cake.


Sausage Roll
Adapted from Delia's recipe (deliaonline.com)

A few notes:
  • These are great to have in the freezer, made up but not cooked, because you can just whack them in the oven, cook from frozen, and you have homemade sausage rolls in half an hour.
  • As I said here, using good, shop bought butter puff pastry should not really be considered a cheat, so feel free to do that...and these will come together in no time at all. 
  • You can make these as big or as bite sized as you wish, just tweaking the cooking time a bit to suit. Really the recipe in terms of amounts is not important, just as long as the amount of meat you have matches the amount of pastry. 
Makes 10ish, depending on how big you make them
You will need 

1 quantity of this homemade flaky pastry or a 375g-ish packet of shop puff pastry, chilled 
4-6 your favourite sausages 
A few spring onions, finely chopped 
Pinch cayenne pepper 
1 egg, lightly beaten 

  • Preheat the oven to 200°c. 
  • Right let’s go, squidge the sausage meat out of their skins and mash it up a bit with the onions and pepper. 
  • Now for the pastry. On a clean floured surface, roll out your chilled pastry into a long rectangle, with a width of around 3 times the width you want your sausage rolls. You might find it easier to work with it in 2 halves or thirds so you have to work with less at a time. 
  • Go back to your meat and roll it back into sausage shapes, which I tend to keep a bit skinnier than the nice fat sausages I use. 
  • Then lay the meet down the centre of the pastry, as in the picture above and brush some egg down one side. 
  • Fold the un-egged side up and around the meat and meet it with the eggy side so it overlaps a little, and press down to seal. 
  • Turn your big sausage roll over so that the seam is underneath and slice into individual sausage rolls. I tend to go for ones that are around 2 inches long. 
  • Now carefully move them over to a greased baking sheet and snip little slits into the top of each one, then brush all over with egg. 
  • Time to bake in the oven for 20-25 minutes until golden and shiny and then cool on a wire rack until it’s time to head out into the sunshine (hopefully).