Tuesday, 28 February 2012

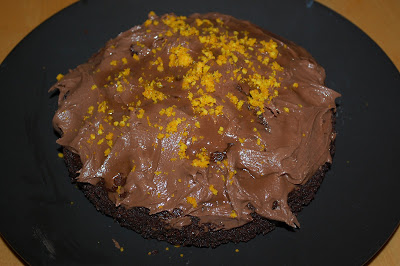
Mocha Self-Saucing Pudding.


Oh hiiii, thanks for visiting. I like it when people give me recipes, or direct me to them. Sometimes I like it because it saves me a decision; decision making is not my strong point, in fact I could probably win an award for being bad at it. Sometimes I like it because it means I make something I probably wouldn't have otherwise; contributing to the achievement of my ultimate goal...to have made eeeeveeeerything.


And sometimes I like it because of how it makes me feel like someone knows me a bit and has thought of me, in my favourite context, when I'm not even there. More than that they go to the effort of remembering the thought and passing it on to me.


This pud is a product of the latter. A lovely lady that I work with tore out a page of The Sunday Times supplement. Briiiiiiiiill, both for the recipe and the fact that I'm not quite high brow enough to buy such words every week, but LOVE reading the supplements (aaaaaand it meant that I got to indulge my Giles Coren fetish by reading half of his review- it was enough). 


This sort of pud is often called a self-saucing one, because, well eeer, it self-sauces.  But when my friend was telling me about the recipe she kept forgetting the phrase and went with 'self-healing, self-loving, self-whatever.....'. So here we are. Self-healing, self-saucing Mocha Pudding, pretty accurate I'd say. With Love and Cake.


Mocha Self-Saucing Pudding
Adapted from a Donna Hay recipe in The Sunday Times

A few notes:
  • This recipe seems aaaaaall wrong...doing it in a pan, pouring batter onto liquid. You will think "really??", but just do it as I tell you, and it will come good.
  • I used instant espresso powder which has a finer texture and stronger taste that regular instant coffee, but if that's what you have you could push it through a sieve or bash it up in a pestle and mortar to make it finer.
Serves 4-6 
You will need

a 15-18cm ovenproof sauce/frying pan

125ml milk
35g butter, melted
1 egg
1 tsp vanilla
150g plain flour
1 1/2 tsp baking powder
1 tbsp instant espresso powder
30g ground almonds
45g + 90g soft brown sugar
1 1/2 tbsp cocoa
250ml water

  • First job, preheat your oven to 180°c.
  • Now whisk together the milk, melted butter, egg and vanilla extract in a medium bowl or measuring jug.
  • Then stir together the flour, baking powder, espresso powder, ground almonds and 45g brown sugar in a large bowl.
  • Pour the milky mix over the flour mix and whisk to nicely combine. Set aside for a mo.
  • Put the 90g of sugar, cocoa and water in your sauce/frying pan and stir over a medium heat so the sugar dissolves, then slowly bring to the boil.
  • Then take the pan off the heat and pour the coffee-ee batter over the top.
  • Pop the pan in the oven for 20ish minutes, until the sponge is firm in the centre.
  • Mmmmm serve with cream.


Friday, 24 February 2012

Moving Home Cherry Flapjack.


Good Afternoon. Did you know I’m moving? Yes that’s right, moving house moving. It’s crept up on me a bit, we’ve been thinking that it was a good idea for ages now, but umming and aaaring about if it really was best and where we should go dadidada and then all of a sudden, we’ve got to be gone from our lovely seaside flat next week. Aaah I really only just realised how soon it was just the other day...woops.


We’re not going to a far away new place or for any particularly exciting reason but moving is moving. Moving is sorting STUFF, and packing STUFF and buying home magazines so you can imagine that your teensy one bedroom can somehow be transformed into a vintage interior-ed giant country pile and moving is, most relevantly to this little computer-based space, eating your way through the freezer and getting inventive with half a packet of pasta and a tin of baked beans.


I kind of like culinary constraints like that sometimes, if you still want deliciousness it means you have to get creative and think and make in a way that maybe you wouldn’t otherwise. These flapjacks are that. I definitely wouldn’t have added local frozen cherries to the humble flapjack, or made them with half oats and half oatmeal, were I not trying to save these ingredients a journey, especially before I have even given you a recipe for lovely normalnormal flapjacks...and that would have been a shame because I wouldn’t have had my flapjacks studded with shiny black jewels, maybe I wouldn’t have made them at all. I always forget how lovely the product of just a few stirs can be until the syrupy smell wafts from the oven. We all would have missed out.


So half oats and half oatmeal and half “I’m sorry I’m inflicting my self inflicted culinary constraints on you” and half “YeY let’s get creative and read Country Living”. You don’t need to be moving to make these...use my inconvenience to your tummy’s benefit. With Love and Cake.


Cherry Studded Flapjacks

A few notes:
  • I used my cherries straight from the freezer, stirring them in frozen. You could absolutely use fresh ones but I imagine they would get a bit more mushed and turn everything a bit more cherry coloured. Nothing wrong with that though.
  • If you haven't got oatmeal and frozen cherries to use up and just want normalnormal flapjack, leave both ingredients out and double the quantity of oats.
  • Feel free to add whatever you fancy instead of the cherries too; dried fruit, nuts, chocolate chips....
Makes 9 fat squares
You will need

a 20cm square tin, greased and lined

100g butter
100g soft brown sugar
3 tbsp golden syrup
110g oats
110g oatmeal
175g cherries

  • First as usual preheat your oven to 180°c.
  • Now gently heat you butter, sugar and syrup in a nice big pan, stirringstirring until the butter has melted and the sugar mostly dissolved.
  • Stir in the oats until really well combined then gently stir through your cherries.
  • Tumble the mixture into your prepared tin and smooth and press the top of the oats down to fill every nook and cranny of your tin and to get a nice shiny surface.
  • Bake for around 30 minutes until bronzed all over.
  • Cut into squares and run a knife around the edge of the tin while the flapjacks are still warm so you don't get your edges stuck and then leave it all to cool completely in the tin.
  • Eat with a nice cup of tea on the side. 


Tuesday, 21 February 2012

Half Term Home Trip Eats.

Hello...How's things? I've just got back from a little trip home where I spend half term: in Sunny Somerset. Here is what I ate/sipped...


Saturday, 18 February 2012

Maple Syrup Scones: a Transitional Scone.


Oh Hiiiiiii. Scones. Yesssssss. It's sooooo almost scones season. Oh ok I know it's not really 'almost' but it's a thought I cling to as I shut the curtains at half 4 rather than half 3 and when I can run through the park without fearing for my death resulting from a trip over a root because I can NOT see where I'm going.


And these are THE perfect transitional scones; not an airy fairy cream and jam summer scone but also not an 'eat this and you're set for an ice marathon' winter scone. Crispy on the outside, spongy on the inside they are a wonderful February weekend breakfast.


They also act in contribution to the beating of that horrid feeling which my tummy always gets this time of year as it gets tired out of digesting hot heavy winter carbs, yet still really wants and needs them. The oats are a nice and friendly type of stodge and the maple syrup a rather worthy feeling sugar.


Another positive supplied by these little lumps of cheer is the fact that they enabled Mr Love and Cake and I to technically have the same breakfast. Well there was no bacon on mine, and no banana on his but still, the premise was the same and that's the sort of simple Saturday morning harmony that should be cherished (okokok quit your pretend vomiting, you know I'm a big fat sap). With Love and Cake.


Maple Syrup Scones
Adapted from Rose Bakery's Breakfast, Lunch, Tea.

A few notes:
  • As with all scones, the less intervention; pressing and squashing and rolling, the better. See here for my 'perfect scone tips'. The only thing is, because of the inclusion of the oats in the dough, I didn't want to use a food processor, so just rubbed the butter in with a plain old fingers.
  • If you don't have any wholemeal flour and don't fancy buying some just replace it with more plain.
  • You can of course use round cutters if you fancy, I just find cutting squares with a knife means less dough squashing and hence increases your chances of super light scones.
Makes 8
You will need

A heavily greased or lined baking sheet

260g plain flour
80g wholemeal bread flour
35g oats, plus extra for topping
1 heaped tbsp baking powder
1 heaped tbsp caster sugar
160g cold butter, cubed
4 tbsp maple syrup

4 tbsp milk, plus extra for glazing

  • First let your oven preheat to 200 °c.
  • Next combine the flours, oats, baking powder and sugar in a large bowl and rub in the butter until it just about starts to look like fine breadcrumbs, though don't go at it for too long.
  • Then make a well in the centre and add the milk and maple syrup to the mixture. First mix it in with a fork and then get your hands in there and softlysoftly bring the dough together, adding more milk if you need.
  • Turn out onto a floured surface and cut the dough in half. Shape each half into a rough square, about 4 or 5 cm think. 
  • Cut each square into 4 smaller squares and transfer each scone onto your baking sheet.
  • Bake for 15 minutes until golden brown. They will still be a bit squishy so leave to cool on the baking sheet for 5 or 10 minutes before transferring to a wire wrack ooooor splitting open and getting creative with your toppings. Bacon went down well and my bananas were brill. May I suggest giving toasted pecans a try too...whatever, a drizzle of more syrup is a must. 


Saturday, 11 February 2012

Mini Lemon Loaves.


Oh dear, I've just realised that the recipe I have for you today is the 3rd one from Nigella's How to be a Domestic Goddess since Christmas. Sorry. I usually like to mix it up, getting lots of different inspiration from lots of different places, but with Nigella on my shelf, well, I find it hard to focus on anything else given the beam of golden light and angel-song that emanates from her and her books.


I got an Amazon giftcard for Christmas you see (thAAAnks Mark and Nicky), and of course my immediate thought was "Mad Men season 4...YESSSSSS", thought whilst participating in a little jig. And theeeeeeen it turned out, joy of joys, that I had just enough prezzy pennies left for Nige and her Domestic Goddess Guide, which is a book I've wanted for 10 billion years.


So of course I've devoured every single word. This little bit is my favourite: "Though description is irrelevant: the utter gorgeousness of just one bite of these chocolate macaroons reveals the rank inadequacies of language. Eat them: that's enough." That's how I feel about most of my waffle on here...I'm telling you about it because it's wonderful to eat, so really, all I'm ever saying is 'pleaseplease just make it then eat it'. 


I hope you don't mind my Nige-athon, because I have a feeling it's going to be a long one. With Love and Cake.


Mini Lemon Loaf Cakes
Adapted from Nigella's How to be a Domestic Goddess.

A few notes:
  • Nige actually makes mini lime loaves but I wanted lemon. You feel free to use any citrus flavour you like, just make sure you use unwaxed, otherwise you'll end up with the zest drying out and being "a bit like hair". Wooopsiiiiies my mistake.
  • Don't worry if you don't have an amazing Secret Santa friend who gives you vintage mini loaf tins for Christmas, just use fairy cake cases in a fairy cake tin.
Makes 8-10
You will need

mini cake tins, lined; I improvised with grease-proof paper

125g soft butter
175h caster sugar
2 eggs
zest of 1 lemon
175g self-raising flour
4 tbsp milk

For the syrup
4 tbsp lemon juice (juice of around 1 lemon)
100g icing sugar

  • Preheat your oven to 180 °c.
  • Now cream your butter and sugar together until lightened in colour and then beat in the eggs, one at a time, and the zest until creamy and fluffy looking.
  • Next fold in the flour and milk and spoon into your lined tins.
  • Bake for 20-25 minutes, until risen and golden.
  • While the cakes are cooking prepare the syrup by heating the juice and sugar in a little saucepan over a low heat until the sugar has dissolved.
  • As soon as the cakes are out of the oven prick all over with a skewer or cocktail stick or even a bit a dry spaghetti, and pour over the syrup slowly, allowing it to be absorbed all over. You might want to go over them twice, adding just a bit of syrup at a time, so it gets soaked in evenly. 
  • Leave the cakes in the tin for a good while, until nicely cooled and properly soaked.
  • Then turn out and enjoy.


Tuesday, 7 February 2012

Peanut Butter Squares: Treats For a Soldier.


My friend Hayley. You've met her haven't you? So you'll know how fab she is, and if not, well I will tell you. She is bright and breezy and beautiful and just downright unstoppable when it comes to having fun. She is also the person with whom I shared the majority of my baking experiences through college and university; fudge being our 'specialty' (you can infer from the apostrophes that it was the thing we made most consistently, rather than success being the most consistent occurrence).


So again, she is fab. But here's the thing, since I last saw her at Christmas, Hayz has been rather unfeelingly whisked away to Sandhurst, where she is learning to save the world. Of course all of us Hayley fans are uber proud of her; when I say 'whisked away', what I really mean is that she spent many an hour runningrunningrunning up, over, under as well as swotting up on classical music and politics so she could impress on rather intense and numerous army 'auditions'.


But hearing what she's getting up to on a daily basis is nothing short of gut-wrenching. It seems to go a bit like this: up to a watery breakfast at 5am, shoutyshouty, pushuppushuppushup, shoutyshouty, bed at 1am. Oh and she has to eat 5000 calories a day. FIVE THOUSAND! Don't get me wrong, I'm sure on each of our baking days we each consumed that in sugar alone, but I don't thiiiiiiink the British Army feed you millionaire's shortbread.


So little Miss Hayley is in need of some treats- big time. Utterly delicious sweet treats with a hint of nostalgia (we used to make peanut butter millionaire's shortbread). But if you're not in the army and doing a squillion push ups a day, no worries, just think of these as homemade Reese's Cups...enough said. With Love and Cake.


Peanut Butter Squares
From Nigella (oh how I love her)'s How to be a Domestic Godess

A few notes:
  • These are soooooo much easier made in a food processor, so do that if you can. If that's not an option though, no probs, you can use a good old fashioned bowl and spoon, it'll just take a little more time and burn a few more calories, but that way you can eat more...hurrah.
  • If you prefer you can roll the sandy peanut butter mixture into bite-sized balls, pop in  mini cupcake cases and drizzle the chocolate mix over. I guess you could say that they look slightly more elegant that way, especially if topped with a silver ball or star.
  • Feel free to mix up and chop and change the proportions of different types of chocolate depending on what you prefer or just what you have around.
Makes 30-40
You will need

a small-ish square, loose bottomed cake tin, lined

For the base
50g dark muscovado sugar
200g icing sugar
50g soft butter
200g smooth peanut butter

For the top
200g milk chocolate 
100g dark chocolate
around 1 tbsp butter

  • So let's do this. Pop all the ingredients for the base in a food processor and whiz to a sandy, clumpy mixture or do the same by hand in a bowl. Don't worry if the muscovado sugar remains a bit nubbly, it even looks like that in Nigella's picture.
  • Tip the mix into your tin and press out to as even a layer as poss with your hands or a spatula.
  • To make the topping, melt all the ingredients together slowly, without too much stirring, in a microwave or in a bowl over a just-simmering pan of water.
  • Pour over the base and pop in the fridge to set.
  • When you're ready, turn out the slab of joy from the pan and chop into squares, or any size you fancy really. 
  • Eat without doing any push ups. Ever.


Thursday, 2 February 2012

Poppy Seed Buttermilk Pancakes.


Heelllooooo there heeeen. Did you know that I’m a bit of a breakfast fiend? I’ve probably already told you, I do that a lot. Any excuse to take a leisurely, treat laden ‘weekend’ breakfast (you need the apostrophes here because, as sad as it is, not everyone’s weekends are Saturday and Sunday specific) and I grab it with both hands, well one hand, while the other clutches at numerous recipe books.


The thing is though, my breakfast mojo has been lying dormant recently. Apart from the Banana Muffins I told you about last week, which really were more of an exercise in using up black bananas than satisfying any greed, I haven’t really worn my treat breakfast cooking hat for a while. Well, I guess that’s not entirely true, I have knocked up these Pan Waffles a few times, because they’re just so delightfully suited to chilly Scottish winter mornings. But for me, part of the treat of a treat breakfast comes from the planning of something new, the scrolling through blogs, leafing through books until a new idea forms in my little book of recipes. A good bit of the treat is going to bed with a new notion in my head; knowing that there’s only a sleep between me and previously undiscovered joy.


This is where I was meant to go on to tell you that HurraH, my breakfast mojo is awake again and here I am being all smug having made my own Danish pastries. But instead it goes more like...at 10.30pm last night, when the kitchen was still messy from dinner, I couldn’t reeeeeally be bothered to peel myself from the sofa and remain vertical for long enough to implement the plan of getting things ready for overnight chilling and hence effortless danish pastries being produced in the morning.


But it’s ok, because I COULD be bothered to switch on the ol’ computer and have a trawl through my favourite places in search of an alternative....et viola. Fabulous little pancakes; a doddle to put together, the perfect use of the buttermilk which I bought purely because I found it, in Scotland (woop) and a teeny hint of a taste, provided by the poppy seeds, the joy of which, you can’t really put your finger on but it’s definitely there. So maybe I’ll get back to you with smugness another time, but for now, I’ll take these, with absolutely no feeling of guilt over my laziness. With Love and Cake.


Poppy seed and Buttermilk Pancakes
Inspired by 101 Cookbooks.

A few notes:
  • If you live in Scotland too, or an equivalent where buttermilk and such exotic products, like ooo fruit, is scare you can substitute yogurt, or you could make your own by squeezing half a lemon or so into normal milk and setting aside for 15 minutes to sort of curdle.
  • These aren't the bounciest or springiest of pancakes, more crisp on the outside and dense in the middle. If you would prefer that perhaps just stir some popper seeds through the batter of these basic breakfast pancakes.
  • I didn’t use a blender for these like I usually do for making pancakes because I didn't want to mash up the seeds. Do feel free to though.
  • Although I don’t usually go in for using cup measures American styleee, I think for a morning time batter, just grabbing a nearby mug and using that to gauge proportions is much less effort-ful than getting out the scales. So when I say cup, I mean an average sized mug.

Makes around 10 medium sized pancakes
You will need

A frying pan (I use 2 to speed the process up)

1 cup plain flour
½ tsp baking powder
A pinch bicarbonate of soda
A 250g tub buttermilk
½ cup milk
1 egg
1 tbsp melted butter, plus extra for greasing
1 tbsp poppy seeds

  • So it’s easypeasy really, just get your pan on a medium-to-high heat.
  • Now mix together the dry ingredients in a big bowl.
  • Then whisk in the wet ingredients so you have a smooth batter, a bit thicker than double cream.
  • Plop a blob of butter in your hot pan and swirl it all around so it gets nice and melty.
  • Now pop spoonfuls of batter in your pan and let them cook away. It’s really up to you how big you make them, I like them big enough to feel generous without them being a nightmare to flip; I think a tablespoon or two of batter at a time does the job.
  • When you can see that the batter is cooking around the outside of the disc and bubbles are finding their way up to the surface, it’s time to flip.
  • When they’re dappled golden brown on both sides pop them on a plate for immediate consumption or store in a warm oven while you get on with cooking the rest of the batter.
  • Either way, when it’s time for eating I suggest a good dollop of marmalade, but as always, pancake consumption is open to interpretation....