Sunday, 26 May 2013

Peanut Putter Granola.


Feeling preeeeetty proud of myself with this one. I didn't really mean it to be anything fancy or 'write home' worthy. I just saw the words 'peanut butter granola' on Pinterest and knew I had to get me some of that....asap.


In fact it isn't fancy at all; a handful of store cupboard ingredients and a bit of stirring and you honestly can have this come together in less than 30 minutes, and not in a Jamie Oliver way. It's one of those recipes that you want to show people that don't cook and can't be bothered to learn and go "LOOK, it's SOSO easy". As well as easy, it's also soso good; one of those recipes whose equation doesn't make sense; you get WAY more pleasure out than the amount of effort and resources you put in.


Turns out it's also pretty great in terms of being something useful to eat...you're bod needs pretty much all of the things that it has to offer, and you can definitely count it as a contribution to my answer to your healthy snacks question (and my rant).


And one more thing to tell you...it's not all that sweet; sweet enough for me (sugar fiend), but I think lots of people are put off cereal type things like this because they think they are sugar laden and aren't ready for such a sweet hit first thing in the morning (WHY??). This is not like that; just mellow and peanut buttery. YUM. With Love and Cake.  


Peanut Butter Granola.

A few notes:
  • If you don't have maple syrup, honey would work just as well I should think.
  • As with all cereal thingys, add whatever you want to the final mix; dried fruit, nuts, spices, and serve with whatever you fancy. I love it plain and simple with milk though.
Makes 4 large servings or more snacky sizes
You will need

1 x baking sheet, greased

2 tbsp your fav peanut butter
2 tbsp maple syrup
1/2 tsp cinnamon
1/2 tsp vanilla extract
pinch salt
1 tbsp flavourless oil, like groundnut or vegetable

  • Get that oven going at 150°c.
  • Pop the peanut butter and maple syrup in a bowl and blast in the microwave for about 30 seconds; until the pb kind of melts and is easy to stir.
  • Add the cinnamon, vanilla and salt and whisk to combine.
  • Stir the mixture into the oats and give everything a really good mix to combine as best you can, though don't worry if you have a few dry oats floating around.
  • Spread out on a baking sheet and bake for 20 minutes, redistributing about halfway through the cooking time.
  • Leave to cool completely on the baking tray so it crisps up and you're left with some bigger clusters and smaller rubble.
  • Store in a air tight jar and munch as desired.


Wednesday, 22 May 2013

Chocolate and Pecan Puffs.


These are the result of a little Twitter chat I had with a school friend who, until recently, I hadn't conversed with for YEARS (how can there be THIS many years between me and school....are you suuuuure I'm 25?).


He told me he and his lady friend had just eaten the most amaaazing pecan and chocolate puff and I must make it immediately. No picture, no description, just chocolate and pecan puff.


I love such cakey chat because it's a twist to how I usually approach this whole bakey thing. Usually I look at a recipe and it looks yummy so I make it, or I want a cheesecake, so I look up cheesecake recipes and twiddle with them until I have one that suits, or I have some really nice something that would go great in a something so I make it.


But this way it's sort of a puzzle. And everyone loves puzzles. There's no better game than squishing pastry and chocolate and nuts together and seeing what you can come up with. Come to think of it, maybe you should ignore my recipe and squish them together in your own way...it's fun. My recipe is reeeeeally good though, so either way. With Love and Cake.


Chocolate and Pecan Puffs.

A few notes:
  • These are the sort of things that could happily be tinkered with in accordance with what you fancy or what you have in your cupboards...maybe no chocolate but lots of cinnamon, maybe no nuts, maybe different nuts....
  • You could of course use your own homemade puff pastry. They might not be quiiiite as light and puffy, but your sense of pride might be.
Makes about 10
You will need

1 x baking sheet, well greased

150g pecans
175g butter, softened
100g soft brown sugar
pinch salt
500g block puff pastry
100g dark chocolate, chopped

  • Preheat that oven of yours to 180°c.
  • Lay out your pecans on the baking tray and bake for 10-15 minutes, until bronze and smelling yummmmy.
  • When they're cool enough to handle, give the nuts a rough chop.
  • Mix the butter, sugar and salt together to a smooth paste.
  • Roll out the pastry on a clean floured surface to a large rectangle; about 30 x 50cm.
  • Spread the butter mixture over the pastry, leaving a 1cm border.
  • Sprinkle over the pecans and chocolate, saving back about a tablespoons worth of each for sprinkling later.
  • Now roll up the pastry like a Swiss roll from one of the longer sides.
  • Cut into 3cm-ish slices and lay each one flat on your baking tray with a few cm gap between each one to allow for them to expand. 
  • Sprinkle a bit of the reserved chocolate and nuts over each slice
  • Bake for 40 minutes, by which point they should be golden and crispy.
  • A fair amount of buttery goodness may have leaked out and be sloshing around the pan. I just scooped it up with a spoon and gave everything a good baste.
  • Transfer to a wire rack to cool.


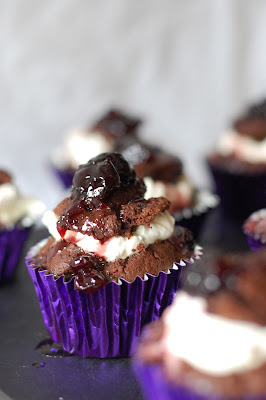
Black Forest Cupcakes.


Did you watch Eurovision? I did...for the first time in a few years. It was BRILLIANT, we had score cards, comment boxes and took our marking mighty seriously...obvs. I was SO rooting for Greece. If you didn't see their entry, sod this reading about cake malarky and look them up on YouTube IMMEDIATELY. That is an order.


We also had themed food...again, obvs. These cakes were my German entry, but were not neeeearly as impressively researched as our savoury offerings which were a significant nod to Azerbaijan. Ever had plov? I would recommend it.


I can't even remember the German musical entry...oh no, yep yep I do...it was Cascada. In a very VERY ugly dress, and no, not even in a 'hey it's Eurovision, let's make a dress out of turtles' crazy fun type way, just in a boring ugly way. 


They should have entered these cakes instead because, while they aren't exotic and Azerbaijani, they are mighty tasty, and squodgy and rich and WAY easier than they look...the perfect party cake formula. But don't wait til next year to make them...or plov. Oh I wish Eurovision was once a MONTH...then we can all prove to Nigel Farage that we are all friends and that he should SHUUUSSSH. With Love and Cake.


Black Forest Cupcakes.
adapted from a BBC Food recipe

A few notes:
  • These are not light and airy sponges, but dense and aaaalllmost gooey cakes, so don't be sad if they sink a bit, it's just what they do.
  • If you don't have black cherry jam, you could use a jar of those lovely cherries in kirsch or brandy and  boil them with a bit of cornflour to thicken; keeping some of the alcohol aside to soak the cakes. 
  • I used the liquor I had left over from these bad boys, hence the specification for cherry brandy, but you could happily use kirsch, or perhaps just plain brandy.
Makes 12 
You will need

1 x 12 hole muffin or cupcake tray, lined with cupcake cases

For the cakes
125g butter, softened
175g caster sugar
2 eggs
200g self-raising flour
2 tbsp cocoa powder
125ml milk
100g dark chocolate, melted

For the filling
300ml double cream, lightly whipped
1/2 medium jar black cherry jam
8 tbsp cherry brandy

  • First we make the cakes. Preheat the oven to 170°.
  • Beat the butter and sugar together until pale and fluffy.
  • Beat in the eggs, one at a time.
  • Sift in the flour and cocoa powder and fold in until thoroughly combined.
  • Finally stir through the milk and melted chocolate.
  • Bake for 20 minutes until risen and fairly firm.
  • Leave to cool completely.
  • While the cakes are cooling, pop the jam and 3 or 4 tablespoons of the cherry brandy in a small saucepan and heat gently until it starts to boil.
  • Let it bubble for a few minutes; until the liquid turns to a syrup. Set aside to cool.
  • When you're ready to assemble the cupcakes, all you need to do is slice or scoop the top off each cake, leaving a little well.
  • Spoon a teaspoon or so of cherry brandy into each well, followed by a good dollop of the whipped cream.
  • Pop the little round of cake that you cut out on top of the cream and spoon over some of the cherries in syrup.
  • Serve as soon as poss, or chill in the fridge if you want them extra fudgy.

Sunday, 19 May 2013

Ricotta and Hazelnut Cake.


This is a recipe from The River Café Cookbook, which I refer to often but rarely follow a recipe verbatim (alas I have never been to the actual River Café, though there are few restaus I'd like to try more). The cake recipes are IMMENSE; made pretty much entirely of eggs and chocolate.


The Chocolate Oblivion, probs their most famous recipe, is 675g chocolate, 350g butter and 9 eggs and that is.it. I mean WoWzers. Have you seeeeeen how expensive butter is right now? Maybe I'll make it for a superspesh occasion or something (because I'm sure it tastes ammmmmmaze) but I don't feel like I can justify the hit my wallet or arteries would take for a spot of random day kitchen pottering.


This one however, is perfect for such pottering. It's not a 'bish bash bosh, chuck it all in and cake is done' sort of recipe; there are multiple bowls and several processes going on. But don't misinterpret that as meaning it is difficult. It's just the sort of thing for when you have an afternoon free and just fancy some kitchen therapy.


As with all the River Café recipes, it is quite sophisticated and continental tasting....I imagine they would frown upon buttercream and such likes. But that makes it all the more treat-full...you can close your eyes and imagine that you're touring Italy in the 20s; all drop waist dresses, loooong strings of beads, too much gin and crystal seas. See you there. With Love and Cake.


Hazelnut and Ricotta Cake.

A few notes:
  • As you can see, I topped my cake with my ever faithful homemade Nutella; it just made sense. You could happily sub shop bought Nutella though, or do as the River Café ladies did and throw over some finely chopped chocolate while the cake is hot from the oven and let it melt. You could also leave it bare.
  • The original recipe uses the zest of 5 lemons...ZINNGGG. I had run out of lemon zest (plenty of lemons, just no zest) so used an orange instead, which I think sounds like more of an appealing combination with the chocolate....if you're not putting chocolate on the top though, go with whichever you fancy.

Serves 10
You will need

1 x 12" round cake pan, base lined with greaseproof

250g hazelnuts
225g butter, at room temperature
250g caster sugar
8 eggs, separated
250g ricotta
zest 1 orange
65g plain flour
1/2 batch Nutella

  • Preheat your oven to 180°.
  • Roast the nuts on a baking sheet for 10-15 minutes, until the skins are loose and the nuts are just starting to bronze.
  • When they've cooled a bit, peel off the skins by rubbing them around in a tea towel.
  • Pop in a food processor and chop coarsely (you could also use a large pestle and mortar if you don't have a food processor).
  • In a medium bowl, beat together the butter and sugar until pale and smooth.
  • Beat in the egg yolks one at a time, leaving the egg whites in another large, clean bowl.
  • In a anooother bowl, lightly whisk up the ricotta with a fork, then fold in the orange zest and chopped hazelnuts.
  • Whisk up the egg whites until they form soft peaks.
  • So...a quick moment to clarify. You have 3 bowls; 1 with the buttery yolks, one with the ricotta, and one with egg whites. 
  • Fold the egg yolk mixture into the ricotta, followed by the flour.
  • Finally, gently fold in the egg whites.
  • Spoon the mixture into your prepared tin and bake for 30-35 minutes.
  • Leave to cool for a few minutes before turning out from the tin.
  • When the cake is completely cold, spread the Nutella on top.

Wednesday, 15 May 2013

Lemon and White Chocolate Biscotti.


I'm not quite sure how that Mr Hollywood chap managed to sneak biscotti into his Bread programme. While not exactly a 'milk and cookies' type cookie, biscotti most deffo 100% certainly falls into the biscuit category. He had it in his 'continental' bread episode.....OK Paul!


But sorry, who am I to question the master...have you SEEN his kneading technique? WouW.


I'm never quite sure whether biscotti is supposed to be 'bang on the table' hard, so you really have no other option than to dunk, or whether there's meant to be a slight chew. The stuff you buy (yuck) is hard and sandy, but whenever I make it at home I end up with a teensy bit of bendyness in the middle, which I like...I'm not keen on breaking my teeth on baked goods you see.


Please don't think of biscotti as a tricky bake. You do have to bend down to the oven a couple of times...which, depending on how many planks you've been doing recently and therefore how sore you are, is sometimes a tad tricky, but other than that it comes together in moments. I mean it. Just channel those Hollywood vibes and you'll be dunking in no time. With Love and Cake.


Lemon and White Chocolate Biscotti.
adapted from a Paul Hollywood recipe

A few notes:
  • As with Paul's recipe, you could just use the dough as a base and tweak and twiddle until it's exactly to your liking...dark chocolate and orange, nuts and dried fruit, spices....
  • The drizzley white chocolate is totally optional, but very pretty.
Makes 15-20 biscuits
You will need

1 x large baking sheet, lined

250g plain flour
1/2 tsp baking powder
250g caster sugar
zest 2 lemons
3 eggs, lightly beaten
1 tsp vanilla extract
150g white chocolate, chopped, plus extra for drizzling

  • Preheat the oven to 160°.
  • In a nice big mixing bowl, combine the flour, baking powder, sugar and lemon zest.
  • Add the eggs and vanilla and bring everything together with your hands to create a dough.
  • Turn the dough out onto a clean, floured surface and gently knead in the chopped white chocolate.
  • Split the dough in half and make logs out of each half.
  • Pop each log on your prepared baking sheet, as far apart as possible; they'll rise and expand more than you think.
  • Bake in the oven for 25 minutes.
  • Remove from the oven and leave to cool on the baking tray for about 5 minutes.
  • Gently transfer each log to a chopping board where you can chop each one diagonally across into biscotti sized slices; about 2cm.
  • Pop all the slices back on the baking tray on their sides and bake for around 12 minutes.
  • Turn the slices over and bake for a final 12 minutes.
  • If you're feeling fancy, melt a bit more white chocolate and give all the slices a good drizzle when they are cool.

Saturday, 11 May 2013

Cream Cheese Brownies.


I wasn't going to tell you about these. I didn't make them specifically so I could tell you about them like I do with most of my baking. It's was just a "*gasp*, it's the weekend and there are no baked goods for pud" sort of moment, so I whipped them up out of pure greed.


I wasn't going to tell you about them because, although they were successful, I still don't really feel like I've nailed the whole brownie thing (epic mistakes are well documented). It's a bit strange because they're meant to be simplepimple and the sort of things you make with kids or real novices but I just don't feel like I quite get there...I might have to make it my mission.


But the thing that persuaded me to show you them was the phase "It goo-ed up my mouuuuff", professed by my dessert indifferent official tester with a mouth full of brownie, meant with big positive connotations. 


Such words from such a person means that they must be bloomin' good, and they really are. But don't just take his word for it, go forth and make brownies. With Love and Cake.


Cream Cheese Brownies.
A Nigella recipe, from How to Be A Domestic Godess, tweaked a bit.

A few notes:
  • When I make these again I will use a smaller tin because I was a bit sad a bout how thin they turned out, even though I did exactly as Nigella told me. Below I have specified the tin I would use, rather than the tin I did use.
  • To compensate for the flatness, I heaped on clotted cream and a homemade chocolate sauce...remind me to give you the recipe sometime...but they are lovely just as they are too.
Makes 9 big brownies
You will need

1 x 8 inch/20 cm square cake or brownie tin, lined

125g dark chocolate
125g butter
2 eggs
200g caster sugar
1 tsp vanilla extract
75g plain flour
pinch salt
200g cream cheese, fridge cold and sliced as thinly as poss

  • Preheat your oven to 180°c.
  • Melt the chocolate and butter together in a medium sized saucepan, over a low heat.
  • Meanwhile, beat the eggs, sugar and vanilla together in a bowl.
  • When the chocolate had just melted, remove the pan from the heat and leave to cool for a minute or 2 before beating in the egg mixture.
  • Finally fold in the flour and salt.
  • Pour half the mix into your prepared tin, and top with the cream cheese slices.
  • Pour over the rest of the chocolate mixture, spreading it around a bit to ensure all the cream cheese is covered.
  • Bake for 20-25, after which time the top should look a bit paler and dry but there should still be some squidge beneath.
  • Leave to cool for at least 10 minutes before cutting into squares.


Wednesday, 8 May 2013

PB&J French Toast.


So how was your bank holiday weekend? I'm guessing it went something like "oo SUN, lets play outside, lets have a picnic, lets go to the beach, lets go to the fair, lets take loads of of pictures and put them all over the internet and share the joy that summer is HERE".


Well I am very happy for you and hope you had a lovely time and basked and baked in the warmth that we've been missing for so long. The only sliiiiiight problem is that mine didn't quite go like that...it went more like "Oh this is a lot of snow, haha, Scotland you're funny and very beautiful, oh no, it's raining a lot, oh no it's REALLY windy, oh no our tent is broken, mmm is wearing 76 layers too much, nope, I'm still cold.....whhhhy is everyone talking about how summery it is???"


Yep. I decided to accompany the Mr and his pals on a little dive trip to Skye (I don't dive let's be clear, I was just along for the views), and while the views were really very wonderful, I would have enjoyed them more if I wasn't concentrating quite hard on keep both feet on the floor and being sad that I wouldn't get to sleep in an actual bed later that night.


On the plus side however, the terrible weather caused an early homecoming (thank the LORD) and therefore excess supplies of PB&J sarnies which I had lovingly packed, imagining I would enjoy them snuggled on a beach after a bracing run around (reality = devoured in a car being buffeted by the wind with my socks and gloves draped over the heaters). And how better to enjoy stale PB&Js than dunked in vanilla-ey egg, fried in butter and curled up on a squishy sofa on a day when I am clean and dry and there is even actual sun. You don't need to suffer an epic trip to enjoy them, though it does make you more appreciative.


PB&J French Toast.

A few notes:
  • This is easy; make a sandwich and fry it, and therefore lends itself well to many variations....Nutella and PB perhaps?
  • If you're not using a sandwich that has been carted across the country for days, it would work best if you were able to use quite stale bread.
Serves 1
You will need

2 x slices white bread
1 tbsp your fav peanut butter
1 tbsp your fav jam, I went for black cherry
1 egg
1 tsp vanilla extract
2 tsp caster sugar
1 big knob butter
icing sugar for dusting

  • Make a generous sandwich out of the bread, peanut butter and jam.
  • Whisk the egg, vanilla and caster sugar in a wide, shallow bowl or plate and dunk the sandwich in it.
  • Leave it to soak up the egg for a minute or two before flipping the sandwich over to let the other side soak up the rest.
  • Meanwhile melt the butter in a frying pan until just starting to bubble and brown.
  • Fry the sandwich for a few minutes a side until bronzed and firm.
  • Remove from the pan, cut in half and sprinkle with lots of icing sugar.
  • Mmmm thank heavens for duvets.


Friday, 3 May 2013

Coconut Granola...NUTRITIOUS, not healthy.


Sister, oh dear sister. Asking me the other day, she was, about healthy snack ideas, because she is a grazer and is bored of fruit and nuts and dried fruit and stuff. But when she said healthy, she meant that weird version of healthy that means just fruit and nuts. When I mentioned cheese, WoooW, you’d think I’d told her to go and down a whole fondue. And then, AND THEN, The bloomin’ One Show (yesyes I watch it ironiiicallly) had a feature this week all about how much sugar is in the drinks we buy and WHAT? Fruit juice and smoothies have loads of sugar in them? WHAT? Implying that we should only evER eat fruit and drink water.


Helllllooooo. Have we forgotten that, hold the front page, we need calories to survive, and, WHAT? fruit juice has sugar in because fruit has sugar in? NEVER? Yes, sugar and vitamins and good stuff. Take a look at my 'in regular rotation' smoothie recipe and you tell me not to make them because they’re bad for me (I warn you, don’t actually do that, it will not go down well). And cheese? Yes cheese has fat, but I’m a girl, and a veggie and I need lots of calcium and protein thank you very much and cheese is full o’ the stuff. 


Yesyes, I go along with the whole, we should probably remember how much sugar is in Coke because it is a lot so we shouldn't drink Coke and Coke alone, and I know that this isn't exactly a place that preaches the gospel of celery. But come ON, we need to be clever about this eating thing if we aren’t all going to be the size of houses in 50 years time. Telling people to only eat fruit and drink water is not clever.


I think of it like this...healthy doesn't really mean anything when you’re only talking about one aspect of life. Yesyes my dessert habit? Not so healthy. But hang on, I make ALL my food from scratch, I make it mindfully, and it is NUTRITIOUS...plus, I work HARD at being a fitty because I know how to make myself love it. It doesn't mean I never have to go to the doctor, or that I won't get hit by a bus tomorrow, but it does mean that my life is HEALTHY and I am happy. So here’s a NUTRITIOUS snack for you to munch on you big grazer you. Yes there’s sugar, but, errm we neeeeeeeeed sOMe sugar, and heck, there’s a whole lot of other good stuff in there as well. Don’t you tell me smoothies are bad. With Love and Cake.


Coconut Granola.
A result of fiddling with this recipe

A few notes:
  • I am stating the recipe in cup measures, because, to be honest, I couldn't quite be bothered with playing with conversion charts and transferring to grams; it's the sort of recipe that doesn't warrant that. Don't worry if your don't have an exact cup measure just use a small coffee or tea cup, a bit bigger than espresso size, and you'll keep the proportions near enough perfect. 
  • As with most granola recipes, you can chop and change as you feel like it. Want to use all the same nut? Go ahead. Want to leave out the spices? Feel free. Stir in dried fruit at the end...use other grains....you make it tasty for you.
  • I managed to find some dessicated coconut that was quite moist, if your's is more dry and sandy, have a look at this little tip from the folk at nigella.com.
Make 1 large jar
You will need

1 x baking sheet, greased

2 cups oats
3/4 cup dessicated coconut
1/2 cup flaked almonds
1 cup mixed whole nuts
2 tbsp soft brown sugar
1 tsp cinnamon
pinch salt
4 tbsp flavourless oil, like groundnut or sunflower
1/4 cup maple syrup
1 tsp vanilla extract

  • First, preheat the oven to 160°c.
  • In a large mixing bowl, combine all the dry ingredients.
  • Add all the other ingredients and mix so everything is really well combined.
  • Lay out the mixture on a baking sheet and bake for 30 minutes.
  • Use a big metal spoon to turn the mixture over and mix it up a bit.
  • Pop it back in the oven for another 10 minutes or so; you want it bronzed all over.
  • Once out the oven, leave to cool completely on the tray, before putting the spoon through it again and breaking it up into clusters.
  • Store in a jar and add to it what you will....this morning I had it with almond milk and grapes.


Wednesday, 1 May 2013

Carmelitas.


Oooookaaaay, who's the sneaky one that decided not to tell me about these bad boys. Who decided that it would probably be best if Carmelitas were to remain hidden from my radar? I am nooooot impressed with you. Google knows about it, Google knows exactly what you're on about and gives you lots of answers to your Carmelita related question. 


But I don't think I'm alone in my lack of insight; no one I've asked (yes, I question strangers on the street about baking, it's called research) has had a clue what I've been twaddling on about. So since finding out about them through one of my very fav bloggys , I have considered it my duty to spread the word....because people, your life will be better if you add Carmelitas to it.


This, my research tells me, is an American native, along the lines of a flapjack but with added buttery goodness. They might be mental when it comes to guns, but those chaps across the pond know what they are talking about when it comes to seriously good snacks. It's a floury, so a bit more cakey, layer of flapjack, topped with caramel, topped with more flapjacky-ness.


And...AND...I have added my own English genius to the mix in the form of SALTED CARAMEL. Mmmmmmhummmmm. This makes them sound fancy, which, in fact, they are not. They are easypeasy-pants. So please bake them now, and serve them with ice cream and put 'make an American friend' on your to do list, who knoooows what else they've been hiding from us. With Love and Cake.  


Salted Carmelitas

A few notes:
  • Of course you don't have to do the salted thing, just leave the salt out of the caramel sauce and you have a regular ol' Caramelita....well as regular as such a thing can be.
  • Don't worry if, when you take the Caramelita out of the oven, it looks a bit wobbly and under cooked in the middle; it will firm up as it cools.
  • I've directed you to make this salted caramel sauce, which I've told you about before. It takes moments to make, but if you can't quite be bothered, use any shop bought caramel sauce or dulce de leche that you fancy and add a teaspoon or so of salt to taste.
Serves 8ish
You will need

a medium sized brownie ban, about 13x8 inch like this one, lined with greaseproof paper

255g plain flour
170g oats
200g soft brown sugar
1 tsp bicarbonate of soda
300g butter, melted

  • First job: preheat your oven to 160°c.
  • Mix the flour, oats, sugar and bicarb together in a big mixing bowl.
  • Stir in the melted butter until well combined.
  • Tip half the mixture into your prepared baking tin and press it into a nice firm, even layer.
  • Bake for 20 minutes.
  • When removed from the oven, spread the caramel sauce over the baked oat layer and sprinkle over the rest of the oat mixture.
  • Bake for a further 25-30 minutes until a little bit risen and just starting to go golden around the edges.
  • Leave to cool completely in the tin before turning out and cutting into squares.