Sunday 30 October 2011

A Weird and Wonderful Vegetable Cake for Halloween.


Happy Halloween weekend. I thought Halloween would be a good time to discuss vegetable cakes with you, after several promises to. They are kind of weird you see, people do give you some funny sideways looks when you mention that the cake you just presented them with is made with butternut squash.


But weird is often accompanied by wonderful and vegetable cakes have far more than their fair share of that. Firstly the vegetable, whatever it is, takes on the job of butter, providing moistness, volume and stability, which means you can leave the chubby stuff out altogether...helloooo smug. Plus slimline cake surely means more icing is justified, yeah?


Secondly, the use of vegetables seems to mean that the cake actually gets moister over time rather than drier. I don't know what that means to the whole 'cakes get dry, biscuits get soft' definition but I don't care when it means I can make a cake on a Friday for a party on a Monday.


And finally, just when you thought your smugness levels had peaked, vegetables bring lots and lots of lovely vitamins and fibre to your cake party and you can even say 'one of me 5 a day', as you tuck in ...YESSS. Never has the addition of cake to your life been more imperative. So go and make one and eat with a ghoulish/vampirey/witchey smile. With Love and Cake.


Chocolate Mummy Cake

A few notes:
  • You could decorate any cake and filling mummy style, plain sponge, carrot, coffee....whatevs.
  • If you don't like marzipan, which I know is quite a common disorder, I'm sure you could get a similar effect with Royal icing. You could even brush it with some strong tea to distress it a bit.
Makes an 18cm cake
You will need

2 18cm loose bottomed cake tins, well greased

For the cake
3 eggs
180g soft brown sugar
300g courgette, peeled and finely grated
120g plain flour
60g cocoa
100g ground almonds
2 tsp baking powder

For the filling
40g butter at room temp
90g icing sugar 
1 tsp boiling water
1-2 tbsp apricot jam

For the decoration
1-2 tbsp apricot jam
1ish packet of marzipan

  • First let's bake the cake. Preheat the oven to 180°c.
  • Whisk together the eggs and sugar for 2 minutes until pale and increased in volume.
  • Beat in the grated courgette followed by the flour, cocoa, almonds and baking powder until well combined.
  • Divide the mixture between the 2 cake tins and bake for around 25 minutes, until risen and firm.
  • Leave the cakes to cool in the tins for 5 or 10 minutes then remove from the tin to cool completely.
  • Meanwhile make the buttercream for the filling by beating the butter until light and fluffy looking.
  • Beat in the icing sugar tablespoons at a time until you have a lovely smooth paste, then finally beat in the boiling water.
  • Spread the buttercream on top of one of the cake layers followed by the jam and finally top with the other cake, placed upside down so the top of the cake is nice and flat.
  • Now for the Halloweenification. Heat the jam in a saucepan or in a microwave until nice and melted and brush a thin layer over the top and sides of the cake.
  • Dust a clean surface with icing sugar and roll out the marzipan to about the thickness of a 10 pence piece.
  • Cut into long strips and wrap around the cake to mummify. 
  • Use buttons for eyes but try not to get them stuck in your teeth.


Tuesday 25 October 2011

Not Perfect Pastry Banoffee Pies.


Helloooooo. This is not a recipe for the perfect pastry confection. If you're having the Queen round for tea, maybe give these a miss. But if you're in the mood for something spine tingling-ly sweet, smooth and crunchy and oh so bad for you, you're in the right place.


You see perfect pastry is supposed to be thinthinthin and light and to melt on the tongue like a dream. But I'm afraid this bad boy is chunky and sturdy and requires a chomp or two before any melting occurs, which is fiiiiiine by me. I like pastry, I like bit chunks of it, I like to munch on it, and I don't care if that makes me a heathen. Of course perfect pastry is perfect for sophisticated little delights, but this, is not that.


These were a product of pure laziness. I had a big lump of pastry left over, time was ticking, for both me and the pastry and I simple could not be bothered to cut out little rounds and line a tin and cut out baking paper and bake with baking beads. Could. Not. Be. Bothered. So i rolled out a big pastry rectangle and sort of squashed it into the muffin tin and baked it as one.


Cut into big chunky cups you have a vehicle for deliciousness and mine comes in the form of banoffee. A bit more effort-ful than the digestive base I usually go for in a banoffee but hey-ho, pastry needs must. Sorry Your Royal Highness, maybe next time. With Love and Cake.


Individual Banoffee Pies

A few notes:
  • I'm sorry about being a bit vague about amounts for the filling, its just that it's more of an assembly job than anything, so really its up to you how much of each layer you fancy, or even how big you want to make the pastry cases. Just go with the flow...this can NOT taste bad.
  • Of course you could use the pastry cases for anything you fancy really, you could make mini Brownie Pies or just fill with fruit and Greek yogurt if you want to pretend you're being healthy.
  • As I've said numerous times before, this pastry is beautifully buttery and melt-in-the-mouthey thanks to the addition of ground almonds and a light hand. What that also means though is that it’s a bit of a bum to roll out because it is so short  and crumbly. What I tend to end up doing is rolling it out to the thickness I want, attempting to line the tin, and then patching up and patting in the leftovers into gaps and tears. So don’t be disheartened it will turn good in the end.
  • You can indeed make you're own dulche de leche, but I haven't ever done that yet...so I'll update you when I do and know exactly how.
Makes 6 big individual pies
You will need

A 6 holed muffin pan, well grease

For the pastry
210g plain flour
50g caster sugar
50g ground almonds
125g butter
1 egg

For the filling
1 tin dulche do leche (Carnation caramel) 
2 ripe bananas, sliced
1 medium tub double cream, whipped lightly
1 square dark chocolate

  • So let’s get going. First things first make the pastry by popping all the dry ingredients into a food processor and pulse together. Then whiz in the butter followed by the egg and leave trundling around until it comes together to form a dough (you could also do this by rubbing in the butter with your finger tips then mixing in the egg by hand).
  • Turn out the dough, pat into a disc and chill in the fridge for at least half an hour.
  • Preheat the oven to 180°c.
  • When the pastry's ready, roll it out as best you can to a rectangle. Lay over the muffin tin and gently push down to line the holes. Patch up any tears that appear with leftover bits and pieces. 
  • Bake for 25-30 minutes until just turning golden.
  • As soon as the pastry's out of the oven use a sharp knife to cut between the holes to make square topped cases.
  • Leave to cool in the tin for around 15 minutes then gently remove and leave to cool completely on a wire rack.
  • Now for filling, blob and smooth a couple of teaspoons of the caramel into the bottom of each case. top with banana then cream.
  • For a final flourish grate a sprinkling of chocolate over the top. Enjoy and leave feeling fancy for another day.  

Thursday 20 October 2011

Blackberry Pie- a happy part of Autumn.


This week has been a mixture of days that make me hatehateHATE the fact that I happen to belong to a country where it's normal for gallons and gallons and gallons of cold water is dumped on ones head in the space of 30 minutes, and days which make me think, actually, isn't autumn lovely, yes I like autumn.


Usually I hate that summer has gone. Uuh walking home in a ridiculously unwaterproof waterproof coat (it's read and shiny so I forgive it), leaving me sopping and numb assures me that I am most definitely built for warmer climes and leaves me ready to bolt to the equator, imagine having a warm face all. the. time. But some days, when its chilly but sunny, and a crispy leaf falls at my feet I do in fact think mmm I like autumn, orange is a happy colour.


Another little bit of autumn joy is that it's pie season, and who doesn't like a good bit of pie? Up here there's justjust enough berries hanging around to make an hour or so running around with a punnet worth the scratched fingers, leaving you in return with a beacon of what's good about autumn.


It's something to think about when your trousers are so wet that you can't feel your thighs, and when you're hair looks like you've forward-rolled to your destination. It's something to remind your that Scotland is great and you're very lucky to live somewhere so lovely, and that you don't have to travel halfway round the world to see beautiful parts of it. Love or hate autumn, making a pie can only make your chilly day better. With Love and Cake.


Blackberry Pie

A few notes:
  • Of course this could be any pie...blackberry and apple, apple, raspberry in the summer...what evs.
  • Feel free to tweak the amount of sugar depending on the sweetness of the fruit and the spice or flavour to suit the fruit and your preference.
  • This is best left to cool to around room temperature before eating, that way the filling sort of sets and doesn't dribble everywhere.
  • This pastry is beautifully buttery and melt-in-the-mouthey thanks to the addition of ground almonds and a light hand. What that also means though is that it’s a bit of a bum to roll out because it is so short  and crumbly. What I tend to end up doing is rolling it out to the thickness I want, attempting to line the tin, and then patching up and patting in the leftovers into gaps and tears. So don’t be disheartened it will turn good in the end.
Makes an 18cm pie
You will need


An 18cm round cake tin or pie dish, greased

For the pastry
210g plain flour
50g caster sugar
50g ground almonds
125g butter
1 egg

For the filling
400g Blackberries
90g soft brown sugar
1.5 tbsp cornflour
2 tsp cinnamon
splash milk
a handful granulated sugar

  • So let’s get going. First things first make the pastry by popping all the dry ingredients into a food processor and pulse together. Then whiz in the butter followed by the egg and leave trundling around until it comes together to form a dough (you could also do this by rubbing in the butter with your finger tips then mixing in the egg by hand).
  • Turn out the dough, pat into a disc and chill in the fridge for at least half an hour.
  • Preheat the oven to 200°c.
  • When the pastry's ready, roll it out as best you can and line the tin (see note). Roll out the leftovers and keep for the top.
  • Mix the berries, brown sugar, corn flour and cinnamon together in a bowl and tumble into the pastry case.
  • Cover with the remaining pastry tucking and folding the edges to join the base and make it nice and homemade looking. 
  • Slice a little hole in the top for escaping steam.
  • Brush the top of the pie with milk and sprinkle liberally with the granulated sugar.
  • Bake, on a baking sheet in case of leakages, for 10 minutes then turn the oven temperature down to 180°c and cook for another 35 minutes until the pastry is golden and the underneath looks bubblingly good.
  • Serve warmish/room temp with cream or ice cream or custard, or all 3 if it's super cold and rainy.


Tuesday 18 October 2011

Baked Peanut Butter Oats


Well hi there...so things have got a tad busier in the Love and Cake household. Not for any exciting reason, have just been trying to squeeze more things; both boring (working) and fun (learning to knit), into the increasingly short days. It's meant that more often than not breakfast has had to be a speedy affair or appropriate train picnic fodder which, I'm afraid, is the inevitable consequence of emerging from an extended student existence and is unlikely to change within the next few decades.


But I still want breakfast to be a treat, it's the first thing you eat after not consuming anything for a whole half a day and I want it to be something I look forward to when the alarm goes off in what really should be classed as the middle of the night considering the dark and the cold; in Scotland from now on that's anytime up to about 10 o clock.


If you're not a peanut butter fan, firstly, eeerrrrm perhaps book an appointment with your GP, and secondly, you might want to go away and make a cup of tea while I waffle on (mmm waffles) a bit more. If you are a fan though, hurrah, this is the perfect busy weekday brekkie. Make ahead, half healthy (oats, natural peanut butter), half treaty (butter and quite a lot of sugar), cut and come again and swoon worthily delicious, it has all the required attributes. 


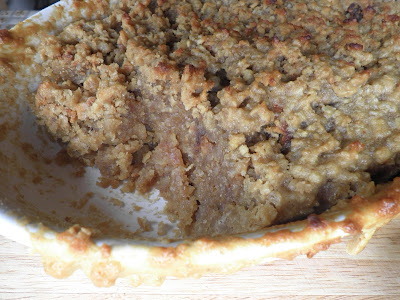
I'm afraid the warm, fudgey, claggy-in-a-good-way geniusness of this simple bake doesn't translate well via photographs, which really just show brown stodge, so you'll just have to trust me, oooor perhaaaaps you might want to give it a go yourself, go on you know you want to. With Love and Cake.


Baked Peanut Butter Oats.
Adapted from tidymom

A few notes:
  • The portion here was served, after a blast in the microwave, with milk and elderberry syrup, I was going for a PB&Jam feel. But you could go with just plain, with actual jam or banana is really good too, or how about Nutella. yEEEs.
  • I was anxious that mine wasn't cooking and setting enough so after 20minutes in the oven I mixed everything around in the dish to redistribute it all. Ooor I could be lying and I could have had an accident which involved turning the dish upside down in the oven and having to spoon everything back into the dish, you decide. Either way I have tweaked the oven temperature and cooking time so hopefully you won't have to do that.
  • I feel a bit adverse to weighing things for a breakfast so I just used a average sized mug to measure everything and popped it into the dish that looked most appropriately sized. Much simpler and more breakfast friendly that scales.
Makes enough for a good weeks' breakfast for one
You will need

a small-ish ovenproof dish, greased

1.5 mugs oats
1 mug soft brown sugar
3/4 mug milk
1/4 cup melted butter
1 egg
1 tsp baking powder
pinch salt
1 tsp vanilla extract
1/2 your fav peanut butter- I used organic smooth with no added sugar

  • Preheat the oven to 180°c.
  • Mix everything together in a large bowl until well combined. A strong whisk is helpful here.
  • Pour and scrape the mix into your oven dish then pop into the oven and bake for 35 minutes. If it looks golden and wobble-free at this point, fab, you're ready, if it's not quite set, give it another 10 minutes.
  • Set aside to cool overtime and fall asleep excited.


Friday 14 October 2011

Bring Back Jam Tarts


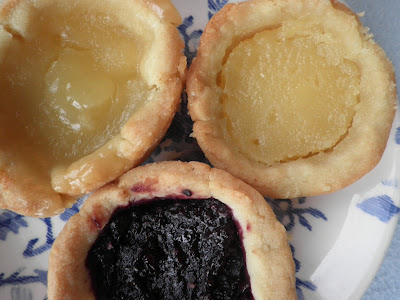
So tell me, when was the last time you had a jam tart? Was it a Mr Kipling one from a plastic packet of 6, half red, half yellow? Was it in your school lunch box? Did you scrape out all the jam and lick it off your finger before even thinking about eating the pastry. No- that last one just me?


Well I think jam tarts are in need of a come-back. They're not fancy, not the star of any show, they just bring a quiet glow of fun and yummyness to a picnic or party, as well as being trusty lunch box fodder.


What I love best about them though is how such a tiny amount of kitchen effort can make something so smile inducing. Their simplicity mean it's the perfect recipe to turn to to use up dribs and drabs of left-over pastry, just roll, cut, spoon, bake, done. No need to make new calculations for other ingredients because you only have enough pastry for 7 when the recipe makes 12.


And really who doesn't  love a jam tart- it's pastry, and jam. Nuff said. With Love and Cake.


Jam Tarts

A few notes:
  • Don't be tempted to overfill the pastry with jam- it will bubble up and stick and cause disaster. Be restrained at this point.
  • I used muffin pans here, just because my shallower fairy cake size pans haven't yet made the journey to my Scottish kitchen. So use fairy cake ones if you can, muffin pans just make it a bit trickier to get the baked tarts out.
  • Use any preserve you like, I always like to do half lemon curd and half jam, Mr Kipling Stylee, but use whatever you fancy or just what you have in the house.
  • Although I said it's a good recipe for leftover pastry, I'll pop a recipe for it from scratch in case you want to make it specially, or you could easily use shop bought shortcrust.
Makes as many as you fancy, this amount of pastry will make tonnes
You will need

Fairy cake tins, heavily greased and dusted with flour

For the pastry
210g plain flour
50g caster sugar
50g ground almonds
125g butter
1 egg

Jam, curd, preserve etcetc

  • So let’s get going. First things first make the pastry by popping all the dry ingredients into a food processor and pulse together. Then whiz in the butter followed by the egg and leave trundling around until it comes together to form a dough (you could also do this by rubbing in the butter with your finger tips then mixing in the egg by hand).
  • Turn out the dough, pat into a disc and chill in the fridge for at least half an hour.
  • Preheat the oven to 180°c.
  • When the pastry's ready roll it out, cut discs to fit your tin with a cutter or mug and line the tin.
  • Fill each little pastry case with a teaspoon-full of jam and pop the tin in the oven.
  • Bake for 12-15 minutes until the pastry is golden round the edges.
  • Throw a party and feel nostalgic.


Tuesday 11 October 2011

Autumn Morning Bramble Pancakes


Hiiiiii...so pancakes, it's been a while. Well I guess not too long considering most normal British people stick to once a year, but in terms relative to my recent pancake past, a few weeks is farfar too long for these flat little beauties to be absent from my breakfast table. 
  Whenever I decide to make pancakes I face a dilemma. You see I have manymany creative ideas in my head  for concoctions that need trying, but am also very aware that my peanut butter pancake heaven will take some serious beating. So I have to decide, do I stick to the wonders of pbpancakes; guaranteed gorgeousness, or do I tick one off the 'waiting list' and risk disappointment.


Well this pancake time I went for the latter, and being that I am still surrounded by autumn's bounty, it was a wise decision. The actual pancake batter, I'm afraid, was not able to reach the dizzying heights of the bar set by the pbps, but the whole Bramble Pancake experience was deffo worth the little morning risk take. 


My brambles were early (Scottish early that is), so added a burst of sharpness which was cosily blanketed by the sweet topping of this years deeeeelicious (not bragging- just fact) Blackberry Jelly. The purple jewels studding the slightly sweet, slightly springy pancake could brighten any dreary morning.


And lets face it, on days that start dark and dreary and end dark and dreary and have a dark and dreary middle, we need all the breakfast joy we can get. With Love and Cake.

(I thought you'd like to see a picture of my breakfast view, that's Edinburgh in the background)

Bramble Pancakes
(adapted from Country Harvest by Linda Burgess & Rosamund Richardson)

A few notes:
  • You could us any pancake batter to drop the brambles into, as long as they're small fluffy ones, rather than big crepey ones. MMmmm peanut butter bramble pancakes-yes peerlease.
  • I used my blackberries straight from frozen, but that seemed to be a mistake because it stopped the batter around the berries getting hot enough to cook- so don't do that.
  • You could stir the berries, any kind in fact, through the batter but I preferred to drop them onto the uncooked sides of the pancakes in the pan to ensure even distribution.
Makes 10-15
You will need

Your fav frying pan

225g plain flour
2 tsp cream of tartar
1 tsp bicabonate of soda
2 eggs
225ml milk
1 tbsp golden syrup
175g blackberries

  • First things first, get your pan onto a medium heat and run a knob of butter around it.
  • Mix the dry ingredients in a bowl.
  • Beat the eggs, milk and syrup together and whisk into the dry mix to a nice smooth batter.
  • Pour tablespoons-full of batter onto the hot pan, leave to cook for a few seconds then sprinkle a few berries on top of each pancake.
  • After a minutes, when the underside is golden and lovely looking, flip them over and cook for another couple of minutes.
  • Serve warm with butter and jam or cream ooo or maybe some honey or more syrup......


Friday 7 October 2011

Bramble Brownie Pie.


So the other day you said I didn't ever make kitchen based errors. Well I am here to present you evidence to the contrary. For starters you just have to speak to Dad and I'm sure he'll regale you with tales of our kitchen fall outs. His particular favourite incident involves a bowl of butter and sugar whisking its way onto the floor, spreading itself over quite a distance- there are photos. Of course he is wrong and I am a pleasure to cook along side.


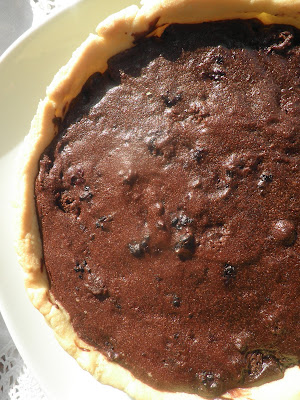
Now see here, yep up there. That is a recent mistake- wowzas it could have been a disaster and almost ended in tears and tantrums but it turned out to be one of those Elvis Costello mistakes; a brilliant one. You see I have a recipe for Bramble Brownies, which is a genius idea because the freshness of the berries really pings next to the richness of the choccychocolateness.


The problem is that every time I follow the recipe the brownies emerge from the oven looking perfect, a crackled top yielding to a hint of squidge underneath. But the cutting of the brownies has always revealed uncooked leaky mixture, which IS oozy and absolutely delish but not really presentable or what can be really labelled a success. So another blackberry season arrives and, another year wiser, out of the oven I pull perfect looking Bramble Brownies. But...here's what happens...I cut, goooooooe, I set aside to deal with later, I SOMEhow flip, upside down onto hob, splat. 


Well as you can imagine I skipped a few heart beats but aaccctually it wasn't as tear inducing as it could have been. The 'mistake' picture up top was actually taken after the flipping incident so you can see that things were really quite salvageable. And how to salvage uncooked, thrown around brownie? Bake again in a pastry case of course. And it is wonderful and totally worth the numerous mistake that led to its discovery. You see, a brilliant mistake. With Love and Cake.


Bramble Brownie Pie

A few notes:
  • Of course you could go ahead and just make the brownies without the pastry case and assume that it's just me being a twit. I'd turn the oven down 20ish° and give an extra 15 minutes to bake.
  • If everything does end up too runny for your liking, serve in a bowl with pouring cream or ice cream and call is chocolate pudding. Done.
  • You don't have to use the blackberries if you don't have any or can't be bothered to go and pick them, just leave them out.
  • If you prefer a sweeter brownie you could substitute some of the dark chocolate for milk chocolate, but it's best to keep at least half of the chocolate that you melt dark, so you get that ultra chocolatey taste.
  • This pastry is beautifully buttery and melt-in-the-mouthey thanks to the addition of ground almonds and a light hand. What that also means though is that it’s a bit of a bum to roll out because it is so short  and crumbly. What I tend to end up doing is rolling it out to the thickness I want, attempting to line the tin, and then patching up and patting in the leftovers into gaps and tears. So don’t be disheartened it will turn good in the end.
Makes an 18cm pie
You will need

An 18cm round cake tin or pie dish, greased

For the pastry
210g plain flour
50g caster sugar
50g ground almonds
125g butter
1 egg

For the brownie filling
3 eggs
175g caster sugar
175g dark chocolate
150g butter
100g plain flour
225g blackberries
100g chocolate chips or chopped chocolate of your choice

  • So let’s get going. First things first make the pastry by popping all the dry ingredients into a food processor and pulse together. Then whiz in the butter followed by the egg and leave trundling around until it comes together to form a dough (you could also do this by rubbing in the butter with your finger tips then mixing in the egg by hand).
  • Turn out the dough, pat into a disc and chill in the fridge for at least half an hour.
  • When it’s ready roll it out as best you can and line the tin (see note). Pop the tin in the fridge while you get on with the rest of the pie. Preheat the oven to 180°c.
  • Now for the filling. Whisk together the eggs and sugar until well combined and a bit more voluminous.
  • Then melt the chocolate and butter together gently in a bowl over a pan of simmering water or in a microwave.
  • Mix the chocolate mixture into the eggs and then fold in the flour, berries and chocolate.
  • Pour the filling into the pastry case and bake for 30 minutes until the pastry is golden and the top of the brownie has a dark crust and doesn't wobble, just gives a little.
  • Cool on a wire wrack in the tin for 10 minutes or so, then turn out if you can...though if it's easier feel free to serve out the tin.
  • Serve warm or at room temperature with whipped cream. Good luck.


Wednesday 5 October 2011

Winter Picnic Parkin.


So it's October; time to start thinking about pumpkins and toffee apples, bangers and mash and pies. All things spiced and warming and squodgy and filling are required. Things that replace the calories that being just that little bit colder rob from you. It's the time that you start reading about 'winter outdoor food' for night time celebrations like Halloween and Bonfire night, all sausages. baked potatoes and soup. Now I'm not sure about you, but an alfresco dinner, in the dark, in howling gales and the incessant drizzle of Britain's winter is really lacking in appeal at the end of a chilly day.


It is a romantic notion; twinkly lights, roaring fires and rosy cheeks. But you just know that real life would mean numb toes, runny noses and chattering teeth. I'd take PJs, a hot-water bottle and steaming HoCho (that's right, that's how I'm saying hot chocolate in my head right now- apologies, I'm sure it's only phase) instead thank you very much.


But alfresco eating doesn't have to be completely summer's domain. Some days really aaare bright and sunshiney and some days a bracing walk and picnic on a park bench is the only way to blow away the cobwebs and wake up the central-heating-numbed senses.


So here's what you need- sticky and moist, spiced and sweet and just the right side of stodge. Parkin is the perfect cold weather picnic treat. But really, don't feel bad about locking the front door, pulling up your woolly socks, putting the kettle on and enjoying a square of Parkin surrounded by the glow of home, sometimes the outdoor should just stay outdoors. With Love and Cake.


Parkin

A few notes:
  • Out of bare cupboard necessity, I used Golden Syrup for the syrup part and dark muscovado for the sugar part. Traditionally though, at least some of the syrup would be black treacle so you could follow my recipe verbatim, use all treacle and all light brown sugar or chop and change and use a combination.
  • The joy/pain of Parkin is that it gets better with age- so don't make it when you are extra-specially hungry, but when you have a plan. Wrap it in foil and leave well alone for a couple of days at least before tucking in.
  • I haven't tried it yet but parkin warmed, with a squodge of cream or a scoop of vanilla ice cream, might be reminiscent of sticky toffee pud....why not give it a go.
Makes 10ish big squares
You will need

A 23cm round or 25x25cm square cake tin, nicely greased

1x454g tin of golden syrup
125g butter
140ml milk
125g soft brown sugar
170g plain flour
1 tsp bicarbonate of soda
2 tsp ground ginger
1 tsp mixed spice
340g oatmeal

  • Preheat the oven to 160°c.
  • Pop the syrup and butter in a pan over a low heat and melt the butter.
  • Stir the milk and sugar into the pan and heat gently until the sugar has dissolved.
  • Mix the flour, bicarb, spices and oatmeal in a large bowl and pour over the warm liquid.
  • Stir everything together and pour into the cake tin.
  • Bake for 50-60 minutes until golden and risen but moist and gooey looking.
  • Store wrapped in foil for a few days before cutting into squares and munching.